Using my Bullet Journal to track my weekly routine
I love my Bullet Journal. I’ve been using it since December 2021 and it’s helped me keep my life on track. I write everything down, so I plow through journals pretty quickly. (I fill them up and start a new one every couple of months. My current one is the thirteenth since I started.)
I write down my daily tasks every day in my journal and take notes during phone conversations. I also write notes about anything that happens that I don’t want to forget. It’s become an invaluable resource.
Another thing I do with it is write down my end-of-the week routine for my business. On Saturday or Sunday each week, I make sure that my Quickbooks is up-to-date, matches my YNAB budget and that all the accounts in my business and personal budgets are reconciled (i.e. my YNAB balances match the corresponding banks’ balances). Having this simple grid in my BuJo helps me make sure I don’t miss anything. And I get the satisfaction of checking off that I’ve done each task. Here’s a picture of my tracker. (Don’t be concerned about the number of credit cards; they’re all paid in full.)
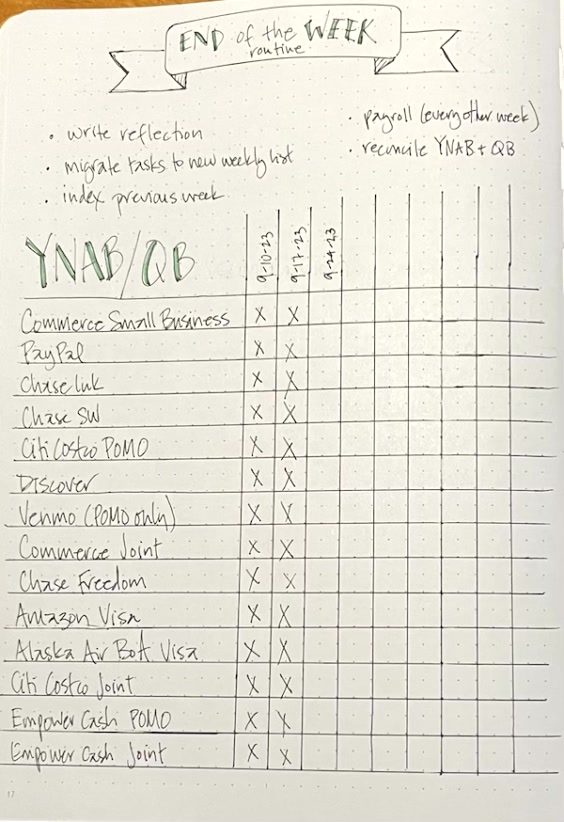
In addition to my end-of-the-week budget/bookkeeping tasks, I have four other things I do on the weekend to keep me on track for the coming week. As you can see in the above photo, I write a weekly reflection, create my task list for the week, do payroll every other week and update my BuJo index. These are simple tasks that don’t take much time but reap dividends. And having them in front of me in my BuJo is so helpful!
I consider myself a minimalist when it comes to my Bullet Journal. You may have seen some beautiful BuJo spreads on YouTube. (AmandaRachLee is a great example.) I’m not artistic. But I do like my frequently used spreads to be nice to look at it. So I put in a tiny bit of effort on the spreads that go beyond my daily journaling. I figure if I like looking at it, I’m more likely to use it. My end-of-the-week routine page is a great example. It makes me happy.
Using rewards as motivation

We have a stationary bike parked in front of a wall-mounted TV. This summer, I created the habit of working out with the bike while watching my summer-obsession TV show, S.W.A.T. on Netflix. I was going great guns and keeping track of my workouts in my Bullet Journal. And then I went to Australia and my routine was disrupted. I started up again after I got back but then I developed a foot condition (now healed) that prevented my peddling. And now I’ve found it hard to motivate myself to get on the exercise bike.
One of the problems was that I’d finished watching all six (!) seasons of S.W.A.T. I was having trouble coming up with another show that was equally enjoyable and absorbing while being exciting enough to keep me peddling fast. Then I realized that I could just watch it again!
So here’s the deal I made with myself: I can’t watch S.W.A.T. unless I’m on the exercise bike.
I’m working my way up to episode-long workouts, but right now I’m at 30 minutes. So that means I’m walking away without finishing watching an episode. That’s great, because the next day I’m anxious to get on the bike to finish the episode. It’s a win-win! (I blogged about how the brain craves completion in a blog post called keeping going way back in 2008.)
I’ve also been having trouble getting myself to do yoga. (That feels unfortunate since during the pandemic I did daily yoga for over a year!) Earlier this year, I stopped doing yoga while I was in physical therapy for tennis elbow. I can do it now but I keep forgetting to. So I’ve made another deal with myself: I can’t play my favorite game Duotrigordle (32 Wordles at the same time) until I’ve done a yoga practice. (I do at-home yoga with Yoga with Adriene.) Since I think about playing my favorite game in the morning, it’s a prompt to do yoga. So far it’s working remarkably well.
As I start re-creating my exercise routines, using my favorite tv show and game as motivation will be a big help, I think! I’m sure there are other parts of my life where I can incorporate this.
Worth repeating (again): Reflections after a year in our new kitchen
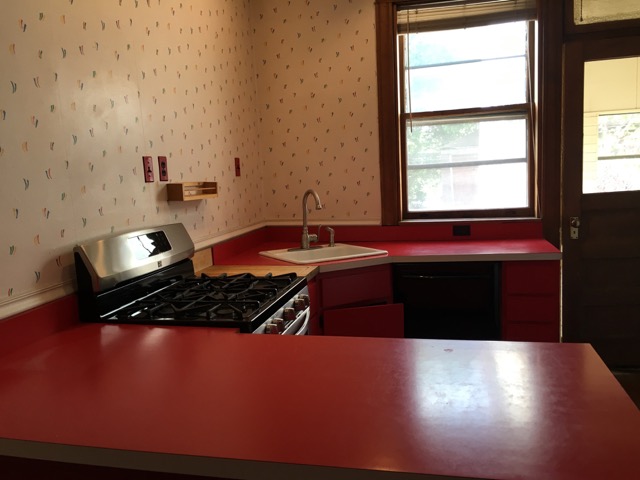
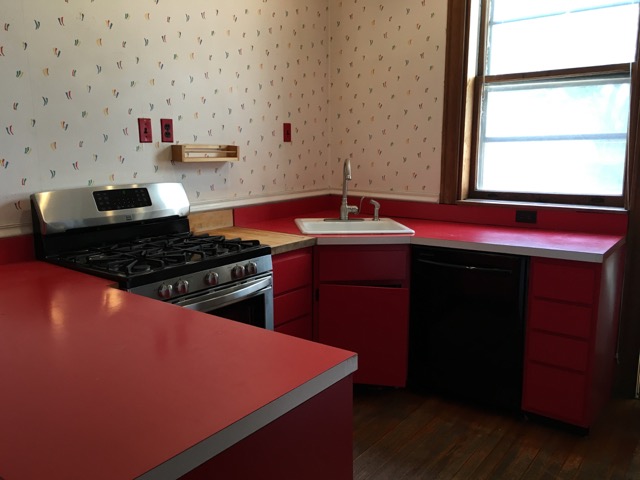
We renovated our kitchen in 2016. A year later I posted some reflections. Lately, I’ve been talking with friends and clients about kitchen design, so I’ve had a chance to think about how much I love this kitchen. The new kitchen has absolutely been life enhancing and we still love it. We’ve done a little bit of rearranging but the organizational infrastructure I set up seven years ago remains solid. My only regret is that we took 24 years to renovate our old red kitchen!
A year ago today, our kitchen renovation was complete and I finished unpacking our stuff into the new kitchen. A month or two later, I wrote a blog series about the renovation. I just re-read the series and relived the joy of that project. Honestly, it was a bit of a pain while we were going through it, but the results were absolutely worth the hassle and the money.
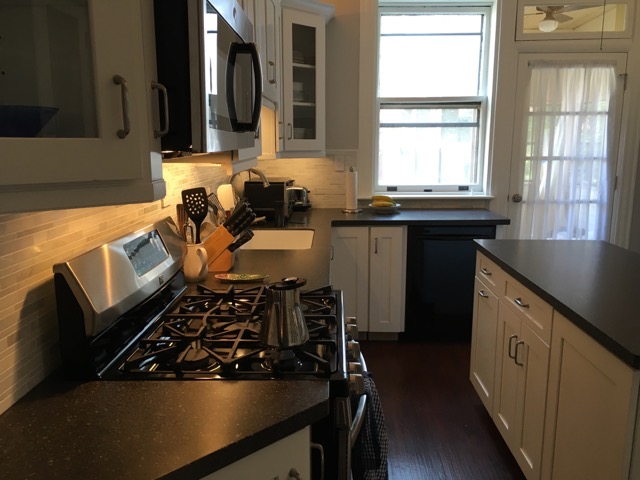
A year later, we’re still loving the kitchen. My favorite storage features are still favorites. I hadn’t mentioned how much I like the trash/recycling pull-out cabinet in the island. It’s so much better than having two trash cans on the floor, which is what we had before. The other thing I love is how easy it is for me to empty the dishwasher each morning because almost everything is stored right near the dishwasher (a huge departure from our old kitchen). I love that we have ample space to store everything. It’s amazing what a difference in quality of life it make when you create a highly functioning kitchen.
Unlike our old kitchen, the countertops in the new kitchen stay quite uncluttered. I think that’s because there’s a place for everything and it’s easy to put stuff away. And when countertops stay clear, they don’t attract random stuff. The exception to that is the counter that runs along the wall from the kitchen to the radiator. (We call that the bar area.) It has started to attract some clutter—things that didn’t really have a home, like a single copy of a Sunday New York Times purchased for its puzzles, the recipe cards that came with our trials of Hello Fresh and Blue Apron and the full-color book/program you get when you go to Opera Theater St. Louis. But it took me less than ten minutes this morning to clear off a six-month accumulation. So that’s not bad!
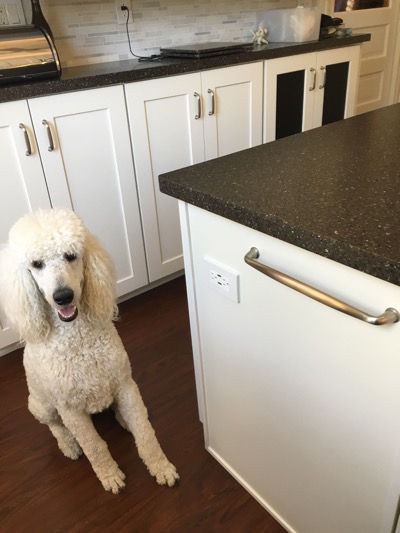
One improvement we added was a bar for our dishtowels, which we put on the far end of the island. We used an appliance pull that matches our cabinet and drawer pulls. That’s worked out great. Here’s a photo taken after I decluttered the bar counter (with special guest appearance by Bix):
There are only a few things I think we’d do differently if we had it to do all over again.
- We might have selected a different countertop because the solid-surface LG-Hi-MACS scratches easily and is heat-sensitive. I’m not sure what we should have chosen instead; we haven’t discussed that.
- I’m not crazy about the Allure vinyl plank flooring we chose. I think it looks fake. If I had it to do over again, I might have chosen vinyl tile or vinyl wood plank that doesn’t look distressed. I don’t mind that it’s vinyl; I’m just not crazy about how the one we chose looks. But I really do love that it’s waterproof.
- I kind of wish we’d designed a place for Bix’s food and water bowls because that water bowl has been kicked more than once. But I haven’t spent much time trying to figure out what we might have done. We’ve ended up placing them at the near end of the island, where we store his food. That’s working out pretty well.
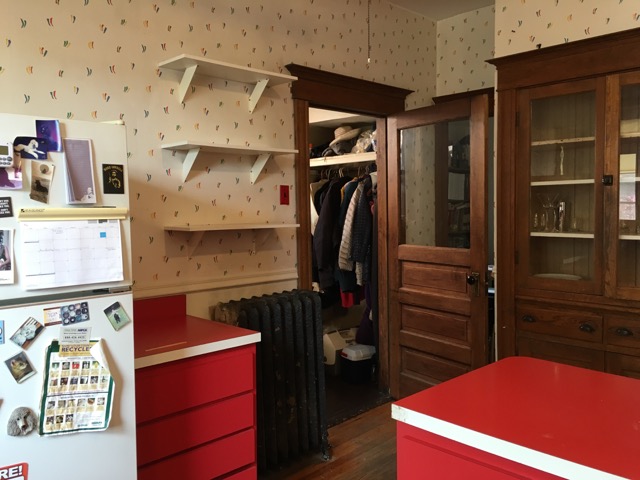
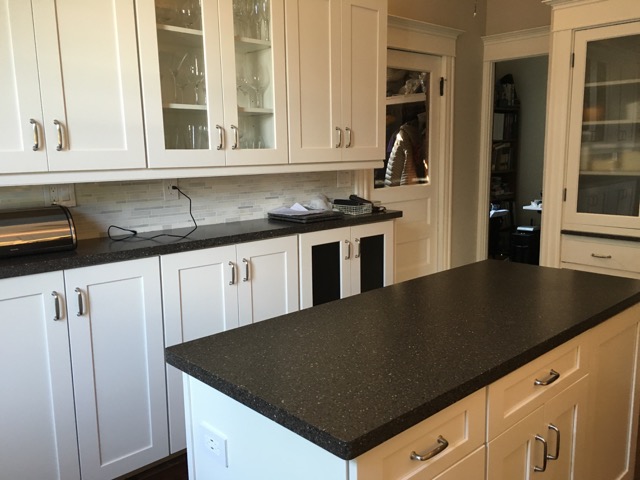
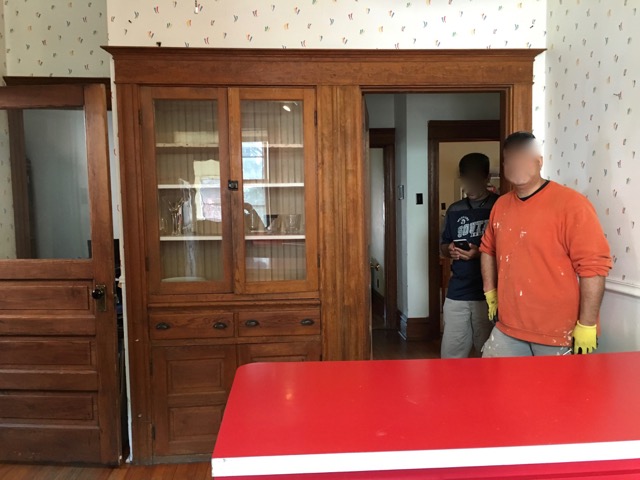
Because everyone likes to look at before-and-after photos, I’ll run again the pix from the first post in the series last year. We don’t miss the red countertops. And we certainly like having upper cabinets!
From the entrance to the kitchen from the living space:
From the sink:
From the back door:

View of the built-in cabinet:
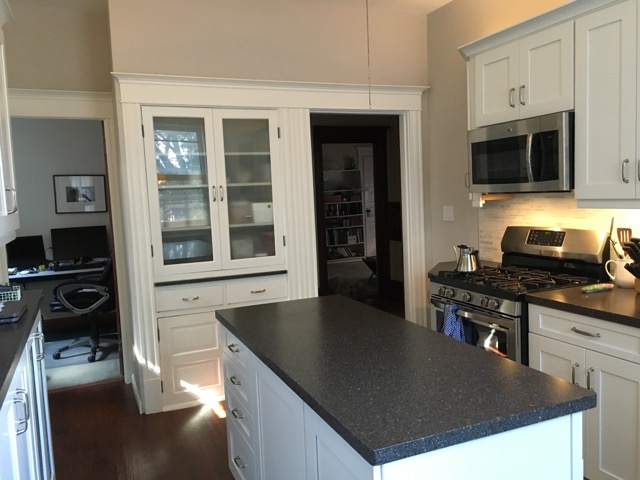
This last “after” shot shows that we sacrificed our pantry so that we could get the refrigerator out of the way. That was a stroke of genius on the part of the designer.

A note to my future self
I bought some terrific bamboo food-storage bag organizers from Costco the other day (that’s an Amazon link to a similar product) and transferred my various sized Ziploc® bags from their boxes to the new organizers. The quart-size bags were in a plastic bin, because I’d bought a large box of them that was too big for the drawer. As I pulled the bags out of their little bin, I saw this note, in my handwriting, stuck to the bottom. It says, There are more quart-size bags in the downstairs dining room.
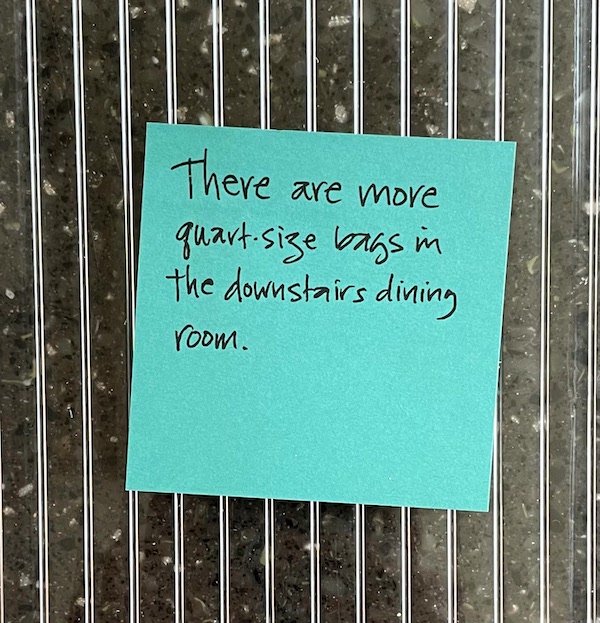
I had no recollection of having had extra quart-size bags, or of writing that note. It makes sense, though, since I’d bought a box that was too large for the drawer. I was so happy to see it!
It’s not the first time I’ve made these discoveries. I’ve been known to put notes near the bottom of a stack of coffee filters, for example, telling me where more coffee filters are stored, because otherwise I would have just ordered more when we were getting close to the bottom of the stack.
My memory isn’t what is used to be and I’m grateful to my past self for making my life a little easier! It’s just a little bit of effort and it’s so helpful.
Saying goodbye to Getting to Good Enough
We published the last episode of our weekly podcast Getting to Good Enough today. On June 15, 2018, my cohost Shannon Wilkinson and I published the first three episodes of Getting to Good Enough, a podcast about letting go of perfectionism so you can do more of what you love. I can’t believe it’s been five years! We were gratified by the enthusiastic response we received—we reached 50,000 downloads in the first ten months—and vowed to keep going as long as we were having fun.
We had lots of fun, but after we returned from a hiatus this summer, we realized that recording, editing and publishing the podcast was feeling like a chore. So we decided the time was right to say goodbye.
We plan to keep the episodes available for anyone to listen to indefinitely, so if you’re just hearing about the podcast now, you can go ahead and listen. Just look for it wherever you listen to podcasts. (Or, if you want, you can listen to it right on the website, linked above.)
Shannon and I are both so grateful for our audience’s support. Saying goodbye is definitely bittersweet, but we’re very grateful for the life-changing experience of doing the podcast.
ETA: In 2025, we decided to bring back the podcast! New episodes starting airing in September 2025.
The power of working with a professional organizer
I’m always amazed at how often I put off dealing with clutter in my own home. If I give it some focused attention, I’m able to declutter and organize pretty easily. But if I add a professional organizer to the mix and the process is supercharged!
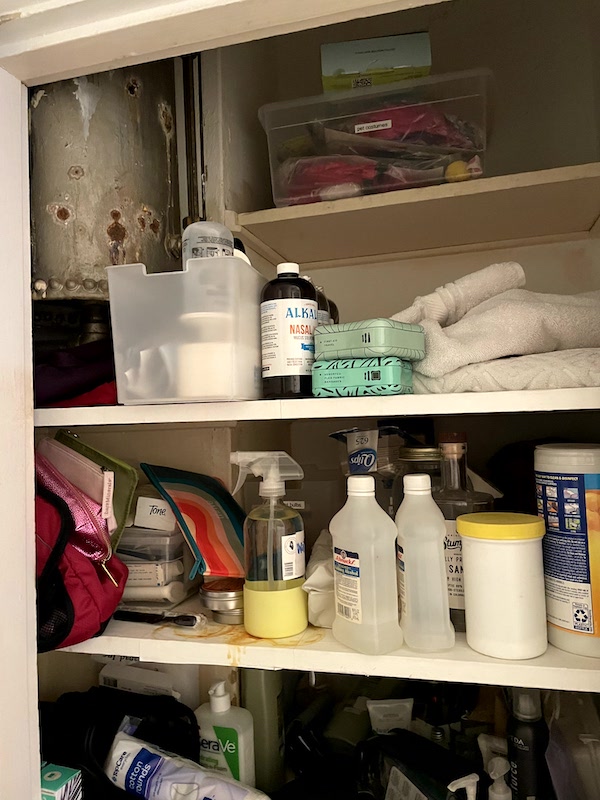
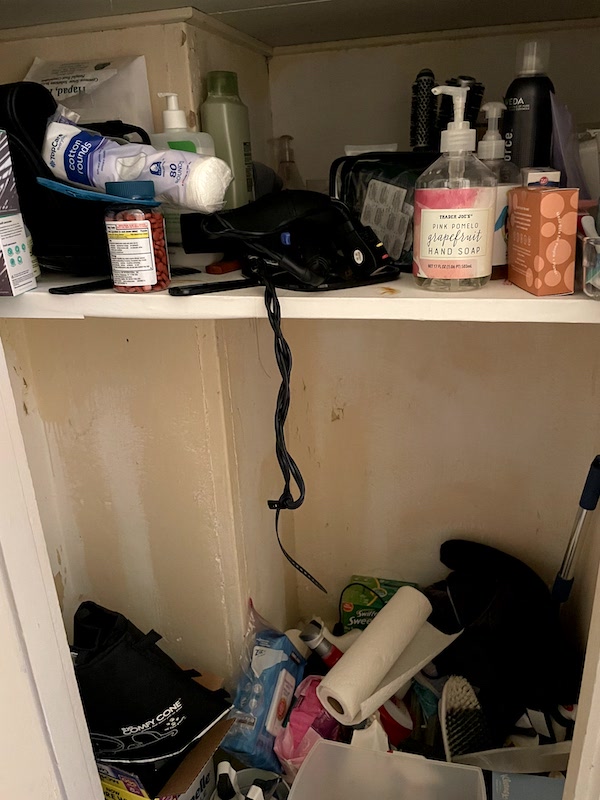
Last week, I asked one of my employees, Lydia, to help me declutter and organize four spaces: one of my bathroom closets, my food-storage containers and two of my pantry cupboards. I am so glad I did.
My house is 115 years old and most of his not been renovated. If you are a lover of old houses, you’d probably really like my house. It has plenty of “character.” The bathroom closets are functional but not at all customized for storage. I reorganized my primary bathroom closet a few years ago (again) and I just let disorder creep in to the point where I could barely stand it any more. So I reached out for help. And I’m so glad I did.
In two hours, that closet went from this:
To this:
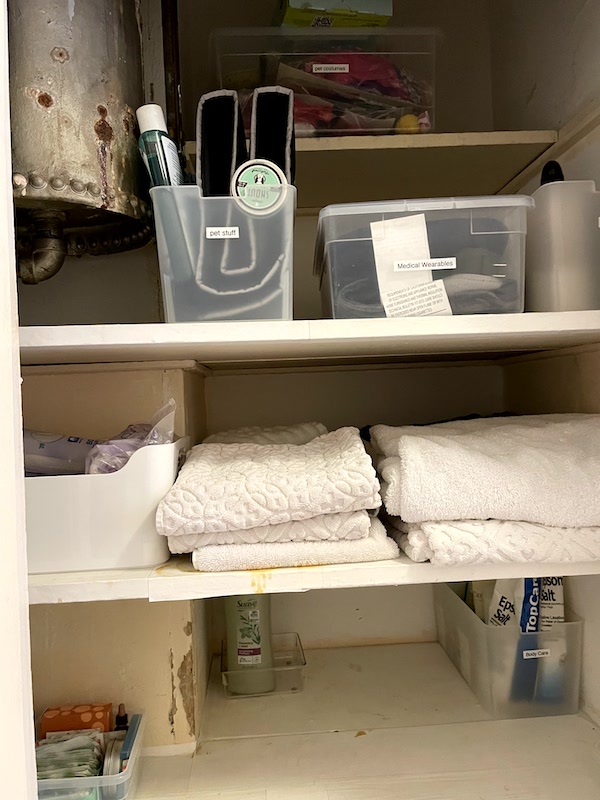
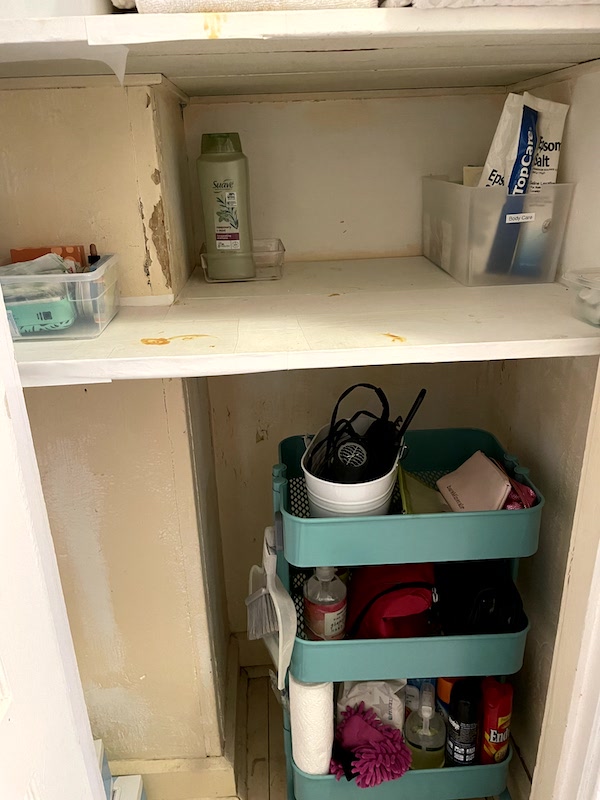
We emptied the contents of the closet, shelf by shelf, onto a folding table right outside the bathroom. I looked at each item, got rid of those that had aged out, sorted like things together and then put it all back together again. Lydia suggested that a three-tiered rolling cart would work well on the floor of the closet (genius!), so I repurposed the one I’d been using next to my washing machine. (In its place, I put a nightstand I’m no longer using, which stores my laundry supplies very nicely.) The cart is perfect for my purposes in the bathroom.
Moving items to the rolling cart not only made much better use of the floor space, it created space on the shelves. (That was helped a lot by my letting go of so much.) Lydia suggested we move the towels from the top shelf down a shelf (since we now had room) where they’re now within reach. We folded guest sets together and put them in the back of the shelf and the towels I use in the front. For 22 years, I have been storing towels on the top shelf, where it’s difficult for me to put them away and get them out. I struggled for 22 years. Why didn’t I consider moving them to a more accessible shelf?
I love it when I have organizers help me because it makes me really appreciate the value of working with an organizing professional. You set aside time to focus on the process. You make a financial commitment. And you get a fresh set of (expert) eyes on your situation. The five hours I spent with Lydia on Friday made a huge difference. I’m been smiling every time I use the refreshed spaces.
If you have spaces in your home that are getting on your nerves, I urge you to set aside some time to focus on decluttering and organizing them. If you have inclination and budget, you can supercharge the effort by hiring a professional to help! If you’re in St. Louis, shoot me an email. Or go to NAPO’s website to find an organizing professional near you!
Do you have a motto?
I have a personal motto that serves me well. I’ve talked about it here before (many times). Here it is:
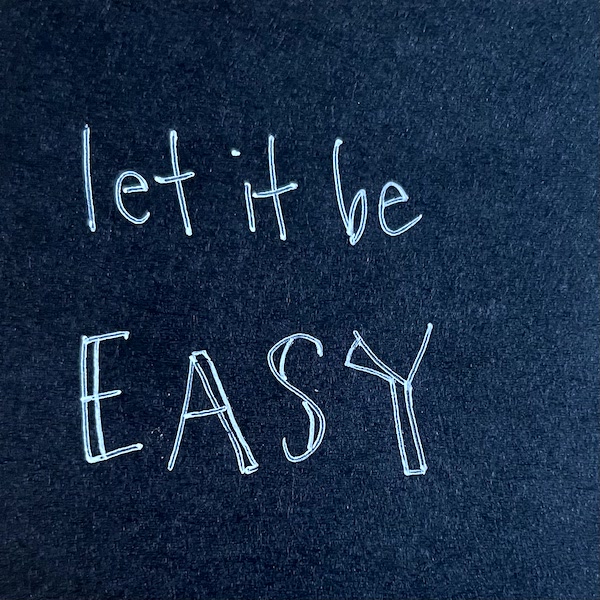
Another helpful motto I have is “it’s good enough.” I have to remind myself of that all the time. Case in point: I was going to re-write my motto for this post because the lettering wasn’t amazing. But I reminded myself that good enough is good enough. And I let it be easy and stuck with my imperfect sticky note. (If the idea of letting go of perfectionism interests you, check out the podcast, Getting to Good Enough that I co-host with Shannon Wilkinson.)
What’s your motto? If you don’t have one, maybe today is a good day to come up with one!
About Janine

Hello! I’m Janine Adams — a certified professional organizer based in St. Louis, and the creator of Peace of Mind Organizing®.
I love order, harmony + beauty, but I believe that the way that you feel about yourself and your home is what truly matters.
If you’re ready to declutter with a purpose and add more ease to your life, you’ve found the right blog — and you’ve found the right company.
read more »Links
- National Association of Productivity and Organizing Professionals
- Organize Your Family History
- Institute for Challenging Disorganization
- NAPO St. Louis
- Getting to Good Enough podcast
- Peace of Mind Spending
- Ravelry
- Are you interested in becoming a professional organizer?
- Shannon Wilkinson, life coach