Putting yourself first

Many of us in helping professions have a tendency to put the needs of those we help before our own. It’s so easy to do.
But, as I’ve discovered recently (yet again), it’s really important to make sure that you are taking care of yourself, so that you can, in fact, take care of others.
I absolutely love the work I do leading organizing teams to create fast, significant change for my clients. I love it, but it drains me. By the end of a session, I am physically and mentally exhausted.
I learned earlier this year that two successive days of leading organizing teams is my healthy maximum. Yesterday, I completed a third day in a row of team organizing. (It was the fourth team job I’d led in five days.)
When I got home, I sat in my recliner with my laptop and finished writing the number of the words I needed to meet my daily quota for my novel. My husband was making a delicious dinner and by the time it was ready I’d rested enough to be able to get out of the recliner and come to the table. During my resting time, I renewed my resolve to not work more than two days in a row leading teams.
The trouble, of course, is that people want help and there are only so many days in a week. But I reminded myself that good self care means putting myself first on my schedule. I have marked days on my calendar with the label “No clients” so that I don’t try to please someone by making an appointment at the expense of my own physical and mental health.
What about you? Are you putting yourself first in your schedule? If not, perhaps you can mark out days on your calendar for yourself or let go of some volunteer commitments. Maybe you can delegate some responsibilities. Whatever you need to do, please take care of yourself first so that you have the energy and resiliency to help others.
Peaceful photo by Hilary Perkins via Flickr. Used under Creative Commons License
Help create a snapshot of organizing in America
The National Association of Professional Organizers is conducting a survey to gauge what the public thinks about organizing and productivity. They’re curious about the general public’s organizing behaviors and attitudes and hope to create a snapshot of how organizing affects the everyday life of Americans.
Obviously, the more responses they get to the survey, the more useful it will be in helping this organization help professional organizers help you!
Can you help? If you have a few minutes, please click on this link to take the 40-question survey. The survey closes on November 25.
Swype makes iPhone typing easier
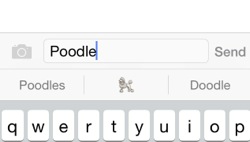
With iOS 8, my iPhone got just a little bit better. For a brief time before I got my beloved iPhone (I currently use the 5S), I had a cheap Android phone. The only thing I missed about that phone was the built-in Swype keyboard that made texting easier. With Swype, you slide your finger from key to key, rather than pressing the individual keys with your finger or thumb.
iOS 8 allows for external keyboards. And now Swype is available for the iPhone. Before I knew about Swype, I’d been dragging my feet upgrading because I’m always afraid of bugs. When my friend Standolyn told me about Swype (at that moment it was available free of charge, now it’s 99 cents), I immediately upgraded to iOS 8 and downloaded the app.
It was like riding a bicycle, if I bought a more expensive, feature-laden bicycle. I immediately fell back in love with Swype. I don’t know how much of this is Swype and how much is iOS 8, because I’ve barely used the Apple keyboard since upgrading the operating system, but Swype predicts words so that you can access them with one touch. (For example, if my husband text me a question, “yes” and “no” appear above the keyboard.) It supplies easy, one-touch correction suggestions. And it corrects words you’ve already typed as you input new words, so that they’re correct in context.
And I’m not an emoji kind of gal, but if you are, you might enjoy the fact that Swype suggests pictures for some words. For example, if I type “poodle” (which I do, frequently) I’m offered the opportunity to select a drawing of a poodle. (See the photo above.) And that just makes me smile.
Here’s a little preview video of Swype:
As an aside, I heard a ergonomist speak recently at our NAPO-St. Louis chapter meeting. She suggested that it’s healthier to use a swiping keyboard on your phone than a typing one. (Apparently younger people are developing thumb problems because of the texting.)
I still love dictating my text messages; in order to access the microphone, I have to switch to the Apple keyboard, which is easy to do with a couple of touches. Dictation seems to have improved with iOS 8—I really enjoy the fact that the words now appear one at a time as you dictate them, rather than all appearing when you tap Done. But sometimes dictating a message—for example when you’re in a public place—is less than optimal. In those instances, I find Swype so much more enjoyable than typing one letter at a time.
Worth repeating: Those pesky extra buttons
This blog post from last year is one of my favorites. It speaks so clearly to my mantra, “Why is it so hard to let it be easy?” Incidentally, my extra buttons remain in their little Mason jar and I’m pretty sure I haven’t accessed them since I wrote this post.
While I was perusing Facebook this morning, I stumbled onto a link to a post on organizing extra buttons on the Organize and Decorate Everything blog.
You know what I’m talking about, right? Those extra buttons that come (usually in some sort of envelope) with new clothes.
In that blog post, Leanne, the writer, details her beautifully organized and very labor-intensive method of dealing with these buttons: she either uses the original packaging or puts the button in a tiny clear-plastic envelope. She writes a description of the garment on the envelope. She does the same with the extra thread that comes with the garment.
Then she files these tiny envelopes in small accordion file, organized by color. Once a year, she goes through the accordion file and weeds out the buttons that belong to garments she no longer has.
Wow. Just wow. To me, that is a whole lot of work that, in my life anyway, would pay very few dividends. I can’t remember the last time I needed one of the extra buttons that came with a garment.
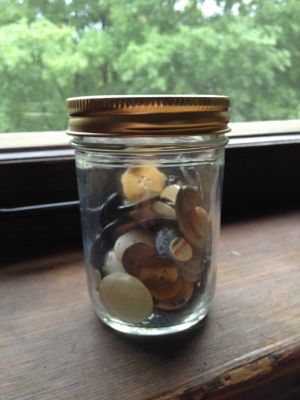
Let’s contrast Leanne’s method with my own. I have a mason jar that I put buttons in. When I buy a garment that has extra buttons (which these days is pretty rare, since I buy so many of my clothes at resale shops), I take the buttons out of the envelope and put them in the jar. And I throw away any extra thread.
In the rare event that I need one of these buttons, I just pour the buttons out of the jar and and find it. I have the matching buttons on the garment, so I can identify it.
That’s it. It takes no time.
Here’s a photo of my button jar:
These contrasting methods do a marvelous job of illustrating an overriding principle I live by:
Organizing systems should be as complex as they need to be and not one bit more.
I found myself admiring how beautifully organized the buttons in that blog post were, and the beauty of accordion file of buttons sorted by color, and then I realized that for me, anyway, that would be a complete waste of time. And if I aspired to a system like that, I’d probably just have a big pile of buttons waiting to be processed. In the case of extra buttons, simple is best.
My blog's 8th birthday
On November 10, 2006 I posted my first blog post. Today, I’m posting my 992nd.
Eight years of blogging feels like something to be proud of. I started the blog at the advice of my web designer, Nora Brown. Originally, my purpose was to allow my clients to get to know me before hiring me. (Since I’m not born organized, I didn’t want them expecting a super-organized perfectionist to arrive at their door.)
This blog has paid huge dividends. I do think it has served its original purpose (and continues to do so), but it has been useful in so many other ways:
- It helps keep my website high in search rankings
- It establishes my expertise
- It allows me to view the world through the eyes of a blogger—I’m constantly looking at situations and wondering how I can turn them into something helpful for my blog readers.
- It’s made me more reflective
- It’s sparked relationships with companies, like Rubbermaid, SentrySafe and the dear departed Springpad.
- It’s helped potential clients understand that I’m a person who keeps commitments and is good at creating habits.
These are just some of the reasons I blog. In 2012, I added started a second blog, Organize Your Family History and now I try to blog twice a week at each of them. (I just switched up my schedule a little bit recently and will be planning to post here on Mondays and Thursdays and at OYFH Tuesdays and Fridays.)
The world of blogging is not what it was last eight years ago. Back then, social media had little impact. In 2006, Facebook was open only to college students, and Twitter was four months old. LinkedIn had just started including public profiles. Pinterest and Instagram were years from starting. Social media sites have since changed the fabric of the landscape immensely. People don’t get as much information from blogs as they did eight years ago. But I keep blogging and I keep benefitting. I can’t even imagine what it would take for me to give up my blogs.
It may sound weird, but my blogs feel like friends to me. I love giving them the attention they deserve and they give so much back to me in return.
I am so grateful to Nora for suggesting I start this blog back in 2006. I look forward to blog post #1000!
Making your keys easy to identify
In the September of 2013, I spent a little time trying to get a handle on the mass of unidentified keys I had floating around my house.
I blogged about it then and I created some solutions that have worked pretty well for me.
One thing I didn’t cover in that blog post is my affinity for using to color to help me easily identify the keys I keep on my main key chain. At one point, I had a copy of a key made and selected a special key whose top was covered with a hard blue plastic adhered to the key. But the hard plastic broke off. So I painted it with blue nail polish instead, with fairly unsatisfactory results.
I also put a green patterned key cap on my main back-door key, which has worked out well, but I have to rely on my memory to know which key it is. That’s not too big a deal, but it does require a little bit of thought.
So I was delighted when the folks at label-label® approached me and asked if they could send me a sample of their all-in-one key cap to review.
Label-label key caps combine my love of color coding with my love for labels. You adhere a label to the key, then fit the key cap over it. There’s a window cut out in the key cap to reveal the label.
Simple in its brilliance, right? Here’s a picture of two of my keys on my main key ring, which have been label-labeled.
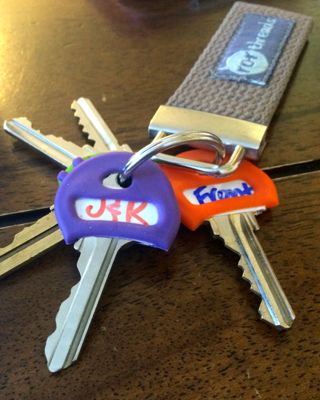
The label-label key cap kit comes with appropriately sized pre-printed labels as well as a set of blank labels that you can write on before sticking them on the key. They labels are laminated and I found the instructions a little confusing for peeling off first the backing the laminated topper and then the backing of the label itself. Once I got the hang of it, though, it was easy. And the lamination has held up well.
It occurred to me that I could probably use a laminated label from my Brother P-Touch label maker to more easily (and neatly) create a key label. I haven’t had the chance to try it yet.
The pack I was sent came with eight caps, each a different color. One nice little feature of the key cap is the little nubbin at the hole end of the key. If you put the nubbin so that it’s on the top when your key is in the keyhole, you don’t have to worry about putting your key in upside down. That’s particularly helpful when the lighting is dim.
If you all the keys look alike, this might be a great solution for you. They’re making me very happy. It’s the little things, right?
Embracing imperfection
As I wrote on Friday, I’m writing a novel this month. This is my third novel. I do it for the fun of the challenge.
When I was writing my 1700 words this morning, I found myself doubting the quality of my work. Was this plot stupid? Was the writing sophisticated enough? Is this a waste of time? Then I realized it didn’t matter. What’s important here is that I meet my goal and write 50,000 words in 30 days. The quality of the words is neither here nor there.
That got me thinking about how liberating it is to embrace imperfection. When you let go of the how great the outcome will be, you can really make some progress. If I were trying to write the Great American Novel and finish with something I could hand off to a reader without further editing, I’d never get the darned thing done. Especially not in a single month. And, truly, I’m not interested in spending more than month writing fiction. I have a life to live and a business to run simultaneously.
As it is, I’ll end the month with a first draft that I can polish up later, if I so desire. And I’ll have met my goal. And, as I know from past experience, it’ll feel great.
The beauty of imperfectionism applies to much more than speedy novel writing. So many of my organizing clients are perfectionists. They want to find the best way to organize their homes. Or the best possible charities to receive their discards. Or the perfect way to store their belongings.
But when you pursue perfection, it can be hard to complete a project. Or even start one. Letting go of perfect allows you to get started and make progress. If you tend to be a perfectionist and it’s holding you back, I suggest you just do something toward your goal. Anything.
I love the expression “Don’t let perfect get in the way of done.” That’s true in organizing projects, in novel writing, and in life. A life lived imperfectly is better than a life lived waiting for the perfect time to do something.
This month as I make progress toward completing a 50,000 word novel in 30 days, I’m definitely embracing imperfection. And I’m going to try to apply that philosophy to other areas of my life.
Search
Recent Posts
- Worth repeating: Figuring out what to watch on TV
- The power of incremental progress
- Podcast guest spot on the role of organization for folks with chronic illness
- No excuses series (part 3): "It was a present"
- No excuses series (part 2): "I paid a lot for that item"
- No excuses series (part 1): "But I might need it!"
- Retiring the New Organizer Guides
Tags
About Janine

Hello! I’m Janine Adams — a certified professional organizer based in St. Louis, and the creator of Peace of Mind Organizing®.
I love order, harmony + beauty, but I believe that the way that you feel about yourself and your home is what truly matters.
If you’re ready to declutter with a purpose and add more ease to your life, you’ve found the right blog — and you’ve found the right company.
read more »Links
- Institute for Challenging Disorganization
- Getting to Good Enough podcast
- National Association of Productivity and Organizing Professionals
- Peace of Mind Spending
- Organize Your Family History
- Ravelry
- Shannon Wilkinson, life coach
- Are you interested in becoming a professional organizer?
- NAPO St. Louis