Worth repeating: Trying out a standing desk
I wrote this back in 2012, when I first became aware that sitting all day is bad for you. (It sounds like such a no brainer now.) The warnings have not subsided, so I thought it might be helpful to run this post again. And it allows me to mention this great review of standing desks, which I came across last year.
We’ve all been reading recently about the health dangers of sitting all day. This is really bad news for people like computer programmers and writers who sit for hours at a stretch, in flow, while time zips by.
When I work with clients, I’m usually on my feet. But I spend at least half (often less than half) of my work week with clients. The rest of the time, I’m at my desk, doing that desk work that’s so essential for running a business.
Not only that, but my hobbies are knitting and genealogy research, both of which are primarily sitting activities.
This news that sitting on my butt—something I do with somewhat alarming frequency—is dangerous is disturbing indeed. As I’ve read about it, I’ve become attracted to the notion of using a standing desk.
I saw this video about the working area of successful writer Christie Aschwanden who has a convertible standing/sitting desk. Unfortunately, it costs something like $3000, which is out of my price range (until I become convinced of the benefits).
I’ve seen multiple blog posts, starting here at Ikea Hackers and here at Apartment Therapy, about creating a standing desk from a regular one.
I’m not the only one in my house thinking about it. One day I saw my husband standing at his desk, with his keyboard, monitor and mouse all resting on top of cardboard boxes. That didn’t turn out to be a sustainable solution. He ended up buying a Standdessk sit/stand desk and has been really happy with it.
I spent a little time thinking about how I might create a standing desk of my own. I know I don’t want to use one full time, because I’m on my feet plenty. But it would be nice to have one when I want to change things up during the day.
And then it hit me. I have two Expedit shelves on their sides, on legs, in one of my two home offices. I selected the legs so that the height would be right for working. Here’s a photo I took back when I was setting up this office.
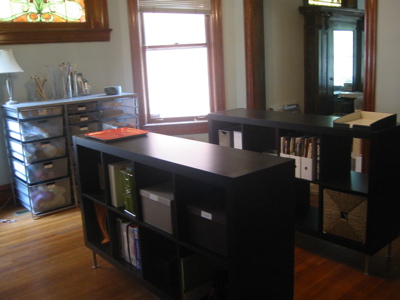
These cases hold supplies for clients
I also use a MacBook laptop, though it’s usually tethered to an external monitor (and I use a bluetooth keyboard and mouse when I’m at my desk).
Today, I decided to untether my computer from my desk and take it the few steps to the Expedit shelf. And here I am, writing this blog post while standing up.
I have to say, it’s kind of cool! The change of scenery is good. Standing feels good, since I’ve been sitting all day. I don’t think the ergonomics are the best, since I have to look down to see my laptop’s monitor. And I think my elbows are a little high. But it’s nice for short stretches. I think what I’ll do is set a reminder on desk days to work standing up for awhile.
If you’re intrigued by the notion of a standing desk, maybe take a look around your house and see if you already have something you can use. I’m glad I finally realized I did!
Apple AirPods: Worth the hefty price tag

I resisted buying AirPods, Apple’s wireless bluetooth headset, because of the $159 price tag. I also thought they looked a little weird. But I’d heard them recommended by The Mac Guys whose opinion I heartily respect and I was tired of catching the wire of my wired headset and accidentally pulling it out.
I bit the bullet in January and I haven’t looked back. AirPods are truly convenient and (dare I say it?) worth the money. When not in use, the earpods—a separate one for the left and the right—reside in a little plastic charging case that looks to me like a package of Glide dental floss. You charge the case with a lightning cable but the case can charge the headset even when it’s not plugged in. So far, I have not encountered any problems with the pods running out of juice, but apparently 15 minutes in the case gives you 3 hours of listening time.
Here’s why I love my AirPods:
- They’re comfortable.
- They stay in my ears.
- They connect (and disconnect) automatically when I put them in (or take them out of) my ears.
- They connect to my phone and to my computer (and I could connect them to my Apple Watch, if I put music on it).
- The sound is great. (Full disclosure: I’m no audiophile.)
- I don’t have to have my phone on my person to use them (just nearby). Very helpful for folding laundry when I have no pockets.
- No wires to tediously untangle before use.
- No wires to get in the way and accidentally catch things on.
- They’re easy to charge and I can get up to five hours of listening time one charge.
- Music pauses automatically when I take out the earbud out of my ear.
- I can access Siri on my phone simply by double tapping the EarPods.
I have a little trouble keeping track of them (which was true with my wired headset as well) and I still need to find a good spot within my purse to store them. But otherwise they’re just great.
Soulful Simplicity winner!
The winner of the free copy of Soulful Simplicity: How Living with Less Can Lead to So Much More by Courtney Carver is reader Briana. Soulful Simplicity is my favorite book about hows and whys of living with less. Briana said in her comment that she would like to win book in order “to learn about practical minimalism. I’ve read a lot about minimalism in general, but this seems to take a different approach.” Here’s your chance, Briana!
Courtney Carver
Courtney is on her Soulful Simplicity book tour right now. If she’s coming to a city near you, I heartily urge you to go to her book talk. I haven’t heard this talk, but I was truly inspired when I heard her speak about Project 333, her minimalist clothing challenge, in 2016.
I’ll be in touch to get your shipping address, Briana. I hope you enjoy the book!
Worth repeating: Getting a ring off a swollen finger
Just over three years ago, my misfortune at having fallen and broken my wrist was turned into good fortune when I found myself working at the home of a hand surgeon. That wonderful doctor took the time to remove my precious heirloom wedding band so that I didn’t have to have it cut off. Here’s how he did it.
On the evening of December 3, 2014, I fell and broke my wrist, though I didn’t know immediately that it was fractured. That night, I took my engagement ring off, but my wedding wasn’t moving and I (stupidly) left it on.
The next morning, I went to urgent care and had the wrist x-rayed. For whatever reason, the urgent care doctor and nurse were unconcerned about my ring.
The following day, I left to supervise a three-day move-in for a client in Cape Girardeau, Missouri. (A couple of hours from St. Louis.) Thankfully, my wonderful team made my injured wrist irrelevant to the success of our job. But it really hurt that first day. And part of the reason for the pain was that my finger was swelling around my ring.
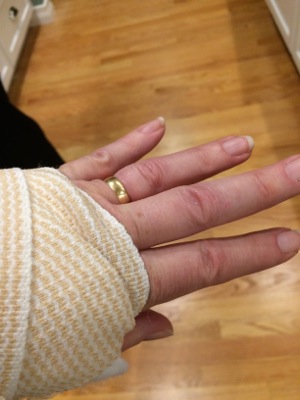
I was really fortunate because the husband of the couple we were moving is Dr. Andrew Trueblood, a hand surgeon with Advanced Orthopedic Specialists in Cape Girardeau. When he came home from work at the end of that first day, he took one look at my hand and rewrapped the bandage around the splint, which provided some instant relief. Then he said, “We have to get that ring off.”
Here’s a photo of my rewrapped wrist, showing how the wedding band was squeezing the life out of my finger.
For a half hour, he worked on getting my ring off, telling me that if we weren’t successful it would have to be cut off. I really didn’t want to have my precious ring cut off. It’s a family heirloom: My great grandmother, Alice Jeffries, wore it for 70 years. And I’ve worn it for another 25.
Andrew’s efforts paid off, and I am so grateful for his skill and attention. I wanted to share here the technique he used, in case you ever find yourself in need of getting a ring off your finger
Step one: Wrap the finger in dental floss.
Over and over Andrew wrapped and rewrapped my finger with dental floss so it looked like a mummy. He said this would reduce the swelling. He did it for probably 25 minutes.
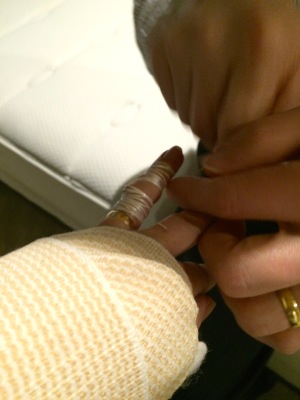
Step two: Get the dental floss under the ring
Since Andrew’s house was still packed (the movers had just brought their stuff to the new house), his access to tools was limited. After he unwrapped my finger for the last time, he patiently used the tines of a plastic fork to ease a strand of floss under the ring, going from of the top of my finger toward my wrist.
Step three: Make the finger slippery
We had some liquid soap on hand, and Andrew soaped up my finger.
Step four: Pull the dental floss
By pulling on the floss and allowing it to go round and round my finger, the ring was slowly eased off. As it was happening, I turned on my phone’s video camera so I could record the last 30 seconds of this miracle. Be sure and watch it to the end to get a glimpse of Andrew.
I am amazed by my good fortune in finding myself in the home of someone who could ease my pain so effectively after this accident. I am grateful to the patience of Andrew and his wife, Amy, and, of course, to my outstanding team that weekend. We got them moved into their gorgeous home without letting a fractured wrist get in the way.
Enter to win a copy of Soulful Simplicity
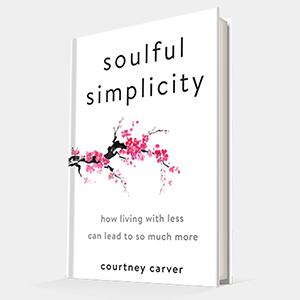
Courtney Carver’s excellent new book, Soulful Simplicity: How Living with Less Can Lead to So Much More came out a month ago, on December 26. That day, I published a Q&A with Courtney about the book and her journey.
Soulful Simplicity is my favorite in the simplicity/minimalism genre. It’s heartfelt, wise and inspiring. If you’re a regular reader of my blog, you know that I’ve been following Courtney’s Project 333 minimalist clothing challenge for a year and a half. So she has quite literally inspired me to simplify my life.
Giveaway!
Courtney’s publisher has sent me a hardcover copy of Soulful Simplicity to give away to one lucky reader. To enter, post a comment below about why you need to read this book. After you’ve entered with a comment, you may get additional entries by tweeting about the giveaway (be sure and use @janinea in the tweet, so that I see it) and/or writing on the wall or commenting at the Peace of Mind Organizing Facebook page. The contest ends at 11 pm, central time, on Wednesday, January 31. I’ll use the Random Number Generator to pick the winner and I’ll announce the winner’s name on Friday, February 2.
Staying comfortable and productive
I recently shared some tips with Tommy John about staying comfortable throughout the day and was included in this infographic they produced. Tommy John is known for (among other things) their boxer briefs for men, and the infographic cleverly ties in the comfort of their product with productivity, using the slogan, “Adjust your business, not your underwear.” I was one of four productivity bloggers whose tips were included in the infographic. Check it out:
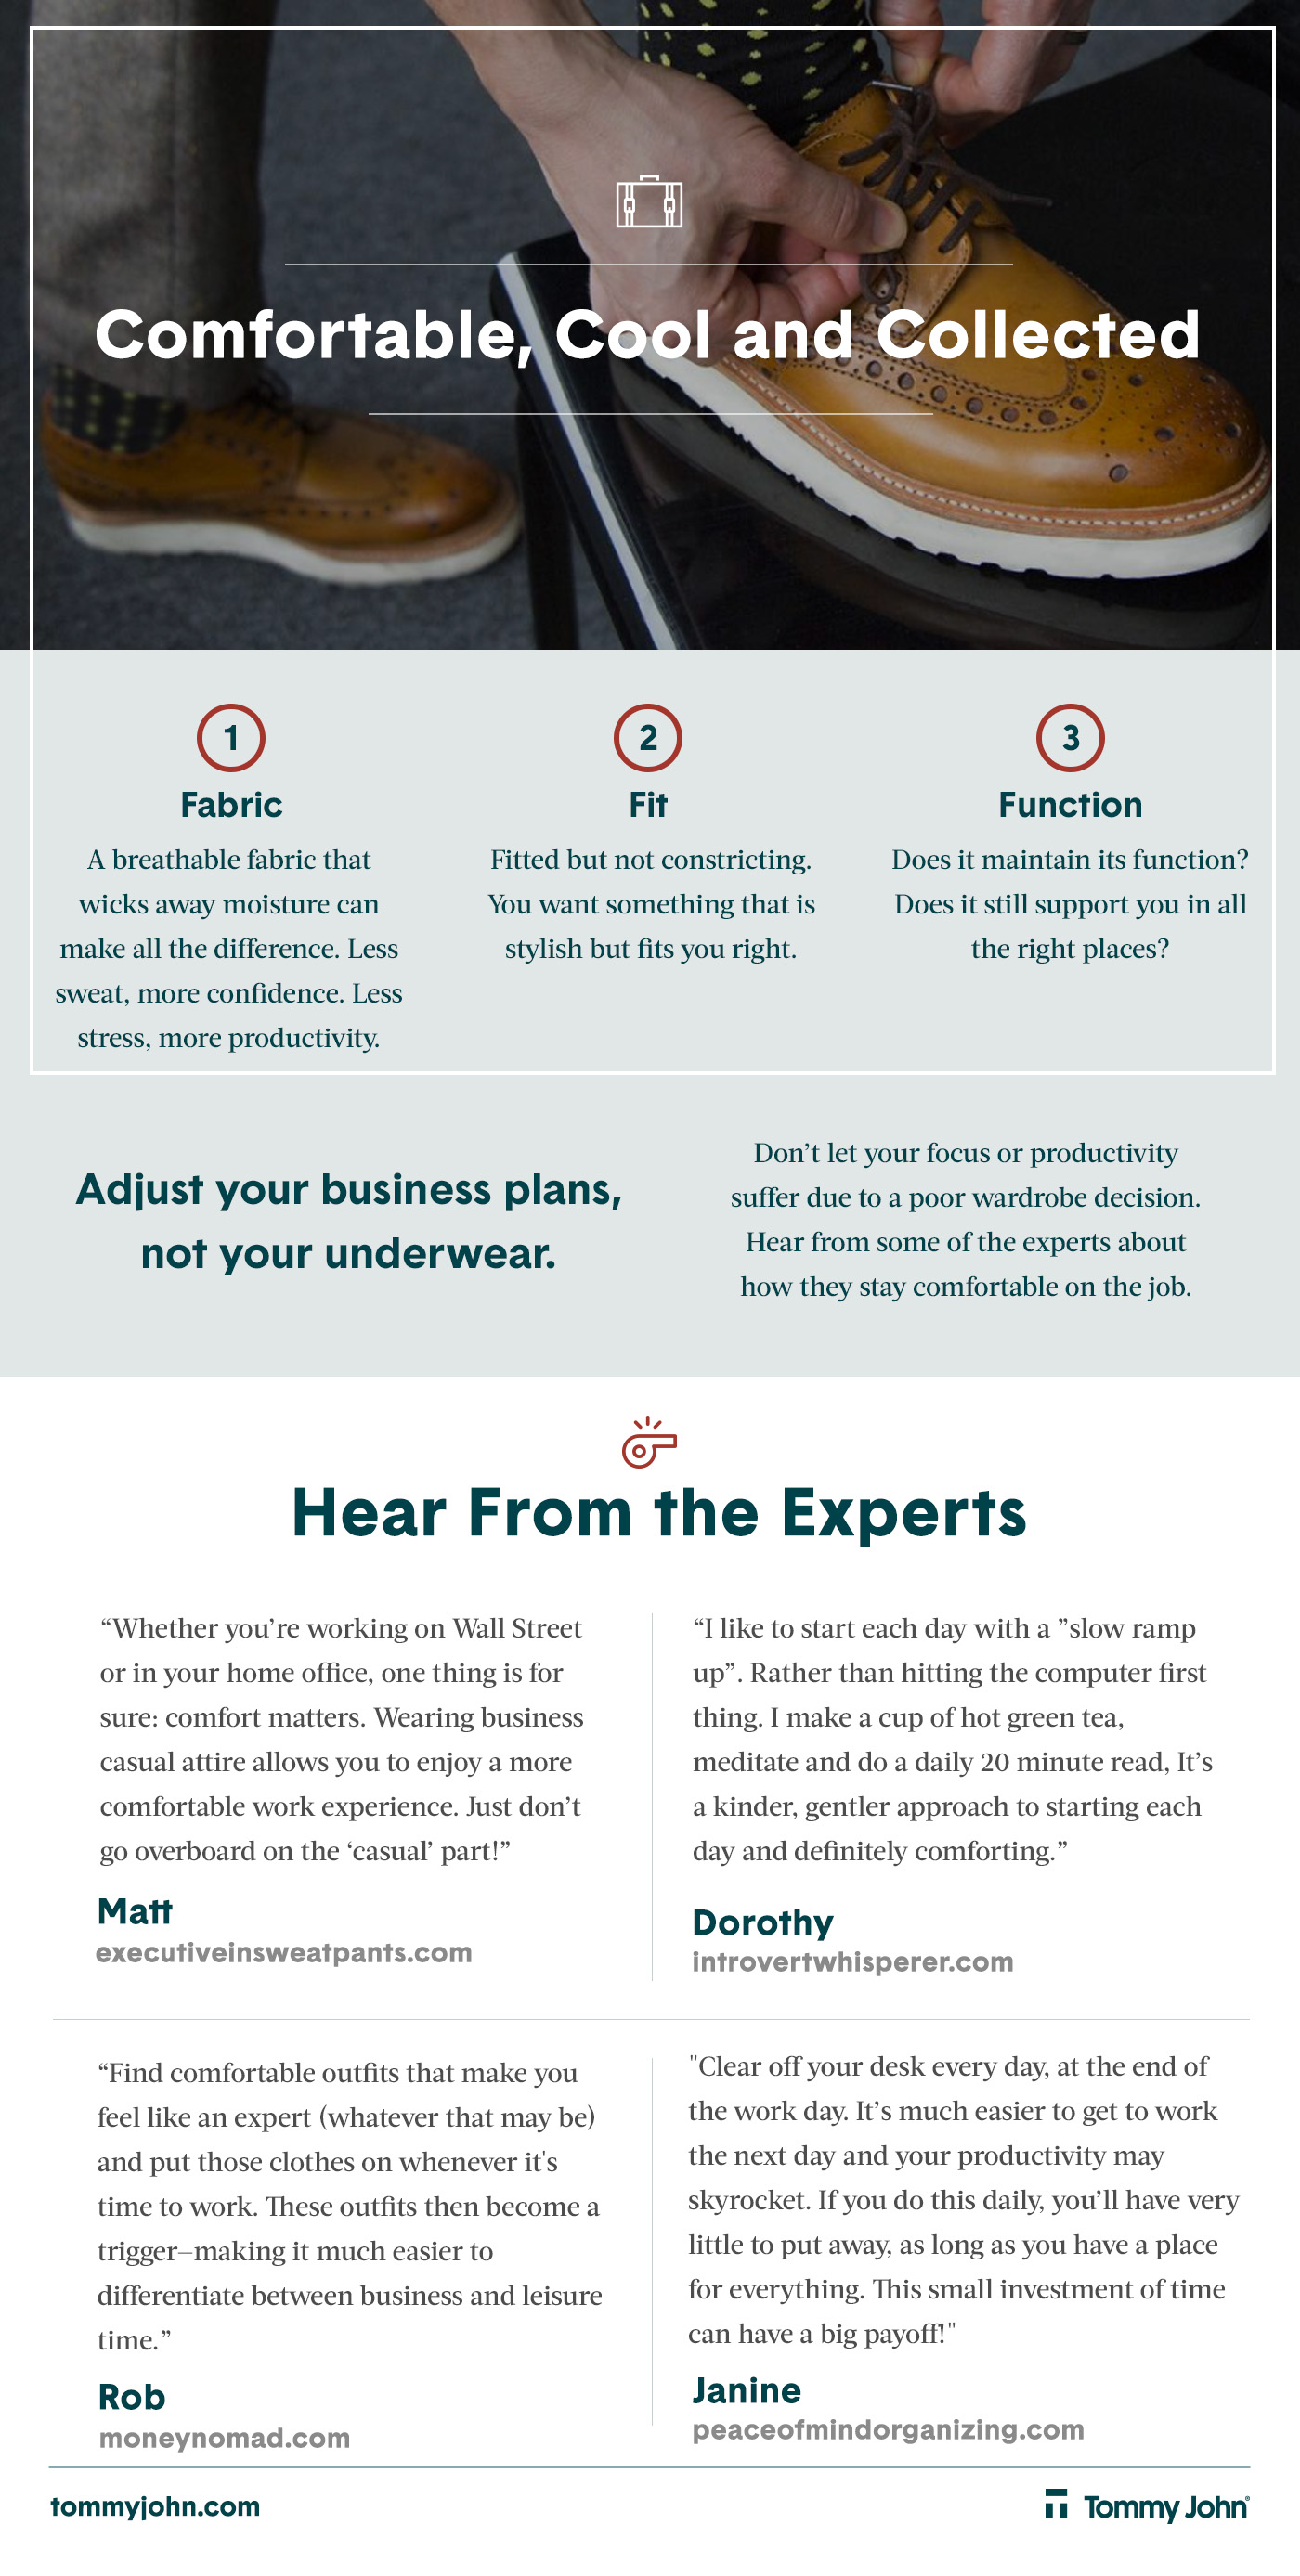
I love seeing productivity tied into an underwear campaign!
Postal rates going up next week
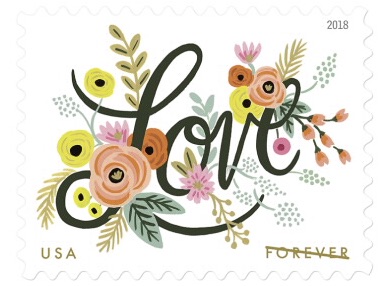
It might be time to stock up on Forever stamps! This week you can buy a one-ounce first-class Forever stamp for 49 cents. But come January 21, the same stamp will cost 50 cents. According to this article on stamps.com, the price of mailing a postcard will also go up a penny, to 35 cents.
While perusing the stamps selection on the U.S. Postal Service website, I spotted a beautiful new Love stamp (pictured above) that is not yet issued. (It will come out on January 18.) I was pleased to see that I could pre-order it for 49 cents. So I’m going to do that, because spreading love on my letters seems like a great idea. And why not save a penny a stamp?
About Janine

Hello! I’m Janine Adams — a certified professional organizer based in St. Louis, and the creator of Peace of Mind Organizing®.
I love order, harmony + beauty, but I believe that the way that you feel about yourself and your home is what truly matters.
If you’re ready to declutter with a purpose and add more ease to your life, you’ve found the right blog — and you’ve found the right company.
read more »Links
- NAPO St. Louis
- Organize Your Family History
- Peace of Mind Spending
- Shannon Wilkinson, life coach
- Are you interested in becoming a professional organizer?
- Ravelry
- Institute for Challenging Disorganization
- National Association of Productivity and Organizing Professionals
- Getting to Good Enough podcast