Worth repeating: A key to keeping surfaces clear
Today I’m taking some inspiration from a blog post I wrote almost three years ago. I wish I could tell you that my bureau has only three things on it today, but the truth is there’s a little bit of clutter. This weekend I’m going to clear it off and get it back to the state that is pictured! Then I’m sure it will be easier for me to keep it clear.
If you click on the clean bureau tag to left on this blog, you’ll see that pretty much every year one of my goals is to put my clothes away properly at night and keep the top of the bureau clear.
It’s obviously been an ongoing struggle with me. But for the past month of so, I’ve been doing it successfully every day, with minimal effort. And I think I know why.
I cleared off the bureau when I did my jewelry reorganization and now only three things, my jewelry box plus two small lamps, reside there.
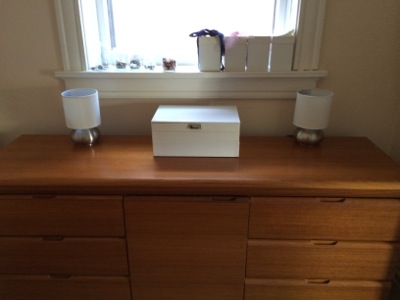
Before, when the bureau was cleared off, many items actually lived there so it always looked a bit junky. Add some dirty socks or tags cut off of new clothes or yesterday’s jeans and it didn’t make a gigantic difference.
But now if I’m tempted to leave something on the bureau it sticks out like a sore thumb. So I take the extra ten seconds to either put it away or toss it down the laundry chute or in the trash, which is right next to the dresser.
With the three items anchoring the space, it’s become really easy to keep this space clear. It’s clear to me that the key is limiting the items that legitimately reside on the bureau top. It’s been only a three weeks or so, but I feel very optimistic.
The same holds true for my desk in my office, which I try to clear each night. If I leave a pile of action papers on the corner of the desk (which I tend to do when I’m feeling lazy), the pile soon grows (and little action gets taken). Once that pile grows, I might start leaving small items in the middle of the desk. After a few days of this, I have to take a few minutes to put everything away except the few things that legitimately reside there.
Based on my experience with my bureau, I think it’s time for me to take a hard look at the things I store on my desk and make sure that they deserve that prime real estate. I’d be willing to bet that I can move a few things to the office-supply closet just a few steps from my desk. And that will make it easier to keep up my clear-desk habit.
My newest favorite iPhone accessory: Loopy
Photo courtesy of Loopy Cases.
I attended the NAPO conference last month and roomed, as usual, with my pal, Geralin Thomas. Geralin is always turning me on to great things and I’ve learned over the years to take her recommendations very seriously.
This time, she showed me her phone case, which is called Loopy. This case has a collapsible silicon loop on the back, which threads through holes in the case to securely fasten the loop.
I dropped my phone in the garage last month and cracked the screen a tiny bit, so I’d been feeling a bit insecure. Who knew that a loop on the back of a phone case could give me such a sense of security?
Since I don’t have a landline, I have to keep my phone on my person, which can be a pain when I’m wearing something without a pocket. With Loopy, I can securely hang on to my phone with one finger while I’m carrying a bunch of other stuff. I can even hold my phone when I walk my dog, if I want, without worrying about dropping it.
An added Loopy bonus is that when I set my phone face up on my desk, it sits at an angle that makes it easy to read. If I want to put my phone in my pocket, the loop collapses.
There was one challenge that switching to Loopy created, but I’m glad to say I’ve overcome it. My other favorite iPhone accessory is the Bracketron si Dash Mount. It allows me to mount my phone on my dashboard, in easy eyeline, so that I can safely use my phone for navigation. It works by placing a metal plate inside the phone case. The powerful magnet in the dashboard mount attaches itself to the metal through the case. (I blogged about it in March 2016.)
The problem was that the Loopy case doesn’t accommodate that piece of metal. The ends of the loop take up too much room. I was really disappointed when I discovered this because I didn’t want to have to choose between the two accessories. But I found this magnetic phone holder at the Container Store and I affixed the little metal plate to the back of my phone. Now I just remove the Loopy case when I drive and mount my phone onto the Bracketron. When I leave the car, I put the case back on. Problem solved! (Believe me, I heaved a big sigh of relief.)
I’m tickled pink by this purchase, so I just had to share the Loopy love!
A few products can transform a space
This week, I had the opportunity to help a dear friend organize the storage spaces of her new apartment in New York City. Having just moved in, she didn’t need any decluttering, so I was able to get busy while she was at work. After I analyzed her needs, I went to the Container Store website and scoped out some products, making a Wish List.
Then I took the subway to the Lexington and 58th Street Container Store and told them I wanted same-day delivery of the products I purchased. I was given a scanner and I wandered through the store, scanning the products I wanted, using my Wish List as my guide. Then I checked out, went back to the apartment and within a few hours the products were delivered (for a $25 fee). It was fabulous.
I just want to show you a couple of photos of how some carefully selected products made a huge difference in this small space.
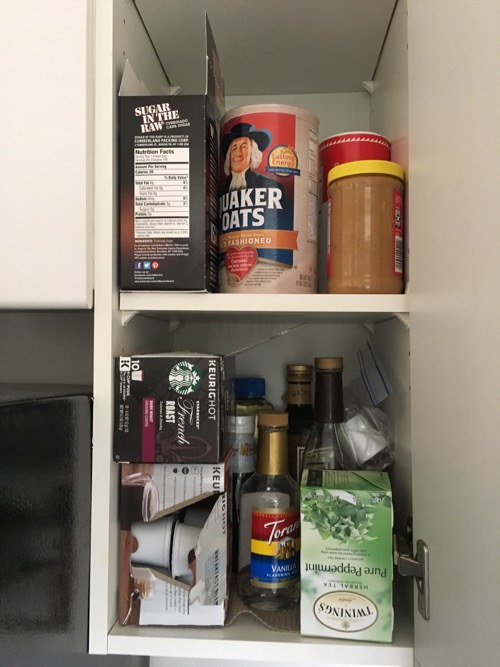
In the kitchen, my friend has a narrow (10 inches wide) cupboard in which she stored supplies to make hot beverages, primarily. She also had a little oil and vinegar and some peanut butter in there.
Here’s the before picture.
And here’s how the space was transformed with a few key products.
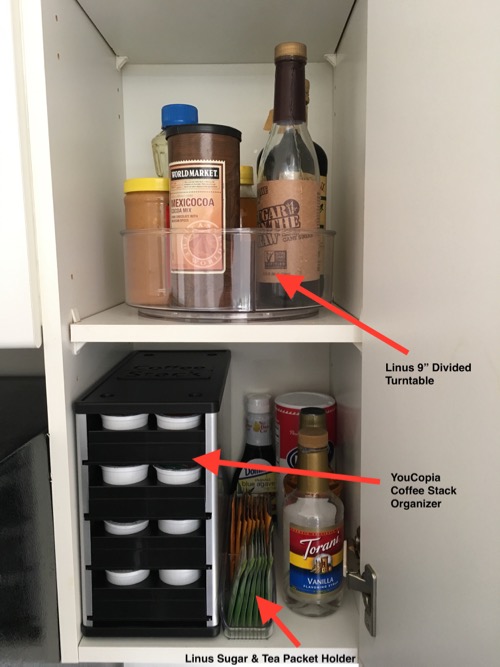
The game changer was the Linus 9-inch Divided Turntable, which now holds her bottles of oils and vinegars, plus some liquid sugar for coffee and her peanut butter. (I moved the oatmeal to the cupboard below, to live with the rest of the breakfast cereal.)
The YouCopia Coffee Stack Organizer was a revelation. My friend has a Keurig and this allowed us to store all her pods in a small, organized space. She buys them in ten-pod packages and each of the four levels of the organizer holds ten pods.
I used the Linus Sugar and Tea Packet Holder to hold her favorite tea bags (the rest are stored higher, in another cupboard; see the picture below) along with some individual packets of Sugar in the Raw. Everything else just fell into place.
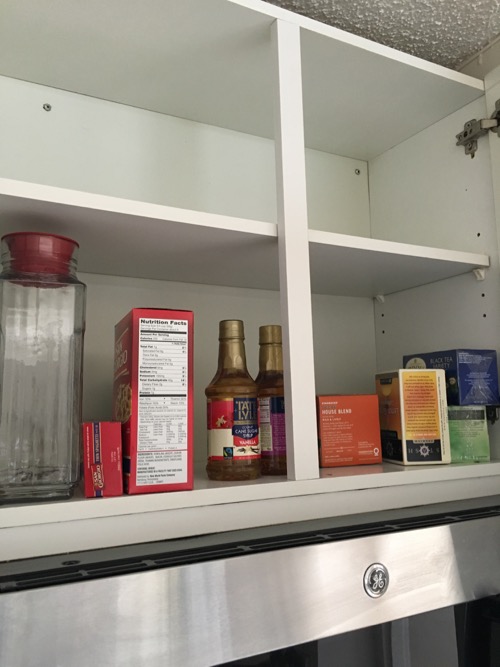
Over the microwave, my friend had a bunch of boxes of tea, along with some pasta and some flavored syrup.
Here’s the before picture:
And here’s how it looked after adding just a couple of containers.
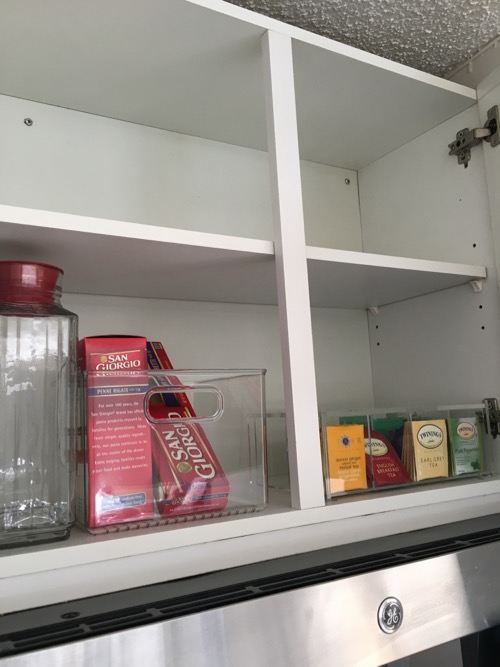
The 8-Compartment Acrylic Tea Box helped coral all those messy boxes. It fit in the space beautifully and held all her tea bags. Heaven.
I used the eight-inch square Linus Pantry Binz to hold her pasta. And I moved the syrups to the skinny cupboard.
I also worked in her bathroom and bedroom closets, which I can save for another post. (I have to get outside and enjoy New York!) It feels so great to be able to help my friend make her apartment so functional!
My strategies for packing light
I’m in the middle of a fun ten-day trip. It’s bookended by a professional conference at the beginning, a wedding at the end and five days in New York City in the middle. I flew to Pittsburgh, took a train to New York, and will drive from there to Central Pennsylvania (for the wedding) and back before flying home from New York to St. Louis.
That’s a lot of back and forth and I didn’t want to be weighed down by luggage, particularly in the train portion of the trip (you could not check bags on the train I was on).I wanted to pack everything into a carry-on sized suitcase.
Packing light can be a bit of challenge when you need to dress nicely for a decent chunk of the trip. I’m proud say I’ve done it without a whole lot of effort. These are my strategies:
- I planned everything I would wear each day. No extra just-in-case clothing.
- I decided to wear the same thing every day while I’m in New York (more on that below).
- I used packing cubes to pack more into the confines of the suitcase.
- I can do a load of laundry midway through the trip.
My friend, Dacy Gillespie of mindful closet shared with me that she’d taken a long weekend trip without taking a single change of clothes. I was really inspired by that—I love the idea of not having to think about what I will wear! So I selected a pair of leggings (actually, I packed two pairs: one shorter and one longer) and a lightweight tunic from Athleta as my NYC uniform. I have a poncho if it’s cold and a scarf if I want to snazz it up. I have booties if I want to dress it up and sneakers if I want to be completely comfy and dress it down. I also have flats.
I so enjoy not having to think about what I’m going to wear! It’s absolutely liberating. It’s helpful that I feel great in this outfit and that it’s really comfortable.
As for the dressier clothes, I have two choices of clothes to wear at the wedding, both of which I wore at the conference.
For me, it’s all about making the decisions while I’m packing, rather than while I’m dressing. I know that overpacking just leads to stress for me. I love being really mobile with my suitcase. And I love not having to think much about what I’m going to wear because the choices are limited. (This is one reason I like Project 333 so much.)
I wonder if I’ll ever use a large suitcase again!
Special help for procrastinators
Do you procrastinate on certain tasks? I used to be a dyed-in-the-wool procrastinator. When I was a freelance writer, I waited until the last minute to work on my magazine articles. Heck, I didn’t even start writing my very first book (in 1999) until the day after Thanksgiving and it was due on January 2! Take it from me, that’s nothing to be proud of.
Now, as an organizer, I’m less of a procrastinator, thank goodness. But there are still tasks I put off. Mostly business-related tasks that don’t have an immediate payoff, but are potentially important, like social-media management.
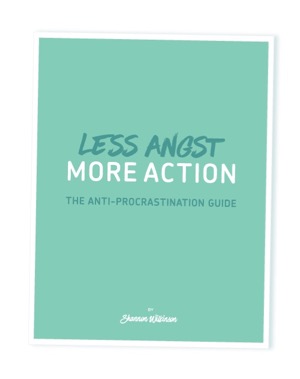
My friend, the life coach Shannon Wilkinson does an amazing job of helping folks with all sorts of things, including procrastination. She has just launched her new website and has offered a gift to all who visit it.
Shannon’s Less Angst More Action: The Anti-Procrastination Guide download is magical. She has you take a six-question quiz that identifies the source of your procrastination. (The choices are confidence, reward, enjoyment and distractibility.) Once that’s identified, she gives you a six-page guide and worksheet to overcome that particular type of procrastination.
I took the quiz and it turns out that my procrastination type is enjoyment. I have a hard time getting started on things I don’t like doing. (That seems perfectly natural to me.) This past weekend, I used Shannon’s worksheet to get in touch with the benefit of doing the task (in this case, social-media management) and the barrier vanished. It was unbelievable. I broke the task into ten-minute blocks and completed six blocks that day and another block the next day. And get this: it was enjoyable!
I haven’t read the other guides yet, but I encourage you to check it out. You may find yourself, like me, doing important things you’ve been putting off forever.
Worth repeating: Working with an organizing team
I started leading organizing teams in 2008, but it was a relatively rare occurrence. By 2013, I’d renamed my team organizing service OPERATION: PEACE OF MIND and more than half my client appointments were teams. Now, I work almost exclusively by leading organizing teams. (And occasionally I send out teams that are led by experienced team members.) I find that the synergy of the team makes a team organizing session more than the sum of its parts. For those clients who can handle the fast pace, team organizing allows for swift and dramatic change. It’s rewarding for the client and for the organizers. I love it!
I originally wrote the post below five years ago and it’s more true now than ever.
When I started my organizing business in 2005, I exclusively worked one-on-one with clients. It’s intimate, fulfilling, valuable work. But it can be really slow. And that means progress is harder to see and it can become discouraging for the client.
A few years ago, I started to be approached by clients who had very large, whole-house decluttering jobs. I realized that bringing in more help was in order. And so every now and then I would put together an organizing team to effect quick change on giant projects.
In the last year or so I realized that it wasn’t just huge or overwhelming projects that could benefit from a team approach. As the long as the client can handle the hubbub and the faster pace of a team, there are many benefits, not the least of which is the visible results we see after a single session.
I don’t have employees. When I put together an organizing team, I use independent contractors, members of the St. Louis chapter of the National Association of Professional Organizers. I call on organizers I know personally, thanks to NAPO St. Louis. I’m always on site supervising them and coordinating the efforts. I’m also typically the one working with the clients to guide decisions.
Here are some of the advantages I have found to team organizing:
- We get a whole lot done. If I’m working one-on-one with a client, I not only guide the decisions, but implement them. When I’m working with a team, there’s someone to do the leg work and everything happens a whole lot faster. Also, the team members pre-sort items for the client before the keep/donate/toss decisions are made (in a decluttering situation), which makes the decision-making much easier. As a result, the client sees visible progress, which isn’t always the case after a one-on-one session.
- It’s economical. I charge less for the time of organizing team members than I charge for my own time. So bringing in a team is not only faster than working with me one-on-one, it’s less expensive.
- More minds are better than one. I populate my teams with smart and talented organizers. I’d be crazy not to tap into their considerable skills and knowledge on the job. While I’m working with the client, I frequently consult team members on the best way to approach or organize a space. So the client benefits from the cumulative knowledge of the group.
- It’s fun! All the organizers I use love working on teams. Doing work we love (sorting and organizing) alongside our colleagues practically makes us giddy. And that’s contagious. While it’s tiring for the client to make a lot of decisions in a short period of time, most confess to having fun while doing it during our team jobs. Time flies.
Here’s a before and after combo from a team job at the end of 2010. Two of the organizing team members worked in this kitchen while the client worked with me and other team members in another part of the house. The client gave basic parameters and was brought in to answer questions periodically. She was thrilled at the end of the day.
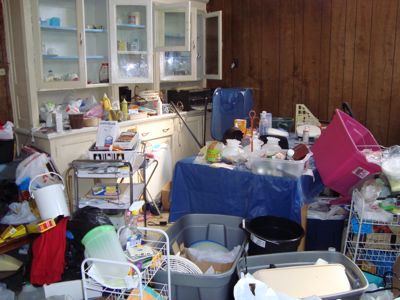
A cluttered kitchen before a team arrived to help.
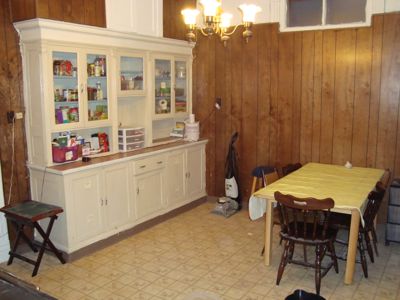
Two organizers created this transformation as part of a team project.
This year, my goal is to help more clients this way. I’m hooked on the fun of the team approach and the quick results. If you have a big project that seems overwhelming, maybe I could bring in an organizing team to help you. Take a look at my Team Organizing page to read a few more details. Then feel free to give me a call or shoot me an email to discuss how a team might help you!
Bix's favorite thing: BarkBox
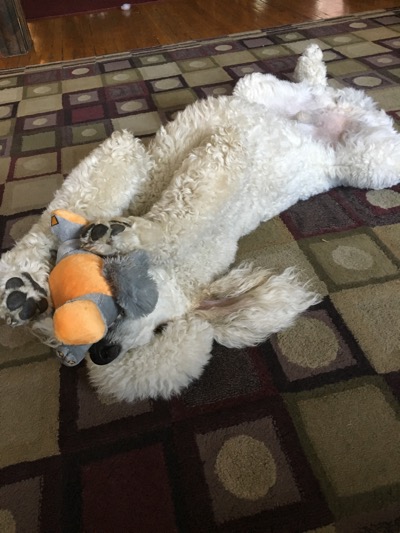
My standard poodle, Bix, who is 18 months old, is a big-time player. He loves his toys with a fiery passion. Every night he instigates a game of fetch in the house and throughout the day he plays with his toys on his own. His very favorite fetch toy is an unassuming plush peanut.
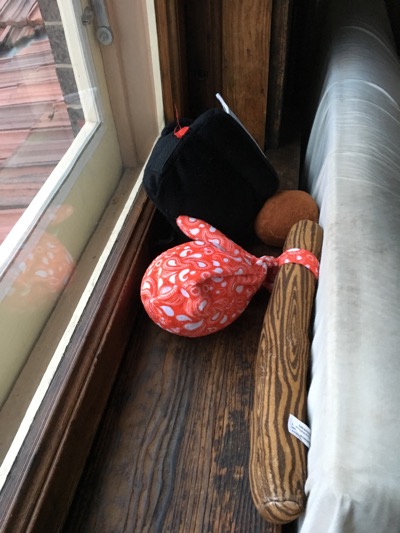
Here he is with his peanut. (You can see the peanut shell in a shot further down.)

I tend to be sort of minimalist in my life, but I have a confession. Bix has an abundant collection of amazing toys. (Some might call it overabundant.) And he gets more every month. But here’s the thing: he plays with almost all of them. We keep the toys in a laundry basket from IKEA and he frequently digs around in it looking for a specific toy. So it’s hard to declutter them (though I think I could probably safely remove a few).
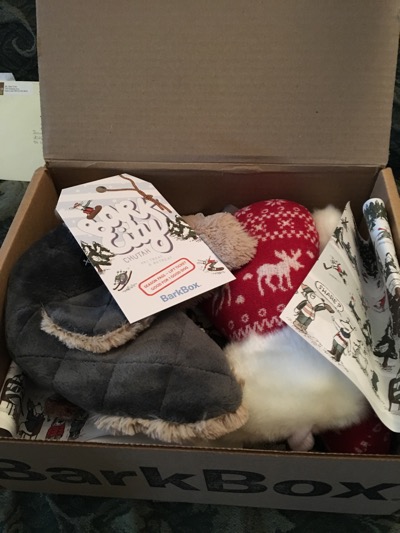
Why does he have so many? Because of BarkBox. It’s a subscription service for dogs that delivers a themed box of toys, treats and chews every month. The themes are so darned clever. They make the humans smile. And they make the poodle ecstatic.
This was the December BarkBox, which had a winter theme.
Bix seems to recognize the BarkBox box (or, more likely, he recognizes our reaction to the BarkBox box) and he sits down politely and waits for us to open it. Then he goes nuts playing with his new toys. It’s truly a joyous thing.
Here he is on BarkBox day with his new zombie cat. I think that was October.
One of the things I love about BarkBox is that almost all of the toys are made for them and therefore unique. And they are are so clever and cute (and funny!). They’re pretty durable. Bix enjoys de-squeakering toys and pulling out the stuffing (thankfully, he doesn’t eat the squeakers or the stuffing) and then he enjoys playing with the toy carcass. We have thrown away very few toys.
Here’s Bix surrounded by the toys he selected to play with that day.
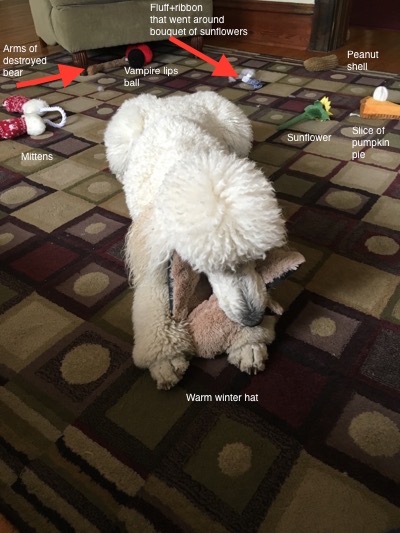
Bix likes to take favorite toys to the windowsill where he watches the world from the back of the couch. Here are his rucksack and his Polaroid camera, from the travel-themed BarkBox, and (of course!) his peanut.
When you subscribe to Barkbox for at least three months, you can get a free extra month by using my subscription link. (And Bix gets a free month too!) I found that after my three-month subscription was up I could go month to month. You tell them the size of dog you have and whether there are any food allergies (for the treats). Bix has been a subscriber since he was eight weeks old, so he went from Medium (“Just Right” to a Large (“Big & Bold”) as he grew up. He’s now 60 pounds.
The declutterer in my wants to stop Bix’s subscription. But the dog mom in me doesn’t. It brings such joy to Bix. And the toys don’t take up that much room, right?
Again, if you have a dog and want to give it a try, you can use this link and you’ll get an extra month added to your subscription. And Bix will too!
About Janine

Hello! I’m Janine Adams — a certified professional organizer based in St. Louis, and the creator of Peace of Mind Organizing®.
I love order, harmony + beauty, but I believe that the way that you feel about yourself and your home is what truly matters.
If you’re ready to declutter with a purpose and add more ease to your life, you’ve found the right blog — and you’ve found the right company.
read more »Links
- Getting to Good Enough podcast
- Are you interested in becoming a professional organizer?
- Ravelry
- National Association of Productivity and Organizing Professionals
- Shannon Wilkinson, life coach
- Organize Your Family History
- NAPO St. Louis
- Peace of Mind Spending
- Institute for Challenging Disorganization