App of the Week: The iPhone's camera
So I don’t know that this qualifies as an app, but it certainly is a feature of my iPhone that I use frequently!
![]()
Have you noticed that there are a lot more photos on my blog in the last couple of months? That’s because the camera in my iPhone makes it so easy to take pictures and get them on my blog. In the past, I’d have to find my camera, take the picture, then plug my camera into my computer, import the photo into iPhoto and go from there.
Now, I just take a picture with my phone (which is pretty much always with me) and it automatically is added to my computer, in the Photostream in iPhoto, thanks to iCloud. It’s kinda like magic.
I use my camera on a daily basis. Besides taking pictures for my blog, I use it for lots of other purposes. For example, the other day I left hand-written homework for a client, so I just shot a photo of the piece of paper so I wouldn’t have to make a copy for myself. When I sprained my ankle last month, my whole foot gradually turned purple. I documented that with my phone’s camera and when I saw the doctor for a follow-up, two weeks after the fall when my foot was looking better, I was able to show her the extent of the injury.
The functionality of the camera allows me to use all sorts of apps, like bar code readers to find better deals on items I’m looking at in the store, or QR code readers to take me to websites without having to type the URL. If I wanted to, I could take photos of receipts and send them to a service like Shoeboxed who will put them into a spreadsheet for me.
Not only is the camera handy and easy to use, it’s actually a great little camera. With 8 megapixels, it takes great pictures and it even has a flash. I can edit photos in the camera (cropping, red-eye removal). And I can easily email, text or tweet the photo right from the camera app. And, of course, it takes video as well as still photos.
The camera in my iPhone 4S is yet another in a long list of reasons I absolutely love my iPhone.
How I use Rubbermaid's Bento boxes
Rubbermaid has created a new kind of storage bin, the Bento Box. Named after the divided Japanese lunch boxes, these storage containers have flexible dividers that fold flat against the interior wall of the box, if desired, or pop out to divide the box.
The boxes are covered in cloth over some sort of very sturdy paperboard. They have a nice, substantial feel. They also have these terrific lids that can act as a tray.
Here’s a photo, from Rubbermaid’s website

When I first saw Bento (they previewed it at the 2011 NAPO conference), I went ga-ga. I was thrilled when I was sent a sample set. (I love having a special relationship with Rubbermaid!)
I wanted to share a couple of the ways I use my Bento boxes.
It took me a little while to decide how to use the extra large Bento box (it’s about 19” x 12”). But when I figured it out, I was thrilled:
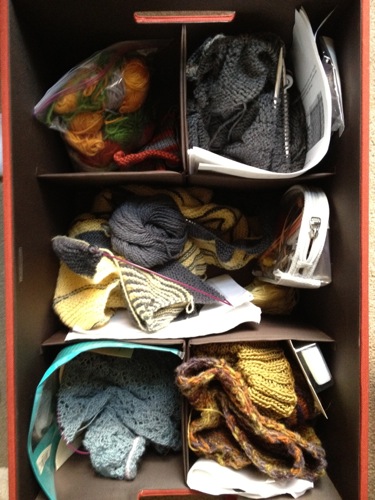
Room for five projects!
I use this box to store my knitting works-in-progress. I used to have a messy pile of bags containing various projects sitting on the floor next to my spot on the couch. I replaced that with this attractive bin. When the lid is on, I use it as an easy-to-reach-for tray for my current project. If company’s coming, I can tuck it right back inside.
I love this.
I use the small bento box (about 5” x 5”) to hold my remote controls for the TV. It’s easy to stick them in and take them out and my days of searching for the remote are (for the most part) over.
Check it out:
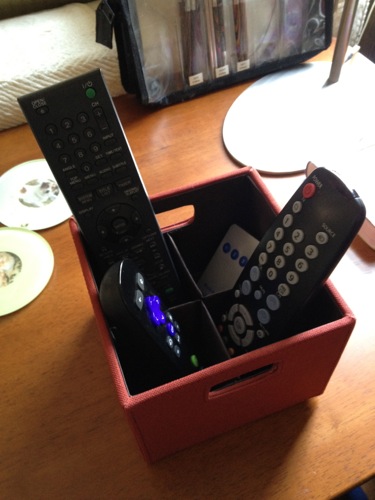
Keeps my remotes handy.
I really think the Rubbermaid product developers outdid themselves when they developed this attractive and flexible set of containers! If you’re interested, you can order Bento from Rubbermaid’s website. It’s also available at Target stores.
Meet my office assistants
I’m a solo entrepreneur with no employees (though occasionally I work with great subcontractors when I lead team projects), but I don’t work alone. Every day, my home office is also occupied by my standard poodle, Kirby and orange tabby cat, Joe.
I took pictures of Joe and Kirby just a few minutes ago. Here’s Kirby, curled up in his chair in my office, doing what he does best: sleeping. He’s not all that helpful, generally speaking (except for his company, of course), but he’s easy to be around.
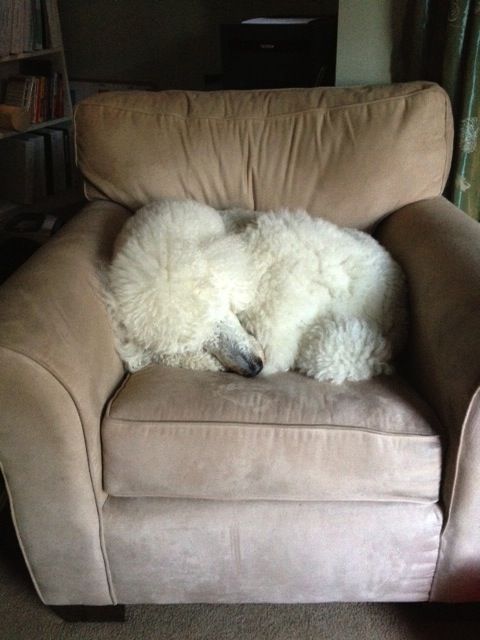
Kirb's a very easy office mate.
And here’s Joe, doing what he does best: taking up space on my desk and getting in my face. You’ll notice he’s right where my keyboard should be…I had to move it to my lap because my unhelpful cat was lying on it. Joe (who, incidentally, drank out of the glass of water—intended for me—that’s behind him in the picture) is a regular impediment to my productivity but he’s also a great (and frequent) reminder of the need to take breaks and take time to accept a little loving.
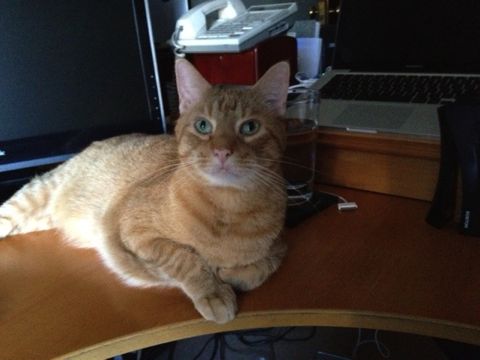
Joe's actually not very helpful.
I thought you might want a little peek at the furry folks who alternate between annoying me and keeping me sane as I work on my business.
Bingo update
Last year, I created a bingo board that turned out to be a powerful motivator for me to accomplish tasks that are important to do regularly, but aren’t urgent (so weren’t getting done regularly). For me, that’s stuff like social media posts, blogging, following up with clients, past and present, tending to my website, stuff like that. You might have an entirely different set of tasks you want to accomplish regularly.
The reason that my bingo board works for well for me is that if I get close to getting a bingo, I’m completely motivated to do the extra task or two to get me there. So I tend to mark my bingo board as the day’s end nears and usually spend a few minutes doing that extra thing or two. It works great for me!
In fact, I was so enamored of the notion that I created an Organizing Guide, called Making tasks fun with to-do list Bingo on how to create your own. I’ve also blogged the heck out of the topic..
Since it’s been about ten months since I first created it, and four months since I last wrote about it, I just wanted to report back about how it’s still working for me and tell you about a little improvement that I made the other day.
I’ve found that my bingo board is most effective when I have full days at my desk. When I’m sandwiching desk time between client appointments, I find that only urgent stuff gets my done. But when I have lots of time, I tend to flounder a bit and even though I have plenty of time to work on stuff, not so much gets done. The bingo board reminds me of these important tasks and gives me a little bit of structure. And it’s fun!
This week, I’ve set a goal of getting a bingo every day (Monday through Friday). I started off by getting a triple bingo yesterday! And after I finish this blog post, I’ll have today’s bingo!
I love the way I set my bingo board up, with pretty squares attached by magnets on a square magnetic board. But there was little irritation: I was using small Post-It® notes to cover the tasks I’d finished and they kept falling off. And littering the area when I tried to reuse them. Plus, I ran out of the pretty pale pink ones I started with and kept forgetting to buy more. So I was using the standard yellow ones and, to my eye, they clashed.
I improved that situation last week when I was participating in a Secret Play Date from Kindergarten Mind. During a Play Date, you’re encouraged to do something creative while simultaneously working (internally) on something else.
I got out my 2011 Wall Art Calendar from Paper Source. This beautiful calendar is meant to be cut up (there are even templates on the back of each calendar page for that purpose). I found a page with a sewing theme and cut out the drawings of buttons on the page. I used glue dots to adhere the buttons to magnets. And now I have lovely magnets to cover the tasks I’ve accomplished!
Here’s a photo I took to share with my fellow play daters:
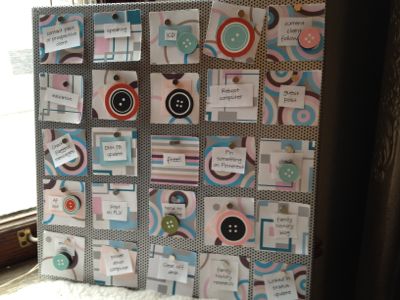
My button magnets make me happy.
Storing cards to send later
If you’re like me and like to pick up greeting cards when they’re on sale or when you find one you really like (or, if you like to reuse cards like I do), sometimes storing them can get tricky.
I’m usually looking for a card in a hurry, like when I’m heading out the door to meet a friend and realize her birthday is coming up. Some years back, I started storing my cards by category using a desktop file box. Now it’s really easy to find what I want in a hurry. I’ve suggested this to several clients, who found it to be an easy-to-maintain system as well.

That's our tile porch roof in the background.
Here’s what you do:
- Take a container, either a shallow desktop file box like mine or a plastic (or even cardboard) shoe box. Or use any container that fits cards well.
- Sort your cards into whatever categories work for you.
- Create labels, either using a label maker, printing Avery address labels (which is what I did), or hand writing a label right on the file tab.
- Cut manila file folders so they’re about the width of a card, using the section of the folder surrounding the 1/3-cut tab. Cut the folder at the bottom as well, so that your file folder divider is just a single thickness.
- Simply rest the cards upright in the file box, using the modified file folders as dividers to separate the categories.
The great thing about this is that the cards become very easy to flip through. At one point in my life, a couple of decades ago, I tried using an accordion file. But that took many more steps to access. This has been terrific. Happy card giving!
App of the week: Milebug
I blogged about the mileage-tracking app Milebug last year, after I realized how much time it was saving me on my taxes. Back then, I was using it on my iPod Touch.
Now, I have my beloved iPhone. And since I’ve decided to do an App of the Week post every Friday, I thought it would be worthwhile to talk about it again.
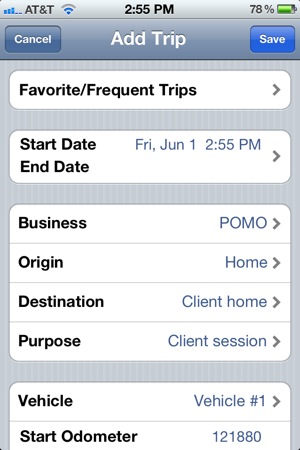
Milebug makes it very easy for me to track my mileage. As a business owner who travels to client sites, I’m eligible to deduct my mileage—to the tune of 55 cents a mile; definitely worth the effort. Milebug makes the process easy: as I pull out of the garage, I pull my iPhone out of my purse and touch the Milebug icon. I simply record my destination and purpose (I can do that with one touch for my most frequent trip, pictured at right, from to a client’s home for the purpose of a client appointment). I also record the odometer reading. On a typical day, I might have an open trip—yesterday’s client visit, for example. When that happens, I record the closing mileage, which automatically becomes the beginning mileage if I add a new trip. Easy peasy.
Before Milebug, I did this with a pen in a little notebook I kept in my car visor. That was almost as easy. But Milebug has a distinct advantage: I just email a spreadsheet of the trips to myself. It even calculates the mileage deduction, since it knows the federal rates (and as long as I keep it updated, it knows if the federal mileage rate changes mid-year). Back when I did this by hand, I would spend a very tedious hour, sometimes longer, calculating the mileage.
Some entrepreneurs I know use Google Maps to calculate their mileage after the fact. Talk about tedious. Milebug is infinitely more convenient, if you ask me.
It all boils down to creating the habit of entering the mileage, something that’s now almost automatic for me after doing it for so long. If you can find something you always do in your car that you can anchor it to (for me, it’s waiting for the garage door to go down; for you it might be fastening your seatbelt or putting on your sunglasses), it makes it an easy habit to form.
I love my iPhone 4S so much I’m rarely without it. (I actually sleep with it under my pillow.) That makes it the perfect place to record my mileage. And Milebug makes that easy.
Travel jewelry case giveaway winner!
Thank you to everyone who entered to win the Travel Jewelry Case from Clos-Ette Too. To select the winner from among the entries, I entered the names in a spreadsheet, assigned a number to each and used the Random Number Generator to come up with the number that corresponds to the winning entry.
The winner is Deborah Underwood, who lives in San Francisco, and, like me, grew up in Walla Walla, Washington. (Deborah is a really talented and successful children’s author…you should check out her website.) I’m very excited for her to receive the travel jewelry case. I hope she likes hers as much as I like mine!
I’ll be doing more giveaways throughout the year, so if you entered and didn’t win, please keep an eye out for the next one!
About Janine

Hello! I’m Janine Adams — a certified professional organizer based in St. Louis, and the creator of Peace of Mind Organizing®.
I love order, harmony + beauty, but I believe that the way that you feel about yourself and your home is what truly matters.
If you’re ready to declutter with a purpose and add more ease to your life, you’ve found the right blog — and you’ve found the right company.
read more »Links
- Ravelry
- Organize Your Family History
- Are you interested in becoming a professional organizer?
- Institute for Challenging Disorganization
- Shannon Wilkinson, life coach
- Getting to Good Enough podcast
- NAPO St. Louis
- Peace of Mind Spending
- National Association of Productivity and Organizing Professionals