A little goes a long way

I adore the Yoga With Adriene YouTube Channel and I’ve been trying to do yoga every day. (Here’s a blog post I wrote about why I love Yoga With Adriene.) But sometimes I have a hard time prioritizing it. I like to do yoga in the morning but when I have to be out of the house early I can have trouble making the time. On those days, I’ll do Adriene’s Five Minute Morning Yoga. Is it better than a longer practice? No. But it’s certainly better than no practice. And it really is a great way to start the day.
Adriene is fond of saying “A little goes a long way” when it comes to yoga. I got to thinking that that’s also true of decluttering and organizing. A lot of people (me included) tend to let clutter build up before they address it. Or they think they need a big chunk of time to do any organizing. But in fact, if you snatch five (or 15 or 30) minutes and focus on letting go of a few things or simply putting stuff away, you can create some order. Add those little sessions up and you can make true headway.
Next time you think, “I’ve got to get organized!” take a little action. Set your timer for five or ten minutes and remind yourself that a little goes a long way. I promise if you do that on a regular basis, you’ll feel more peace of mind.
Are your affairs in order?
I published this article in my newsletter this month and, based on the feedback I received, it struck a chord. It’s an important message, so I thought I’d share it here.
Last fall, my aunt asked me to be her Power of Attorney for finances and health. She was 92 and had been told by her doctor that she had dementia. I was already my father’s Power of Attorney so I agreed to do it. I’m glad I did, though I didn’t actually realize how much work it would be.
This year, it became apparent that she needed to move to memory care and it fell on me as her Power of Attorney to find a place for her to move, convince her to move, arrange her move and get her house on the market. I continue to handle her daily finances. And she lives a couple of thousand miles away in Walla Walla, Washington. Luckily I have the skill set to do this fairly easily and I’m very glad to be of assistance.
But I started to think: What if she hadn’t made those arrangements? If we hadn’t signed papers last fall while she still had her faculties, everything would have been much more difficult today. Since moving in February, she had a stroke and has had to move into a skilled nursing facility.
You just don’t know what the future is going to hold for your health or the health of those you love. If you don’t have a will and a health directive, please get them. If you you haven’t designated a Power of Attorney for finances and/or health care, please do it now. And, finally, if you have an elderly relative who doesn’t have a Power of Attorney, please encourage them to assign one. I promise that at some point you will be glad you did.
Worth repeating: Letting go of sentimental items

When I re-ran my No Excuses series last week, I had a comment about the difficulty of letting go of sentimental items. I thought I’d repeat a blog post from April 19, 2021 (almost exactly a year ago!) that addresses this challenge.
During last week’s Declutter Happy Hour class, we discussed the challenge of decluttering sentimental items. They can be so hard to let go of, even when you’re motivated to downsize.
The piece of advice I always share about sentimental stuff is that the more you keep of it, the less special any of it is. For example, instead of keeping all your kids’ art projects, which can be hard to store in a way that allows you to enjoy them, keep just the meaningful ones. Another example: Instead of hanging onto your grandmother’s collection of a dozen tea cups, keep one or two and display them. Then release the rest to cousins who might appreciate them or tea cup collectors who might buy them on eBay or in a resale shop.
I also always urge clients to think what will happen to these sentimental items after they pass away. The best way to see that they’re respected and appreciated is to disperse them while you’re still able. That will not only help you downsize, it will make it easier for the person who is responsible for going through all your stuff after you pass.
Getting in touch with why you’re decluttering can help in these difficult decisions. Remember, it’s not an all-or-nothing proposition. You can choose just to keep one or two items that represent a particular person or time in your life and let go of the rest.
Photo by Lydia Matzal on Unsplash
No Excuses series (part 3): "But it was a gift"
This is the third in a three-part series of posts debunking the three excuses I hear most frequently from clients for wanting to keep items they no longer use or love. The series originally ran in January and February 2017 and I decided it was worth running again. Click here to see the other articles in the series.
The third common excuse I hear for keeping an unloved or unused item is that it was a gift. This is a tough one. People tend to have a difficult time parting with items that were given to them. (As an aside, this has completely changed how I give gifts, knowing that my gift may some day become clutter for the recipient.)
What do I say to clients who tell me they can’t let go of something because it was a gift? The first question I ask is:
- Do you think the gift giver would really want you to keep something you don’t use, just because they gave it to you? If they knew you were investing time and money in paring down your belongings and getting organized, would they care if you let it go?
Usually that’s enough to help the client release it. If that doesn’t do the trick, I might ask:
- Is there another family member you can pass this on to who would love it?
That can be very helpful, especially when the gift giver has passed away. (I’m the thrilled recipient of some paintings that my grandmother created, given to me by her nieces when they were decluttering.)
Really, what I find is that the client just needs permission to let gifts go. So let me do that for you right now: You are not obligated to keep an item you don’t use or love just because it was a gift. I give you permission to re-gift it or donate it. Don’t stash it in a closet. And try not to worry that the giver will ever ask about it. Chances are they won’t.
No Excuses series (part 2): "But I paid a lot for it"
This is the second in a three-part series of posts debunking the three excuses I hear most frequently from clients for wanting to keep items they no longer use or love. The series originally ran in January and February 2017 and I decided it was worth running again. Click here to see the other articles in the series. Stay tuned for part 3 next week.
The second most common excuse I hear from clients who want to keep something they don’t use of love is that they paid a lot for that item. I get it. It feels terrible to let go of an expensive item that turned out to be a foolhardy purchase. But you know what? Keeping it doesn’t make you feel any better. In fact, when you see the item, it just makes you feel worse.
There are two important things to remember when you’re tempted to keep an item you don’t use or love just because you paid a lot for it:
- The money is spent. Keeping it won’t bring it back. Selling it will get you some of the money. And donating might get you a tax deduction. Keeping it doesn’t help.
- There’s a cost associated with keeping items that you don’t use or love, especially if clutter is an issue in your life. There’s an emotional cost (that reminder of your bad purchasing decision); there can be a physical cost if the item contributes to clutter that poses a tripping hazard or you’re unable to clean because there’s so much clutter; and there can be a financial cost if there’s so much clutter that you have to rent a storage unit or you can’t make repairs or do maintenance in your home.
For those expensive items you don’t use or love, I suggest pulling off the Band-aid. Take a deep breath and decide to let it go. If it’s easy to sell it, do so. Otherwise, donate it or make yourself feel better by giving it to someone you love. I’m pretty sure it will be a relief to get that thing out of your home!
No Excuses series (part 1): "But I might need it some day"
This is the first in a three-part series of posts debunking the three excuses I hear most frequently from clients for wanting to keep items they no longer use or love. The series originally ran in January and February 2017 and I decided it was worth running again. Stay tuned for parts 2 & 3 in the coming days.
When I work with clients on decluttering, we discuss their goals and motivations for letting go of excess. They understand that it makes most sense to hang on to meaningful items, not those that are sitting idle. Yet it’s not unusual for a client to want to keep an unused item that’s perfectly good because “I might need it some day.”
I usually push back, particularly if we’re dealing with severe space constraints and the need to let go of a lot of stuff.
Here’s what I say to those clients when I hear, “But I might need it some day.”:
- How likely is it that you’ll need it?
- If you decide to let it go and you do find you need it, are you able to get another one?
- If you keep it, will you be able to find it when you need it?
That last question is important, because if a client is keeping a lot of those “some day” items it may be difficult to organize the stuff they keep in a way that will allow them to find everything.
Here’s the thing about perfectly good items that aren’t being used. If they’re perfectly good, somebody else can use them. Rather than having them sit idle, taking up space, it’s better to contribute to the greater good by donating them and letting them be used. If you hang on to them until a future decluttering session and then decide to let them go, they may be less valuable or useful to others.
Basically it comes down to a couple of things:
- Your goals for decluttering and getting organized. If you’re trying to create space in your home and life so that you can find what you want when you want it and live with ease (my definition of organized), then storing a lot of unused stuff might well get in the way of that.
- A fear of regret. I think a lot of us live in fear of regretting our decisions. If you do find that you let go of an item that at a future date you could have used, you may feel a twinge of regret. But you’ll get past it. Crowding your space with unneeded items is a pretty high price to pay to ward off future regret, in my opinion.
I have seen over and over how living with less makes one’s life easier. A great first step toward living with less is letting go of the perfectly good stuff you don’t use.
Stay tuned for parts 2 and 3 of the No Excuses series: “I paid a lot for it” and “It was a gift.”
St. Louisans: Find out how to dispose of stuff with RecycleWizard.com
Last week our NAPO chapter heard a program from the St. Louis County Department of Public Health about how to safely get rid of unwanted items. They introduced us to a new online tool called the Recycle Wizard. You just type in the name of a waste item and the wizard will tell you how to recycle or dispose of it.
Here’s an example for the results when I searched on Battery (Disposable):
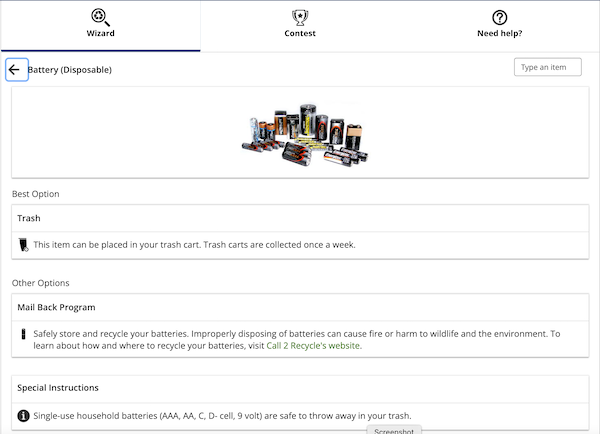
While this is specific to the St. Louis area, I think the Recycle Wizard might be useful to people in other parts of the country who can use it to see what our community recommends in terms of whether something is safe to put in the trash or can be recycled. It’s a welcome resource!
During the program, we also learned about the Household Hazard Waste (HHW) collection sites in St. Louis County, which can be used by residents of the St. Louis County, St. Louis City and Jefferson County. Residents can drop off their HHW in the drive-thru sites during open hours (reservations are encouraged) and are limited to one drop off per day. (But there’s no limit to the number of times per year they can use the facility.) The first $50 of the disposal charge is free each trip; after that it’s $1.70 per pound. The exception is latex paint, for which there is a charge of 50 cents per pound, with no subsidy. (It’s shipped to a facility that recycles it into paint!)
The presenter on HHW, Sarah Staebell, encouraged us to try to avoid having to dispose of household hazard waste. Her suggestion was to buy only what you need, share leftovers with others and only then take the waste to a disposal site.
About Janine

Hello! I’m Janine Adams — a certified professional organizer based in St. Louis, and the creator of Peace of Mind Organizing®.
I love order, harmony + beauty, but I believe that the way that you feel about yourself and your home is what truly matters.
If you’re ready to declutter with a purpose and add more ease to your life, you’ve found the right blog — and you’ve found the right company.
read more »Links
- Getting to Good Enough podcast
- Ravelry
- National Association of Productivity and Organizing Professionals
- Are you interested in becoming a professional organizer?
- Peace of Mind Spending
- Shannon Wilkinson, life coach
- Organize Your Family History
- NAPO St. Louis
- Institute for Challenging Disorganization