Worth repeating: Getting past "I might need it some day"
I wrote this post almost four years ago. “I might need it some day” remains one of the most often-heard reasons clients have for hanging on to items they no longer use or love. I thought it was time to repeat this message.
One of the most common reasons folks (including me) tend to hang to items that they use or love is that they feel they might need it at some point in the future and they fear regretting that they let it go. If you live in a home with plenty of storage space and you’re organized enough that you can find the item when you need it, then this might be no big deal.
But if your home is crowded with “I might need it some day” items, or you don’t have any systems in place to allow you to store the items where you can find them again, you might want to consider asking yourself these questions to get past that barrier:
- What are the chances I’ll need it?
- Will this item likely be the best choice at that time (considering that clothing goes out of fashion, technology becomes obsolete, books go out of date)?
- Would I be able to buy a new one if I did end up needing it?
- What’s the worst that could happen if I did find I needed an item that I had I let go?
- What’s more expensive: replacing the item down the road or hanging on to it indefinitely?
That last point is particularly potent when you pause to consider the cost of keeping stuff you don’t need or love. When your home is crowded with unloved or unused items, it often makes it harder to find the stuff you do love and use. There’s a physical and emotional cost of keeping unwanted items “just in case.”
Sure you might need that item in the future, but if what you need now is more space and order, then perhaps letting it go is the most beneficial course of action. I’ve been a professional organizer for 13 years now and I’m constantly reminded that our lives become so much easier when we let go of excess.
My experience with COVID
On January 12, 2022, I tested positive for COVID. I believe I picked it up eating in a restaurant.
Based on symptoms, I think I had the Omicron variant. Thanks to having been vaccinated and boosted, the symptoms were quite mild. I felt like I had a cold for about five days and one of the days I felt like I had a bad cold.
Because I know all the questions that have swirled through my head about COVID over the last almost two years, I thought I’d share my experience here in case it answered any questions you have.
The day I believe I became infected was Saturday, January 8. Here’s the timeline:
- Saturday, January 8: Exposure
- Monday, January 10: Very slight symptoms (mild shortness of breath), later in the day
- Tuesday, January 11: More obvious symptoms (stuffy nose, scratchy throat, shortness of breath going up and down stairs). I went to a testing site and got a rapid test. The result was negative. At this point my doctor friend told me to get another test the next day because I probably tested too soon, with the optimal time between 48 hours after symptom onset. (He also said that in January 2022 any signs of a cold are more likely to be COVID than anything else.)
- Wednesday, January 12: My symptoms were worse. I went back to the testing site and got another rapid test + a PCR test. The rapid test result was positive and I started isolating, based on recommendations from the Centers for Disease Control. My husband went with me and also took a rapid test and PCR test. The result of his rapid test was negative.
- Thursday, January 13: My worst day, symptoms-wise. My throat was sore and gravelly and I was quite tired. I even took a nap. After that I felt better each day.
- Monday, January 17: I ended strict isolation. I allowed myself to watch TV upstairs unmasked unless Barry came in the room. But I continued sleeping in the guest bed until Friday.
- Saturday, January 22: I resumed normal life. (The 2022 version of normal life.)
Interestingly enough, my husband’s PCR test was also negative and at least three subsequent rapid tests have been negative. I don’t know how that happened, but I’m grateful!
We live in a two-family house, so it was easy for me to isolate. We live on the second floor, but my office and the bathroom I use are on the first floor, so it was just a matter of moving into the first-floor guest room. Whenever I was upstairs, I wore an N95 mask. I prepared meals (or Barry prepared them for me) upstairs and brought them downstairs to eat.
Thanks to being vaccinated and boosted, my experience with COVID was more an inconvenience than anything. I was scheduled to fly to Walla Walla to see family and am so glad I was diagnosed before getting on a plane. I rescheduled the trip for two weeks later.
I didn’t expect the sense of relief I’d feel once I actually got COVID and didn’t get very sick. Of course I’ll continue to mask in public, but I am so grateful that chances are slim that I will get sick from (or pass on) COVID for the next several months. That gives me much more peace of mind in traveling to see my elderly father and aunt and my high-risk brother.
I hope reading this is a little helpful!
Worth repeating: Creating an anchor on your desk
I originally wrote this post several years ago. My little tray is still in use on my desk. The Container Store is no longer selling the little tray I bought, but you can buy a pair of ceramic trays for about $20 on Amazon. Or this little Muji tray, similar to what was recommended on Wirecutter, is available for only $2, with a $9 shipping charge.
On social media, I saw a link to a New York Times Wirecutter article called Tame Your Desk Clutter With This One Simple Trick. You can bet I clicked on it.
The article, which is definitely worth a read, suggests using small Muji plastic trays to place random small items in to corral them. (That’s the one simple trick.) To be sure, a desk surface can attract small items that can feel hard to keep in check.
In organizing, we call this anchoring. If you put a tray or basket under a more-or-less random pile of stuff, it feels orderly. Think salt-and-pepper shakers and other tabletop paraphernalia. They can feel scattered if unanchored but if a tray is placed underneath, it feels organized.
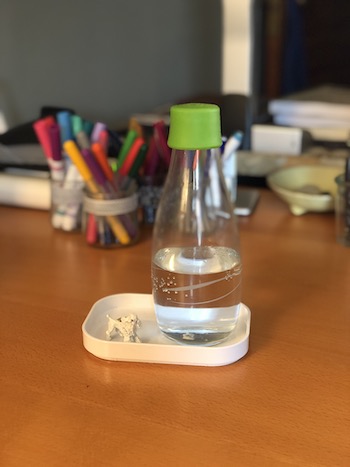
I found myself wanting to buy one of these little Japanese trays and give the concept a try on my desk, though I don’t have a whole lot of desk clutter (this week, anyway). When I was at the Container Store, I picked up a Compact Plastic Lid/Tray. It’s part of a set of containers, whose lids are sold separately, that come in four sizes. I bought the Extra Small size (5 5/8” × 3 7/8” × 3/4”) though I would have purchased the Small lid (7 3/4” × 5 5/8” × 7/8”) if they’d had any in stock.
I have two little items on my desk that make me smile (a metal poodle, which my husband gave me to represent Bix when getting Bix was my birthday present four years ago, and a little metal disk I found on the street that says “Hello Sunny”). They used to live on my monitor stand, but when I got a new monitor I emptied and moved the stand. So these items were floating free on my desktop. I put them in the little tray, along with my water bottle (also from the Container Store back in the day) and I have to admit the whole thing makes me happy! My water bottle feels less likely to be tipped over and less like clutter. And my little poodle stays visible.
What do you think of this concept? I’m not sure it’s life changing, but it was a fun experiment for me.
An easy fix for worn keyboards
I spend a lot of time typing over the course of a week. I have a MacBook Pro, but I use an external keyboard, mouse and monitor when I’m at my desk. My favorite keyboard is the Apple Magic Keyboard with Numeric Keypad. I’m not a numbers cruncher, but I do use my calculator enough that I prefer a 10-key number pad. I like that it connects wirelessly. I like that this keyboard has rechargeable batteries. I also like its low profile, the way it looks and the way it feels. The main thing I’m not crazy about is its price tag, $129.
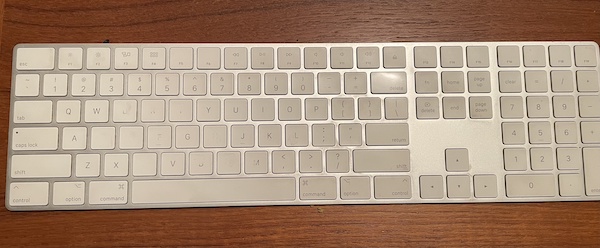
That’s why I was really disappointed when the numbers started wearing off the keys. As a touch typist, I don’t look at the keys that much but when I do look at them, I do need to be able to see them!
Here’s a photo the keyboard and its worn keys.
I didn’t want to shell out another $129 for a new keyboard when this one otherwise worked well. I tried replacing it with Wirecutter’s pick, the Logitech K380 bluetooth keyboard, which I bought on Amazon for $40. It was fine, but my hands felt cramped and it lacked the 10-key number pad. It also lacked a delete key and, for whatever reason, the keyboard shortcut I use on my laptop to delete letters to the right of the cursor, Fn-Backspace, did not work on this keyboard.
It got to be frustrating, so I started seeking other cost-effective solutions. When this happened on a different keyboard back in 2017, I made letter decals with my label maker to cover the missing letters. It didn’t look great and at first I didn’t care, but the edges ended up curling and it became unsatisfactory.
This time, I took a more professional approach. I googled around until I found this website, Keyshorts. It’s a company out of Poland that makes customized keyboard stickers and laptop skins. They offer some really beautiful decals that can transform a keyboard. But all I wanted for my keyboard was for it to look like it used to. They can do that too. Since the site had good reviews, I placed my order. The cost was $23.25, including shipping from Poland.
I was pleased to get a personalized response asking me for a photo of my keyboard to make sure they sent me the right decal set. It took a few weeks, but the decals arrived in perfect shape earlier this month.
It was very easy to adhere the decals to all the keys on my keyboard and I very quickly became used to the slightly different feel of the decal-covered keys.
Here’s what the keyboard looks like now.
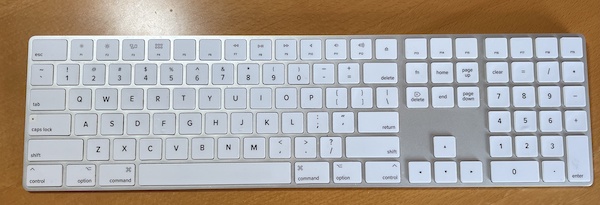
I am thrilled. For under $25 I have my beloved keyboard back! I give a big thumbs-up to Keyshorts.
P.S. I see that they also sell clear decals to protect keyboards. So if I ever get an expensive new keyboard, I may get a set!
Did you catch me on the radio?
I’m a podcaster and I enjoy being a guest on other people’s podcasts but being interviewed live on the radio recently was a thrill! (It was fun to enter a client’s home the other day and be called a radio star.)
On December 30, I was interviewed by Jennifer Blome and Wendy Wiese on The Jennifer and Wendy Show on KTRS-AM here in St. Louis. It was fun—we covered a lot of topics, including whether people are born organized (or disorganized), the difficulty of parting with sentimental items, my advice for decluttering and organizing, Marie Kondo, and the benefits of living with fewer clothes.
You can listen to it here now, if you’d like:
I was flattered to be asked and thoroughly enjoyed the experience!
What's your Word of the Year?
Each year since 2013 I have come up with a Word of the Year to guide my year. I keep a list of them in Evernote. Here’s the list:
2013: growth
2014: innovation
2015: recognition
2016: balance
2017: fearless
2018: connection
2019: expertise, processes, health
2020: intention
2021: ease
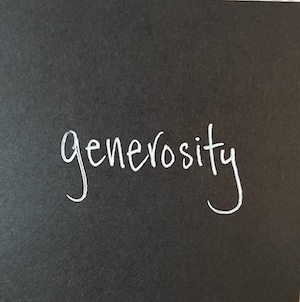
This year I added my tenth Word of the Year. It is generosity. I came up with it when I was behind the wheel of my car, cursing another driver for a minor infraction. I realized I would benefit (really, we all would benefit) from a more generous spirit toward others and myself.
That was in December and the word has come to mind many times since then. My hope that is in 2022 I will embody generosity in thoughts and actions.
Why do I take the time and effort to come with a Word of the Year? (It’s not usually as easy to come up with one as it was this year.) A Word of the Year serves as a filter through which I make decisions throughout the year. It helps keep me on track. It’s my North Star.
Most years, I try to come up with some sort of reminder of my word to keep it top of mind. Last year, I bought a necklace from My Intent that was a metal circle pendant with the word EASE stamped on it. This year I haven’t yet come up with a great reminder, but I am posting on my bulletin board the Post-It® note on which I wrote my word for the top of this blog post.
If you don’t yet have a Word of the Year, you might consider coming up with one. I urge you to stick to a single word. In 2019 when I had three words, the whole exercise really lost its power. I couldn’t remember them! If you’d like a little help in coming up with yours, check out Christine Kane’s Word-of-the-Year Discovery Tool. I’ve used it many times to come up with my word.
The Word of the Year can be a powerful tool and it is fun to look back and see what your focus was in years gone by!
Top nine blog posts of 2021

As the year wraps up, I thought I’d take a look back at my favorite posts of 2021. I narrowed it down nine that I thought were particularly helpful. I hope you find them useful (or at least interesting)!
In chronological order:
Challenge completed! 100 days of wearing the same dress. I literally wore the same wool-blend dress every day for 100 days and it was an awesome experience.
Styling your Zoom backdrop. When Zoom became a way of life, I knew that I had to up my game with my Zoom backdrop. So I called in the big gun, my friend Geralin Thomas to help me create a peaceful (and branded) Zoom backdrop.
Decluttering dog toys. My standard poodle, Bix, love his toys. And he had an overabundance of them (to say the least). I gave them the big declutter treatment.
10 things you can throw away right now. Lots of folks hang on to stuff they needn’t be afraid of tossing. This list can get you started throwing stuff away.
Go-bag to the rescue. My husband is having some health issues that have resulted in sudden hospitalizations. I created a hospital go-bag to grab when necessary and it proved to be a great help.
Meet my employees. In 2021 I added a second employee to my team and I (finally) put a page about them on my website. They’re great people and great organizers!
Buying and selling a car in this crazy market. When I decided to take a high offer for my van, I had to use my wits to snag a new car to replace it. Here’s what I did.
Do you back up your computer regularly? My computer suddenly died one day in October and having both a backup on an external hard drive and in the cloud meant I didn’t lose anything (though I may gained some grey hairs in the process).
I feel fortunate to have this blog to help me remember what went on in my life over the last year (last 13 years, actually). It’s so nice to be able to share those things that have helped me.
Thank you for reading this blog. I wish you the very best for 2022!
About Janine

Hello! I’m Janine Adams — a certified professional organizer based in St. Louis, and the creator of Peace of Mind Organizing®.
I love order, harmony + beauty, but I believe that the way that you feel about yourself and your home is what truly matters.
If you’re ready to declutter with a purpose and add more ease to your life, you’ve found the right blog — and you’ve found the right company.
read more »Links
- Are you interested in becoming a professional organizer?
- Getting to Good Enough podcast
- National Association of Productivity and Organizing Professionals
- Shannon Wilkinson, life coach
- Organize Your Family History
- Peace of Mind Spending
- Ravelry
- NAPO St. Louis
- Institute for Challenging Disorganization