My new favorite app: NPR One

I’m a big fan of National Public Radio. I’ve been listening to it for decades. But in recent years, that fell by the wayside. Instead, I’ve been listening to music on my phone or podcasts that automatically land on my phone. I used to listen to NPR on my car radio (I don’t think I even have a radio in my home any longer), but I’d switch it off if I didn’t like the story.
I do subscribe to a couple of podcasts of favorite NPR shows, including Wait Wait Don’t Tell Me and Ask Me Another.. On those podcasts, I’d hear ads for the NPR One app, which, the ads told me, provides “Hand-picked stories based on what you like.” After months of hearing ads, I finally dowloaded the app.
I am so glad I did! Oh my goodness, NPR One is like the having best of NPR without having to tolerate anything that doesn’t interest me.
I’m probably only skimming the surface, but here’s how I use it. When I open it, I hear the top-of-the-hour news, including news from my local station, KWMU. Then news and feature stories or podcasts start playing. If I’m interested in the story, I touch the word “Interested.” If I don’t want to hear the story, I touch the skip icon. Soon, the app started learning my interests and I now have to skip less often. The more I use it, the better it gets.
The wonderful thing is that I’m keeping up with (some) news and I’m hearing new-to-me podcasts. I’ve discovered the podcast Pop Culture Happy Hour, which I love. I canceled my subscription to Entertainment Weekly after reading it for decades, so it’s helping me stay on top of pop culture.
If you like NPR and use a smartphone, I encourage you to give NPR One a try. It gives you all the benefits of listening to the radio and much, much more.
I'm in a coloring magazine!

I enjoy coloring in grown-up coloring books and I have blogged here about how I organize my colored pencils and how I organize my coloring Sharpies. I was tickled pink when I was contacted by the editor of The Coloring Studio a quarterly publication from Stampington & Company that’s part magazine, part coloring book, about reprinting some of the information I shared on my blog. The result is an articled called How to Organize Your Coloring Tools.
If you like coloring I think you might like the The Coloring Studio. It’s a high-quality publication that delves into techniques (some I’d never heard of), color palettes and artist profiles, among other things. The Autumn issue (the one that I’m in) goes on sale today! You can order it at the company’s website. The price is $14.99.
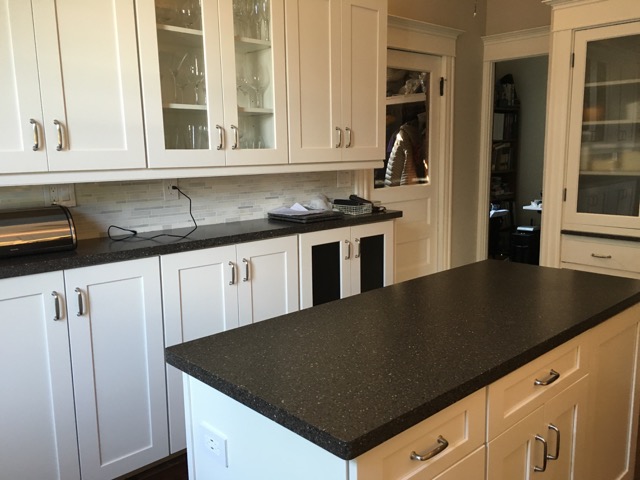
Favorite storage features of my new kitchen
This is the third and last post in a series about the kitchen renovation we did this spring. (Click here for the other two posts.)
Today I want to highlight a few of the storage features of my new kitchen that make me smile. Nothing earth-shatteringly innovative here, just really nice conveniences.
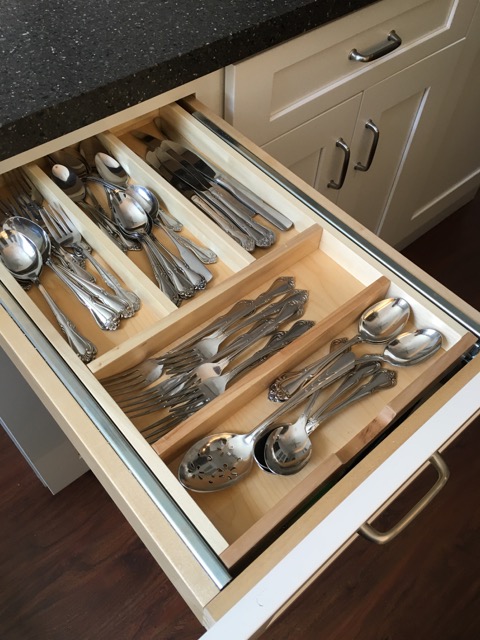
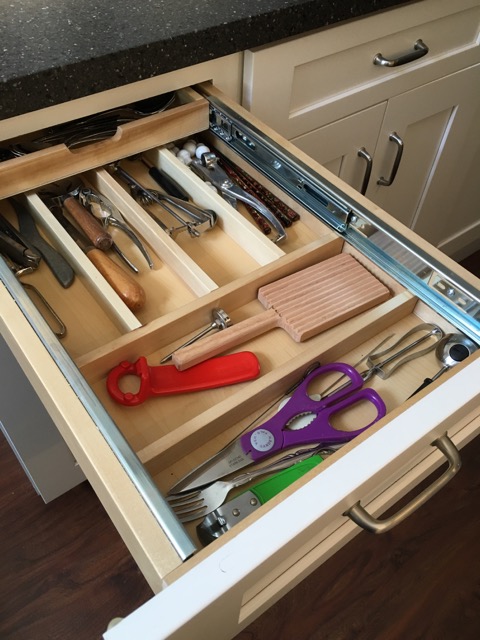
Two-tier cutlery drawer
I love how one drawer is now doing the work of two, thanks to the innovative two-tier cutlery drawer.
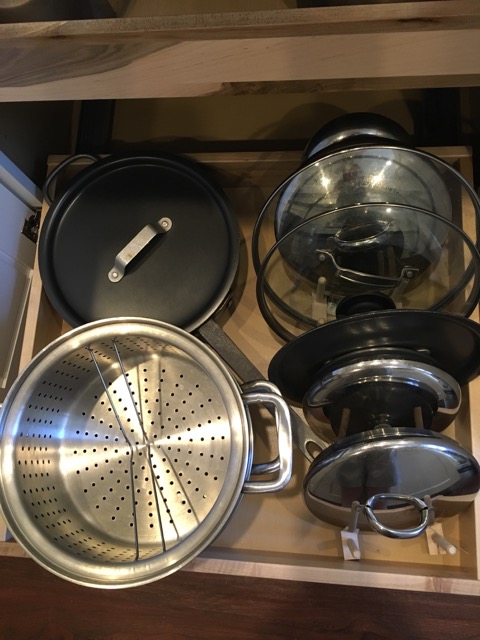
Simple pot lid holder
Two simple maple racks from the Container Store are holding my pot lids upright next to the pots. It’s working out so well and making me crazy happy.
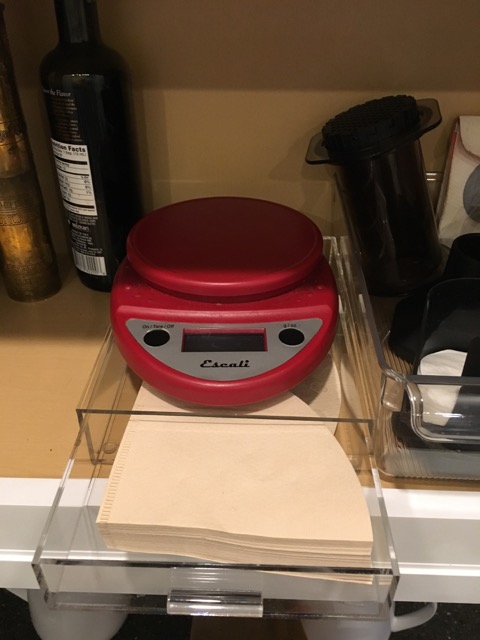
My coffee filter drawer
I take a coffee filter out of this acrylic drawer every day and every day it makes me smile. I love that I found a sturdy drawer that’s exactly the right size I need for my filters. And that I can place the scale I use to weigh my coffee (I’m weird that way) right on top of it. It’s so much better than the flimsy coffee-filter box I used to use.
Our barware cupboard
We used to store our barware on the top shelf of the built-in cabinet and I would have to get out a stepstool if the glass I wanted wasn’t right in the very front. A lot of the barware was stored in the basement. Now we have a whole beautiful cabinet that can hold an ample supply of barware. And I love the way it looks. Another happy-making thing.

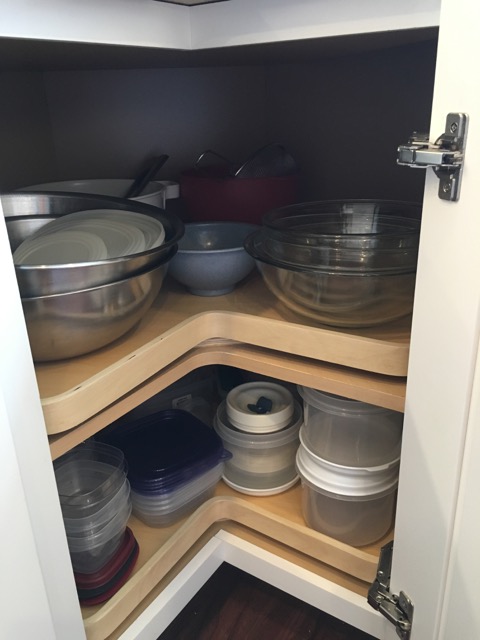
A corner cupboard Lazy Susan that actually works
I’ve seen lots of poorly functioning Lazy Susans in corner cabinets in clients’ kitchens. Ours is working really nicely. One of the things it has going for it is there’s no center pole, so I can use the whole surface. We store frequently used items like mixing bowls and colanders there and it’s conveniently close to the dishwasher. We also store food-storage containers there which, alas, means that I’m storing them nested rather than with lids on. But it’s working out really well. _(ETA: I’ve since learned that this type of Lazy Susan is called a Super Susan
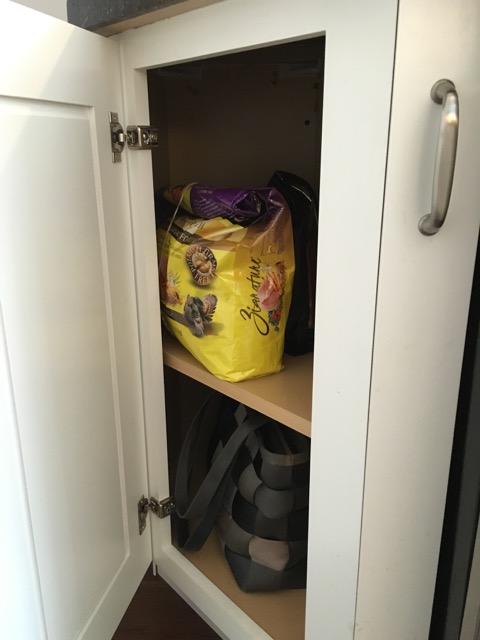
A hideaway spot for my purse
In our old kitchen, I stored my purse on the top shelf of a freestanding cookbook bookcase. That space tended to get quite unruly. Now I use the angled cupboard at the entry to the kitchen from the house. It’s an odd-shaped space so I wasn’t sure how I would use it. I slide my purse in the bottom shelf; we store extra dog food in the top shelf. (We pour the dog food into large Montana glass canisters that we scoop out of. The canisters live in the built-in cabinet, along with treats.)
Here’s a wide shot of the cupboard:
And here’s a closeup of how nicely the shape works for my purse:
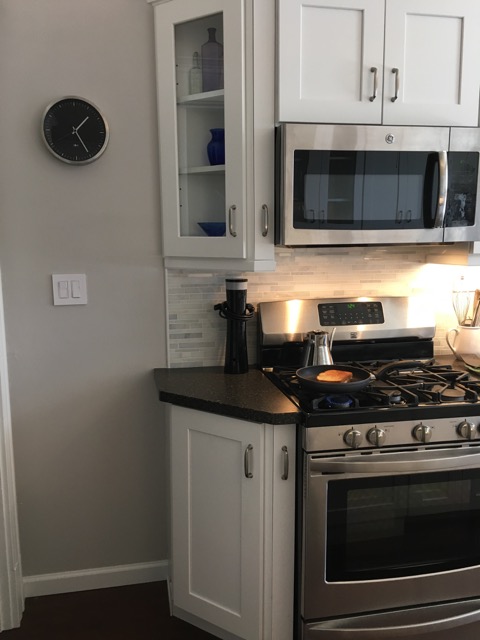
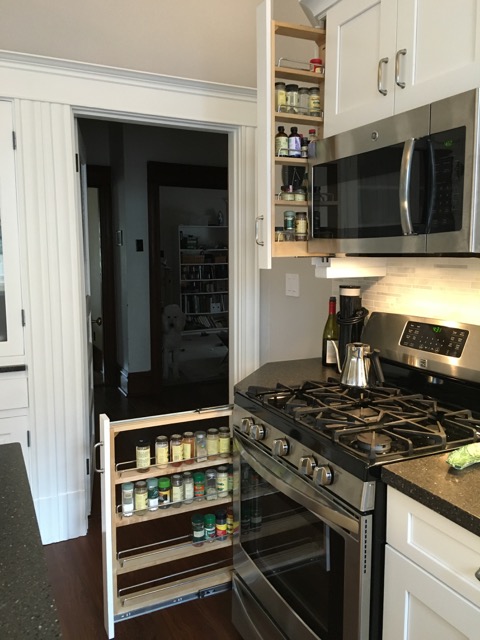
Our pull-out spice racks
Because of the angled countertop, a 3-inch filler was necessary to the left of the range and microwave. We didn’t want to waste space, so we had pull-out spice racks installed there. (You can see them closed in the picture above.) It’s turned out to be very convenient and it’s awfully nice to have a dedicated space for spices that’s not in the way of other things. Another benefit is that it’s really easy to read the spice labels!
Those are just a few of my favorite things about my new kitchen. It really is a joy.
Lessons learned from our kitchen renovation
This is the second of three posts on our recent kitchen renovation. I encourage you to also read Happiness is a new kitchen and Favorite storage features of my new kitchen. This kitchen renovation has been a great experience for us so I wanted to share!
Last week, I shared photos of our lovely new kitchen. We’re not quite finished…there’s the tiniest bit of finish work that needs to be done as soon as we get the supplies from the cabinet company. But for all intents and purposes, it’s finished.
We were lucky: ours was a pretty compressed timeline. It went like this:
- March 21: We made an appointment to have our kitchen measured by Home Depot’s installation company
- April 3: We had our first meeting with the Home Depot kitchen designer, Chris Burns, who created a design based on the measurements and photos taken by the installer.
- April 8: We finalized the design with Chris and ordered the cabinets and countertops.
- May 3: Demolition began (all cabinets were removed, with the exception of the built-in); wallpaper had to be removed too
- May 10: Cabinet installation began
- June 1: Countertops were installed
- June 3: Flooring was installed
- June 16-17: Finish work was done and cabinet/drawer hardware was installed
- June 18-19: We moved back into the kitchen!
After that, there was still more finish work to do, along with the replacement of the new floor (more on that later). But starting June 19 the kitchen was fully operational and fully enjoyable.
So we were out of a kitchen from May 3 to June 18, which isn’t bad at all, though it felt like a long time. Looking back, here are some of the lessons I gleaned from the experience. Perhaps they’ll help you if you redo your kitchen.
Lesson 1: It’s worth the hassle. As disruptive as it is to go without a kitchen for weeks or months, the effort is worth it. Having a kitchen designed to your needs, with modern storage conveniences is a joy. You get to factor in your own aesthetic, so it’s beautiful too. The memory of the inconvenience fades, but the reality of the great space remains. (Until it’s time to do it again, which for us will be a very long time from now, if ever.)
Lesson 2: Expectations are everything. Understand that there will be glitches. When you’re told how long something will take, double that time in your head. When you’re given a price, know that the cost will inevitably go up. This is reality. And expecting it will help keep your blood pressure down.
Lesson 3: Limit your options. You can go crazy making decisions if you factor in every option. There are just too many! We went in with a few ideas of what we wanted (painted, not stained, Shaker-style cabinets, dark countertops), we selected a mid-price-range cabinet line and we stuck with those parameters, which limited our choices. My husband, Barry, had some pretty solid ideas of what he was after and when we factored in both our preferences, the options that pleased both of us were whittled down. For us, making quick decisions based on relatively limited choices made the process less agonizing. And, I’m glad to say, we’re happy with the results.
Lesson 4: Don’t be afraid to be a squeaky wheel. We’re lucky because we work from home so we could keep an eye on the kitchen construction easily. Barry wasn’t afraid to speak up if something didn’t look quite right to him, and he has pretty exacting standards. We weren’t afraid to call and check on the status of orders if things seemed to be progressing slowly. Perhaps most significantly, when the installer finished installing the vinyl plank flooring in June, we weren’t shy about calling Home Depot to express concern over some shoddy work. That led to a visit from the supervisor who was very disappointed by his contractor’s workmanship. He suggested a complete replacement of the floor and sent a pair of skilled workers to do the job. The difference was night and day. I’m so glad we didn’t settle for the initial poorly installed floor.
Lesson 5: A little planning goes a long way. We were lucky; since we live in a two-family home, so we have an extra kitchen. It’s a completely substandard kitchen, but it was usable for the six weeks we needed it. We planned well so that we had just the items we needed, with the rest packed away in boxes. We only had to dip into those boxes a couple of times (primarily when Barry decided to make a birthday cake for a friend in May). Another thing I did was create a spreadsheet of where items were stored in the old kitchen and where they would be stored in the new kitchen. That gave me comfort that the new design would work for us. (We lost a pantry in the new design, so I was a little concerned.) That spreadsheet made moving into the new kitchen a breeze.
Lesson 6: If it sounds too good to be true…. Our initial contractor, who had been recommended to us, gave us an incredibly low bid. I figured he was just a really poor estimator and I tripled the amount in my head and was still satisfied. It became apparent with just the small amount of work he did after the demolition that his quality standards were not high enough. So we fired him. Luckily we had discovered a really great contractor, so everything went off without a hitch. But we should have known when we saw the initial contractor’s bid that he wouldn’t be the guy for us.
How about you? For those of you who have been through the experience, what lessons did you learn? Please share!
Happiness is a new kitchen
This is the first of three posts on our recent kitchen renovation. You can also read the lessons learned from our kitchen renovation and the favorite storage features of my new kitchen. This kitchen renovation has very successful for us and I wanted to share!
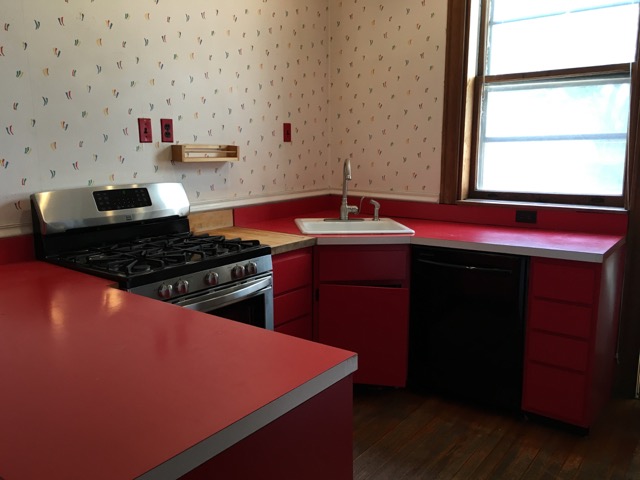
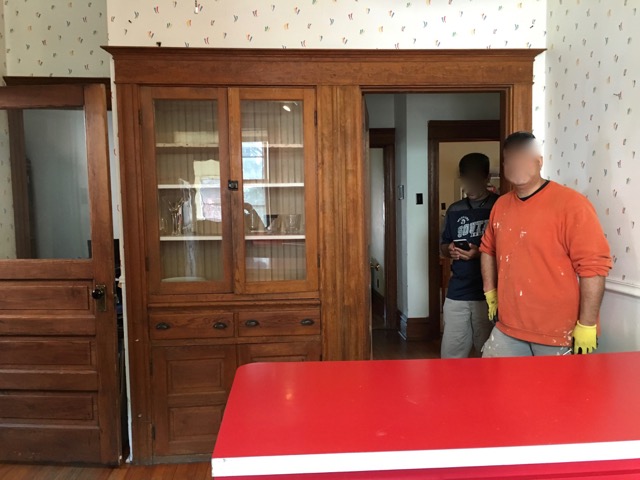
After only 24 years of living with an 80s-era kitchen in our 1908 home, my husband and I had our kitchen remodeled this spring. It wasn’t strictly necessary. (In fact, this Huffington Post piece on not needing a new kitchen really resonated with me.) But it seemed time. And, of course, once it was done we wondered why we waited. We absolutely love it.
I thought I’d turn the experience into three blog posts:
- A showy-offy post with before and after pictures (that’s this one)
- A post on lessons learned in the process and my advice to others going through the same thing
- A post showcasing my favorite storage solutions in the new kitchen.
So if you like kitchen renovation posts, keep your eye on the blog for the next week.
I’ll start with some before and after pictures and follow up with a few details about the renovation. (The before pictures were taken right before demo began…the counters were never that clear ordinarily.)
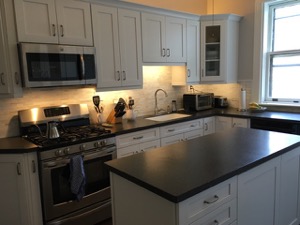
Here we go. From the entrance to the kitchen from the living space:
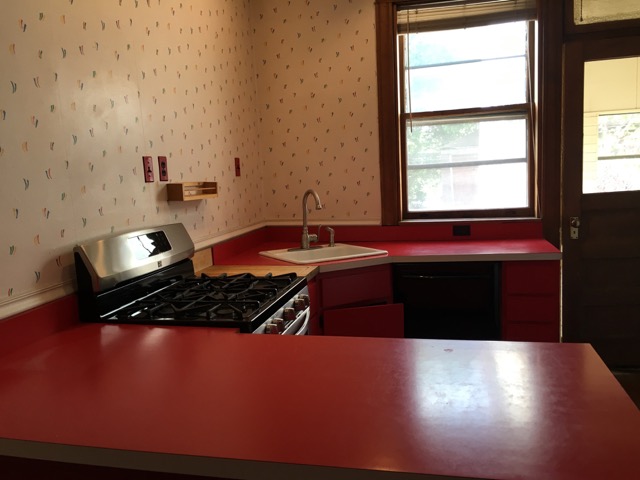
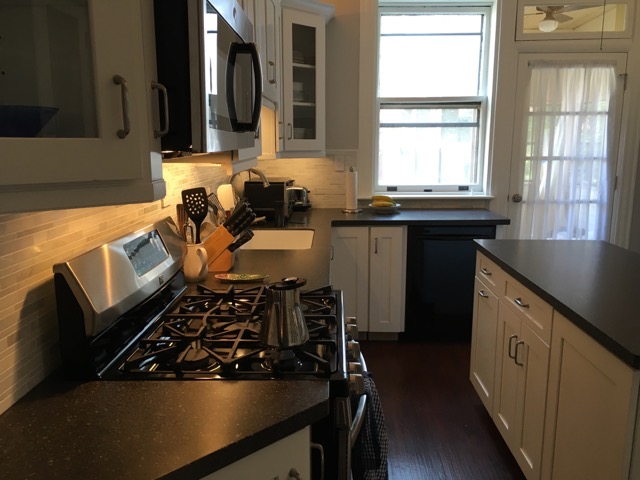
From the sink:
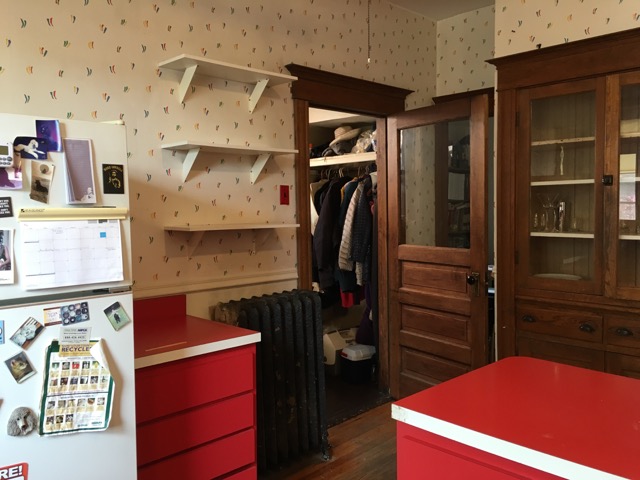
From the back door:

View of the built-in cabinet:
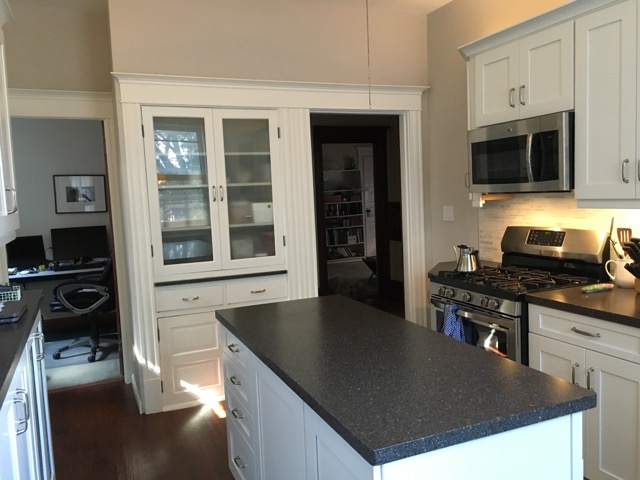
This last “after” shot shows that we sacrificed our pantry so that we could get the refrigerator out of the way. That was a stroke of genius on the part of the designer.

Nice change, huh? The kitchen is not only a lot more attractive, it’s a lot more functional since our storage space expanded many fold, despite our losing our pantry.
We used Home Depot to do this kitchen. The designer, Chris Burns, was exceedingly talented and such a joy to work with. The cabinets are American Woodmark Reading collection. The countertop is LG HI-MACS solid surface, with an integrated sink. We used Allure Ultra vinyl plank flooring. The backsplash is MS International Grecian White Interlocking. We kept our relatively new range and dishwasher but got a new stainless steel refrigerator (Whirlpool) and above-the-range microwave (GE), both purchased at Home Depot.
A big design challenge for Chris was the fact that this 10 × 13 kitchen has five doors in it, plus a built-in cabinet. (The pantry door was replaced by the refrigerator.) It also has a functioning radiator. The whole wall that used to house the refrigerator was designed around the radiator, which is now enclosed by cabinet doors with radiator grill in place of glass. (See the second and fifth after photos.)
We put upper cabinets above and below on the radiator wall. The bottom cabinets had to elevated a little to accommodate the radiator, which means there’s little vertical space on the counter between the cabinets. We only have room for a bread box and a place to stash our keys, which is just fine with me. The contents of the former pantry are now split between the cabinets on the radiator wall (which we call the bar) and the built-in cabinet.
Obviously, we painted all the woodwork white, which felt like a big deal but is such an amazing change. And we replaced the glass of our beloved built-in cabinet with frosted glass.
Getting rid of the peninsula and adding an island was a dream come true. This kitchen is now so functional and so easy to use, not to mention beautiful. It’s gone from a room we tolerated to one we love. It took some time, money and inconvenience, but it was worth every bit!
Renting, not buying, moving boxes
I recently coordinated a move for a client using recyclable plastic moving boxes from STL Rent A Box rather than purchasing cardboard boxes. It worked like a dream and I’ll definitely consider it for future moves.
STL Rent A Box provides heavy-duty plastic boxes with clamshell lid that are 27“L x 17“W x 12“H. The box is larger than a standard small moving box and longer but shallower than a medium. The boxes nest within each other when the flaps are open. They’re very sturdy. They stack when they’re closed.

For this particular move, I ordered 25 boxes. (I was guided by the handy packages STL Rent A box offers based on the number of rooms involved.) The boxes were delivered to my client’s home in two neat stacks on flat dollies. My team packed them and we supplemented them with a few cardboard boxes along with some clear plastic totes my client already had. (This was a local move.)
We marked the boxes with removable labels supplied by STL Rent A Box. The movers moved the boxes as usual into appropriate rooms in the new house. On unpack day, we unpacked the boxes and stacked them on the dollies. The day after we finished unpacking, STL Rent A Box came and picked up the empty boxes. No muss, no fuss.
Here’s what I liked about the experience:
- We saved money: The client paid just $99 for the boxes, including pick up and delivery.
- We saved time: We didn’t have to assemble and disassemble the boxes as we would have with cardboard boxes. I also didn’t have to take the time to purchase and pick up cardboard boxes.
- We saved effort: There were barely any empty boxes to worry about discarding when the move was over.
- We helped the environment: The boxes are reused (after sanitizing).
- We saved stress: Move day in this case happened to be a rainy day. It was nice not to have to worry about items getting wet or boxes falling apart.
STL Rent A Box owners Stacy and Todd Isermann couldn’t have been easier to work with. I called them on fairly short notice and they accommodated me seeming effortlessly. They were cheerful and professional. I’ll definitely suggest STL Rent A Box to my next moving client!
If you don’t live in St. Louis, have no fear. This isn’t a phenomenon limited to St. Louis A quick google search revealed this web site that lists other recyclable plastic moving box companies around the country. It’s worth noting that STL Rent A Box isn’t on that list so if your city isn’t mentioned it might be worth doing a little more digging.
I think this a terrific concept and I look forward to using them again!
Worth repeating: Need a reason to declutter? Do it for your pets
I wrote this post three years ago and I still talk about this kitty who so enjoyed his decluttered space. It came up last month, in fact. Making your animal’s life easier is another great reason to clear out a cluttered space.
Many of my clients are animal lovers. I’m an animal lover too. I even made my living as a pet writer before becoming an organizer. Perhaps I attract animal lovers.
I’ve never worked with animal hoarders (nor do I aspire to), but I’ve worked in severely cluttered homes that were also home to a few animals. I’m always amazed at how the animals maneuver around the clutter.
For some high-energy dogs or cats, a cluttered environment might feel like a fun playground or obstacle course. But I believe that most animals enjoy an orderly just like many humans do. They want wide open spaces in which to rest and play. They want to be able to get around easily.
This was brought home to me recently when my team worked on decluttering the crowded living space of a home occupied by one human and one young cat. As soon as we would clear a space (the top of the dining room table, for instance), he’d jump right up. Every time I turned around, it seemed the kitty had found a new spot in which to rest.
My favorite such moment was when I looked up and there he was in a china cabinet drawer that had just been emptied:
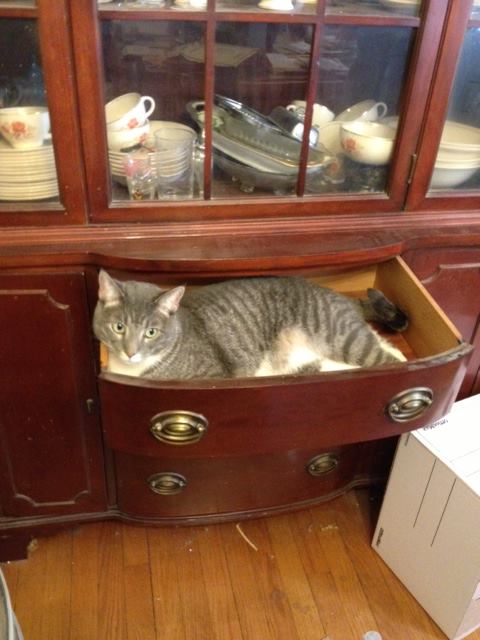
A little later, my heart sang when he started batting his toy around the newly clear living room floor.
If you’re looking for a reason to declutter your home, do it for your pets. I’m confident they’ll be happier and more comfortable.
About Janine

Hello! I’m Janine Adams — a certified professional organizer based in St. Louis, and the creator of Peace of Mind Organizing®.
I love order, harmony + beauty, but I believe that the way that you feel about yourself and your home is what truly matters.
If you’re ready to declutter with a purpose and add more ease to your life, you’ve found the right blog — and you’ve found the right company.
read more »Links
- National Association of Productivity and Organizing Professionals
- Are you interested in becoming a professional organizer?
- Institute for Challenging Disorganization
- Getting to Good Enough podcast
- Peace of Mind Spending
- Organize Your Family History
- NAPO St. Louis
- Ravelry
- Shannon Wilkinson, life coach