Creating a capsule wardrobe
For the last eight years I’ve been fortunate enough to be friends with Geralin Thomas, a professional organizer and wardrobe consultant who has patiently been trying to educate me on what to wear and how to wear it. (I like looking nice, but I lack confidence in knowing what looks great on me and how to put together outfits.)
Geralin was visiting me recently and, like she did last year, went through my closet with me so that we could retire those garments that were either unworn or too worn. She took a look at what was left and created a mental shopping list to fill things out.
And then we had some very successful (and, I must say, enjoyable) shopping excursions. The icing on the cake was the time we spent yesterday putting together top-to-bottom outfits, so I can dress with confidence.
My goal is to have as few clothes as possible and still feel well-dressed. I’m easily overwhelmed by choices, so when choices are limited I am happier.
Geralin taught me that what we did was create capsule wardrobes for me. On page 85 of her new book, Decluttering Your Home: Tips, Techniques and Trade Secrets Geralin describes a capsule wardrobe as one in which “individual pieces are combined into outfits that offer maximum use…it’s simply a collection of pieces that work together.” In my case, I now have a nice, simple color-coordinated collection. Everything goes together so I can’t really mess it up. (But to keep from messing up, I photographed the outfits that Geralin put together for me—including accessories.) This allows me to dress with confidence and it makes dressing so much easier.
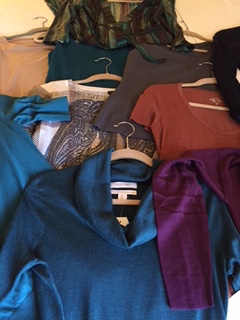
Here’s a photo of happy me with part of our score from the designer section of the fabulous Scholarshop, a charity resale shop in St. Louis.

A year ago, we purchased clothes in three neutral colors: black, charcoal and camel. Most of those clothes are still in my closet, and this year we added some color. Primarily, we focused on peacock, teal, green, rust and plum.
My pants wardrobe has been pared down to three pairs of dress pants (black, charcoal, camel—they go with all my tops), along with some black leggings, some ponte knit fitted pants and some jeans. (I have some attractive work-out clothes that I wear when I’m leading organizing teams.) I don’t need any more options than that. And It feels so good.
We took photographs of the outfits, including accessories, and my next step will be to use Geralin’s Wardrobe Planner Worksheet (which you can download free from her website) to write down the individual components of the outfits. I did this last year and it was very helpful.
Geralin is so patient with me and slowly, ever so slowly, I’m learning. Thanks to the great choices we made, I don’t think I’ll have to do any shopping for quite some time, but if I do venture out without Geralin, I think I’ve learned enough that I can make some successful choices!
My love for my Kindle Paperwhite stands the test of time
At the end of 2012, I bought myself a little gift: A Kindle Paperwhite e-reader. After less than two weeks with it, I was in love and wrote a blog post about why I love my Kindle Paperwhite.
We’re closing in on the 3rd anniversary of that purchase and my love has not wavered. Three years is an eon for a mobile device. I’ve not once been tempted to upgrade this piece of technology that I literally use daily. (I love my iPhone 5S, too, but can’t wait to upgrade when my contract is up in March.)

Here’s why I love my Kindle Paperwhite so much:
- It holds thousands of books (though I only have hundreds).
- It doesn’t slow down as I fill it with books (occasionally, page turning is slow and I then reboot and it’s fine again).
- It’s lightweight.
- I can hold it in one hand.
- When I open its leather case with magnetic closure, the Paperwhite turns on and take me to my place in the book, so it’s a bit like opening a paper book. (Closing the case turns off the Paperwhite.)
- It has an adjustable light that’s not harsh.
- There’s no screen glare, so I can read in bright sunlight.
- A single battery charge lasts weeks.
- I can use it as a flashlight in our dark bedroom when I get up in the middle of the night.
- It allows me to have the book I’m reading with me at all times—because even if I’m don’t have my Kindle device with me, I can read the book on my iPhone’s Kindle app and pick up where I left off.
- If I come across a word I don’t understand, I can just touch it and, if I have a wifi connection, the definition will be revealed. (How great is that?)
When I first bought the Kindle, I was worried that I’d spend a lot of money on books. Before that, I was using the library and accustomed to satisfying my reading habit without spending money. The fact is, I’m spending no more money on books than I was back then. I occasionally purchase Kindle (or even paper) books that are important for my work, just as I did when I was primarily a library user. But most of the books I read are free, through these services:
- The St. Louis Public Library’s Get It Now ebook program
- The St. Louis County Library’s eMedia program
- The Kindle Owner’s Lending Library, which is available to people with Amazon Prime
- BookBub, which sends me a daily email with low- or no-cost Kindle books offered in the genres I select. (I blogged about BookBub in 2013.)
I’m on track to read 52 books this year. (Nerd that I am, I keep track of them in Evernote.) I could count the number of those books I paid for on one hand. The Kindle makes it easy for me to devour books because I can take them with me and I can easily read them in bed. When I travel, I never have to worry about finishing the book I’m working on and getting my hands on another for the trip home.
Hats off to Amazon for creating a device that has stood the test of time. I see that the newer generation Kindle has a higher resolution, but I remain loyal to my 2012 version, because it meets all my needs.
Monkey Bars: Strong, attractive garage products
One key to having a neat and organized garage is getting everything you can off the floor. I’ve seen a variety of options in my clients’ garages, but I hadn’t been exposed to Monkey Bars before I saw them at this year’s NAPO conference. I was impressed by the strength and durability of the garage shelving systems I saw.
Then I was contacted by their marketing folks offering a product for review. Since I was curious about the product, I accepted a Large Yard Tool Rack. We’re not much of a yard and garden family (we hire someone to take of the lawn) and we have limited tools, which we pretty much hang on nails on the joists of our decidedly un-fancy garage. There was definite room for improvement in the storage of our yard tools, so I was anxious to give it a try.
I was encourage by this video, which shows how easy the installation is.
I don’t own a drill, so I asked my handy friend John if he would install it for me. Installation really was a breeze—the hardest part was figuring out where to place the rack. It took at most 15 minutes for John to install it and it would have been faster if I weren’t there distracting him.
Not only did the rack go up very easily, but it’s solid and attractive. The hooks attach with a metal clip, not plastic, and they attach very easily and solidly. When John finished installing it, he said, “This is great; I’m going to buy one for my garage.” High praise indeed.
The price is good, too. The kit comes with the 51” bar, two brackets and hardware, plus eight different hooks. All for $99.99.
A look at their website shows that Monkey Bars is about a lot more than yard tool storage. They make overhead storage, garage cabinets, and shelving that can be integrated with their other products. The brackets holding up the shelves can hold bars on which can be hung tools or accessories. I’m impressed!
For the larger products they offer dealer installation, which for someone like me gives great peace of mind. I was glad to have this opportunity to try a Yard Tool Rack and experience the quality of the product. I’ll be mentioning it to clients who are looking to use products to upgrade their garage organization.
The 30 X 30 challenge

I love doing genealogy research, but I often have trouble finding time to do it. Because it’s seldom urgent, it falls to the bottom of the priority list, like so many enjoyable things. Since I blog at my other blog, Organize Your Family History, it’s important for me to do the research so I have genealogy-related things to blog about. But, as I said, it can be a challenge to find time.
In early August, I decided to implement a personal 30 X 30 genealogy challenge, in which I committed to doing 30 minutes of genealogy research 30 days in a row. It was amazingly effective. I did not miss a day, and I had days where there was no way I would have done it otherwise—one day there was a big family emergency, but I managed to do my research. Another day I led a huge organizing team for 10.5 hours, but I got in my 30 minutes before leaving the house.
One thing that made it easy was that I was working on a specific project (transcribing my great great great grandfather’s Civil War pension file), so I had a specific task to do and could skip the step of deciding what to work on.
I think one of the reasons this was so successful is that it felt realistic. 30 minutes is not a long time. And the whole thing would be over in 30 days. If I had made a one-year commitment, I probably would have given up on week two.
My 30 X 30 genealogy challenge ended on September 5 and I probably did research all of five times in the remaining weeks of September. Today is October 1 and I’ve decided to implement another one, starting today, so that I get more genealogy research done.
But I’m also thinking of other areas of my life where I could implement a daily challenge. It could be a great way to jumpstart a new habit. I think, for me, the factors I need to make it a successful challenge are:
- It needs to be something I want to do daily (obviously)
- It needs to require relatively low effort
- The effort needs to be measurable
The obvious choice for me is exercise, something that I struggle to find time to do every day. I will commit to taking a 30-minute walk, or the exercise equivalent, as measured by my Apple Watch, every day for 30 days. Today is the first day of October, and it’s nice, though not required, to start things like this on the first day of the month. So off I go! I’ll report on progress here.
My Apple Watch: Lovable, if not indispensable
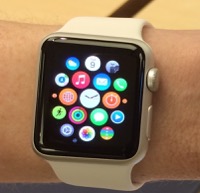
I wrote last April about my excitement over buying an Apple Watch (and how I navigated the choices available). I ordered it online and the day it was set to arrive I was like a kid on Christmas morning. I devoted some time that day to setting it up just right. I loved it.
Soon, the excitement wore off and I was able to give it a more objective evaluation. People constantly ask me how I like it and my response for the last several months has been, “I like it, but it’s not indispensable. My phone is indispensable, but I could live without my watch.”
Yesterday, I put that to the test because I decided to upgrade my watch to the new OS2. It has to be on the charger for that to happen. A normal installation should take under an hour, but there was a problem with mine and I ended up keeping it attached to its charger (which means it couldn’t be on my wrist) for 24 hours before I caved in and called Apple. Turns out, my installation was problematic and required powering the watch off, then on, and starting over. It’s fine now. (Note to self: Next time, call Apple sooner. They were great.)
Going 24 hours without my watch strapped to my wrist made me realize that I really do use it a lot. It serves as a handy extension to my beloved iPhone. Here’s how I use it most:
- To tell time (Imagine, a clock on my wrist!)
- To easily set a timer (I use a timer many times a day)
- To tell at a glance who is calling me
- To easily turn the ringer off if I don’t want to talk to a caller
- To read and swiftly reply to text messages
- To turn the music on my phone on and off
- To tell me when I need to turn when the Maps app is running on my phone (it buzzes my wrist and, if the sound is on, makes a tick-tick turn signal sound)
- To monitor my exercise
- To get me to stand up when I’m working long hours at my desk
- To see the outside temperature at a glance
- To see the next appointment on my calendar at a glance
The Apple Watch has to be charged every night and I’ve developed an easy routine of doing that. With the new OS2, I’ll be able to use it on its side on my nightstand to tell me the time and as a snooze-able alarm clock, so that will be nice. The band is much easier to take on and off than my previous FitBit and MisFit fitness bands and I find the watch very comfortable.
So the bottom line is that I’m very fond of my Apple Watch and I’m glad I bought it. Would I replace it immediately if I lost it or it died? Probably. But I wouldn’t go into the same panic I felt last year when my iPhone died.
Organizing your car
Last week, a client asked me to help him organize the console and glove compartment of his car. I think that’s the first time I’ve been asked to organize a car and it was fun! In no time at all, we had his car organized so that he can find what he needs easily.
Perhaps because I had so much fun with my client, I decided to organize my own car today. In my case, the console is pretty much empty and the glove compartment under control, but the cargo area and back seat (full of organizing supplies) needed some love and attention.
Organizing a car is like organizing any space, just on a smaller scale. Here are the basic steps:
- Empty the area in question (glove box, console, cargo area)
- Sort the items into categories, putting like things together
- Toss the inevitable trash
- Take inside the stuff that belongs inside (I can guarantee there will be some)
- Donate the car gadgets that seemed like a great idea but you never use
- Start putting away the stuff you know you want to keep in the car. Start with the items you use most often and put them in the areas easiest to reach from the driver’s seat.
- Put the “just in case” stuff in the farthest away storage spaces—you really want to keep close at hands the items that are used regularly.
Here are some storage ideas we used for my client:
- Ziploc® bag to corral his food items in the glove compartment
- Stacked accessory boxes in his center console (which is square-ish), with the most used stuff in the top box, without a lid. Tucked underneath in an accessory box with a lid were items he wanted in the car but didn’t need super-easy access to.
- The pocket in the passenger side door for the owner’s manual, so it didn’t take up valuable space in the glove compartment.
Don’t forget about your wastebasket! Putting wrappers and other trash items in a receptacle is probably the single best thing you can do to keep, your car looking clean. I absolutely love the hand-knit basket I put in my car (I knitted it before I bought the car and it fits perfectly into the spot in front of the console! Here’s a picture:

If you like the idea of a decorative, hand-made wastebasket, there are no shortage of options for car trash cans on Etsy.
Now that my car is clean and organized, I’m off to get it washed and detailed! When I think about how much time I spend in my car, I realize I should do that more often!
Unwanted housepaint gets new life with PaintAway

Do you have old cans of paint hanging around your house? I do. And so do many of my clients. At least here in St. Louis, it can be so hard to actually get rid of the paint, which is considered household hazardous waste.
That’s why I was thrilled to get a call from Terry Oliver, whom I have enjoyed working with in his capacity as an employee of 1-800-GOT-JUNK. Terry has co-founded a company called PaintAway, whose focus is to help folks get rid of their paint and (here’s the best part) put it to good use. Instead of being dried out and ending up in the landfill, PaintAway gives the paint to organizations that can remix and reuse it. The Muny, St. Louis’s beloved outdoor summer theater, will be the recipient of paint collected by PaintAway, for example.
To be clear, PaintAway has no affiliation with GOT-JUNK, which cannot legally disposes of paint for its customers.
PaintAway charges a little over $5 a can for the paint removal. That’s similar to the household hazardous waste charge one incurs for paint disposal. But with PaintAway, they come to you to take it away; you don’t have to take it to the disposal facility. And, of course, the paint is reused. It seems like a brilliant idea to me and I told Terry I’d be happy to spread the word here.
I’m planning a big basement cleanout soon (we’re doing some renovations), and I plan to call PaintAway to take away my old paint and give it a new life!
About Janine

Hello! I’m Janine Adams — a certified professional organizer based in St. Louis, and the creator of Peace of Mind Organizing®.
I love order, harmony + beauty, but I believe that the way that you feel about yourself and your home is what truly matters.
If you’re ready to declutter with a purpose and add more ease to your life, you’ve found the right blog — and you’ve found the right company.
read more »Links
- Are you interested in becoming a professional organizer?
- Peace of Mind Spending
- National Association of Productivity and Organizing Professionals
- NAPO St. Louis
- Institute for Challenging Disorganization
- Getting to Good Enough podcast
- Ravelry
- Shannon Wilkinson, life coach
- Organize Your Family History