Maintaining order
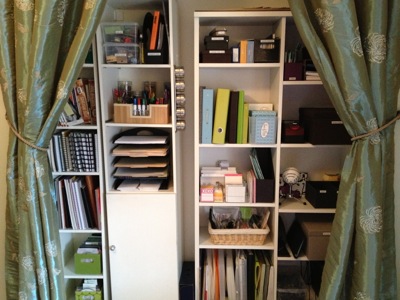
I love doing whole-house transformations. That’s when my team and I come in and create order in every room of a client’s home. We’re working side by side with the client, decluttering and organizing in ways that work for them.
So far this year, we’ve done four really rewarding transformations. The clients are thrilled at the end of the last session. But the proof of the pudding is whether they’re able to maintain the order.
I visited a client yesterday whose home we finished at the end of January. It still looked amazing, and that made my heart sing. It got me thinking about the basic tenets behind maintaining order. It’s really not complicated. They are:
- Establishing a place for everything
- Making a habit of putting things away in their place
- Catching up quickly if backsliding occurs
- Weeding constantly
- Shopping mindfully and thinking about where a new item will be stored before buying it
If you’re able to follow those five tenets, you’ll have an orderly home. The trick is in owning no more items than you can comfortably store. When you have a number of belongings that’s appropriate to the storage space you have for them, then it’s easy to have a place for everything and put everything in its place.
In almost every one of my client organizing projects, decluttering is the first step. You can hire a professional organizer to help you declutter. Or you can do it on your own. (Here’s a short step-by-step series I wrote last year on decluttering.) Just don’t skip this important step in creating and maintaining order!
Unwanted fabric takes on a new life with Charity Sharity
Many of my clients are creative people who have acquired supplies for their creative hobbies, like sewing, quilting, scrapbooking, knitting and needlework. It’s the rare fiber/fabric enthusiast who doesn’t end up with a stash of supplies.
I’m a knitter and I have a nice, organized yarn stash. But I bet if I went through it today, I’d come up with a couple of bags of yarn that I could easily part with.
As part of a program for our monthly meeting of the St. Louis chapter of the National Association of Professional Organizers, we heard from Carole Splater, the founder of Charity Sharity, a program that collects unwanted fabric and yarn and distributes it to groups who will use it for charity projects.
No money exchanges hands, and it all happens by coordinating with Carole.
During Carole’s program, we saw examples of projects that had been completed using fabric that Charity Sharity provided (which they received as fabric donations). They included:
- bags to contain goodies sent to active military personnel
- shawls for veterans in soldiers’ homes
- tote bags for domestic violence shelters, for women and kids to carry their belongings in
- teddy bears for police cars, emergency rooms, and school nurse offices (they’re made from two 12” squares of fabric…talk about giving fabric a new life!)
- bedrolls made for homeless men, women and children living on the street
When I think about all the fabric that was once gathering dust being transformed into items that help needy people, it makes me so happy. I was delighted to learn that they also accept donations of yarn.
If you would like to donate fabric (or request fabric), simply email Carole at carolejs0202@gmail.com.
Have you started your taxes?

I don’t know where the year has gone so far, but it hit me this morning as I was making coffee that I’d better get started on my taxes! My niece and nephew will be visiting from Australia from April 2 to 12 and I leave for the NAPO conference on April 14, so I really need to file my taxes this month.
It’s not that I haven’t done anything at all: I bought TurboTax last month, so that was a baby step in the right direction. I’ve kept all my tax-related documents together as they’ve come in. And all my bookkeeping for 2014 is completed. But I haven’t started entering any data into TurboTax yet.
Why do I delay starting this particular task? I think, as in most procrastination, it boils down to fear. I’m afraid it’s going to be hard or that I’ll hit a glitch. I’m afraid I’ll discover that I owe money. I’m a little afraid that since I upgraded my operating system to Yosemite I’ll have some sort of technological problem (my least favorite kind of problem).
I’ve discovered over the years that delaying starting your taxes because of fear does me no good at all. Back in the first few years of this century I filed extensions. I’m here to tell you that only extends the misery. I know it will feel great to get the taxes filed, whether or not I owe money. (I’ve been diligent about estimated taxes, so don’t think I will.)
So right here and now I vow to spend at least an hour getting started on taxes on Saturday. (I know that getting past the barrier of getting started is a huge step. Once I’m started, I’ll be much more inclined to continue.) I also vow to make taxes my focus on Sunday. This is the last weekend until the very end of the month where I don’t have to work, so I need to make it count.
I’ll also reward myself for my hard work on Sunday. I think that reward might take the form of binge watching Downton Abbey while knitting on Sunday evening.
If you haven’t started your taxes yet, I encourage you to take a baby step in that direction this week. There may be more than a month before the April 15 deadline, but it will be here before you know it!
Photo by Ken Teegardin of SeniorLiving.org via Flickr.
Worth repeating: Accepting help
I originally wrote this post in 2013. In my life anyway, it’s more true now than ever. Yesterday I hired someone to shovel our walks and alley after about four inches of snow fell. What a relief that was! There is so much help offered out there. We can all benefit by accepting it.
Sometimes I wonder why it is so hard for most of us to accept help. By the time I’m called into a client’s home, she (or, sometimes, he) typically has contemplated hiring me for weeks, months, or years. And typically that time is filled with guilt, self-recrimination and stress.
The reluctance to accept help isn’t limited to hiring someone, though. I’ve observed that it can be difficult to ask for help from friends or family members or even accept help when it’s offered.
Accepting help is a big part of how I try to let my life be easy. There are many things I’m not good at that my friends are. For example, my friend, Sally picks out all my wall paint colors. I’m absolutely inept at that. I’m a bit color-challenged, I’m easily overwhelmed by too many choices and I lack confidence in my design abilities. Sally is great at it and loves doing it. Hooray!
My friend Geralin helps me with sticky wardrobe choices. If I’m going on TV, I call Geralin for advice on what to wear and how to accessorize. If I want to knit myself something, I’ll check with her to make sure she thinks the sweater would be flattering on me. (One time she replied with a succinct “Not on my watch!”) Geralin is great at this and it seems as natural to her as breathing. Why wouldn’t I ask her help?
I have a wonderful housecleaner who comes every week. He does a much better job than I ever would and he relieves me of a dreaded task. Same goes with the guy who mows our lawn.
I no longer have a problem accepting help, whether hired or gifted. I know I love helping people, so I believe my friends when they say they want to help me. I have no trouble charging my clients for my help, so I have no difficulty paying others for theirs.
Is there anything in your life you’d benefit from getting help on? Ask for it!
The ultimate relaxing experience
Two years ago, I was introduced by friend, Shannon Wilkinson to flotation therapy. I blogged about it in a post called Floating with my thoughts.
Since then I’ve floated two more times in Portland (at Float On and The Float Shoppe). Each time it’s been wonderful. I always come up with great ideas while floating and when I’m through, I feel completely relaxed, as though I’d just had the most wonderful massage imaginable.
I remember commenting to Shannon that I wished there were a place to float in St. Louis and, if there were, I’d probably go once a month. That’s how valuable it felt to me.
Well, my wish has come true. It feels like a miracle. Just this week, F.LO.A.T. opened in midtown St. Louis, at 3027 Locust Street. It was created by three therapists and float enthusiasts, one of whom, Kevin McCulloch, is a friend of mine. I was over the moon ecstatic when I heard it was coming.
On Monday, Kevin treated me to a float and it did not disappoint. F.LO.A.T. has two types of tanks. One they call the At Peace Float Spa; that’s what I experienced this week. They also have the Genesis Pod.
In the At Peace Spa, the tank is like a very large bathtub, enclosed to the ceiling. It has a door in it like a shower stall door. You open the door and step into the 10 inches or so of heavily salted water where float effortlessly. Once I turned off the light from inside the tank I was in utter, complete darkness. And I heard no sounds. As I floated, I barely felt the water that was supporting me. I felt weightless. It’s hard to describe how cozy and relaxing that is.
In addition to feeling relaxed, I also had the opportunity to do some deep thinking, without any type of distraction. That is a true rarity in my life (and I bet yours). I always experience significant insights while floating.
After 90 minutes of floating, I was signaled that time was up by the light in the room slowly being turned on, making the tank door glow. It was very gentle. Right outside the tank is a shower. I showered off the salt, dressed and joined my friend, Jeannette, who had also just floated. We were two extremely mellow women, enjoying some water in the comfy sitting area. (Jeannette is a writer for St. Louis magazine and wrote this great blog post on her floating experience that day.)
Here’s a photo of the float room at F.LO.A.T. (The tank is inside that shower door.)

The other type of tank they have, the Genesis Pod is a smaller, womb-like space. At the Float Shoppe, I floated in a similar pod and it was a great experience, too. I look forward to trying out the Genesis Pod. Here’s a photo of it:

At F.LO.A.T., a 90-minute float costs $65, comparable to a massage. Will I do it monthly as I’d hoped? I do believe I will. So far, I have dates booked in March and April. They have memberships for frequent floaters that make the floating even less expensive. You can bet I’ll be taking advantage of that.
If you are in St. Louis, I hope you check this out. I remember that it felt like a leap of faith the first time I tried floating. Though Shannon had described it to me, I had trouble visualizing what the experience would be like. I’m so glad I trusted Shannon and just gave it a try.
If you have questions about it, feel free to ask in the comments.
P.S. In case you were wondering, I learned from Jeannette’s blog post that F.LO.A.T.‘s wackily punctuated acronym stands for “For. LOving. Antigravity. Timelessness.”
Your memory is a terrible thing to rely on

When I was in my twenties, I had a mind like a steel trap. Oh, the things I could keep in there and recall in a nanosecond! It made me a valuable employee; my ability to keep details straight and handle logistics well allowed me to work on some great projects. (For example, I organized—and attended—a small conference in Africa with participants from all over the world. I put it together from my office in Washington, D.C., and this was before the internet.)
Now that I’m in my fifties, my memory is a shadow of its former self. But I’m lucky: in the intervening three decades, technology has emerged that helps me compensate. There’s no need to store things in my brain. I can write everything down and access it instantly using the app of my choice. That frees my brain for more important things.
Here are the apps I use most:
- Calendar on my Mac and devices; iCloud syncs them seamlessly
- Reminders, the built-in iOS app that I typically access with Siri
- Things my latest favorite task list app (I promise a future blog post on it.)
- Evernote for keeping track of notes, lists, and websites. I use the desktop app, as well as the iOS app on my iPhone and iPad.
I know there are many, many apps from which to choose. These work for me, so I’m not exploring others at the moment. But you may be using different apps that suit your needs, which is great.
But there’s a huge caveat here. In order for this to work, you have to actually look at your apps. You can’t just deposit stuff and ignore it. It’s like the Action Box I suggest clients use to handle their incoming mail…it doesn’t work if you just put stuff in, you have to go through it on a regular basis and keep it lean. (You can learn more about the Action Box in my Organizing Guide called LOVE IS FOREVER (STAMPS): how to fall back in love with snail mail.)
I’m still working on this, but the key (for me, anyway) is to create a daily habit of looking at my calendar and my Things task list on a daily or twice-daily basis. First thing in the morning and at the end of the work day is sufficient, though on days that I spend a lot of time at my desk I’m looking at them a lot more. I look at Evernote on an as-needed basis. Reminders come to me, so I don’t have to remember to look at them. Creating the habit of looking at my calendar and task list means that I don’t have to remember to look at my lists. Again, freeing up my brain for more important things.
In December 2012, Lifehacker published an article called How I Learned to Rely on my Memory and Stop Depending on Technology, that is the antithesis of what I’m talking about here. I re-read it just now and it made me squirm to even think of trying that experiment.
I am so happy that I have technology to help me make up for the deficits in my memory. Depositing everything into my apps makes my mind clearer. And, I feel, it makes me happier and more productive. I love that.
Photo by Hey Paul Studios via Flickr.
Special offer for early registrants to Get Back on Track!
As I mentioned here before, my amazing friend and life coach Shannon Wilkinson is coming to St. Louis in mid-March and we’re putting on a fun in-person workshop called Get Back on Track on Saturday, March 14.
Because we want to get a good head count to reserve the venue, we’re offering a little incentive to register early. Those who register on or before February 27 will receive a special bonus of our downloadable kit, Why Resolutions Don’t Work—and How to Get What You Want Anyway.
The kit sells for $19. The workshop itself is only $34. So if you register by February 27, it’s like getting to spend an amazing 90 minutes with Shannon and me for only $15! Best deal of the year so far, hands down.
I’d love to see you at this workshop—we’ll be there to answer your questions about how to set, keep going or get back on track for your 2015 goals. Shannon’s coaching techniques are amazing (they feel like magic) and participants will have the opportunity to get coached live during this workshop.
So check it out and register while the getting is good!
Search
Recent Posts
- Worth repeating: Figuring out what to watch on TV
- The power of incremental progress
- Podcast guest spot on the role of organization for folks with chronic illness
- No excuses series (part 3): "It was a present"
- No excuses series (part 2): "I paid a lot for that item"
- No excuses series (part 1): "But I might need it!"
- Retiring the New Organizer Guides
Tags
About Janine

Hello! I’m Janine Adams — a certified professional organizer based in St. Louis, and the creator of Peace of Mind Organizing®.
I love order, harmony + beauty, but I believe that the way that you feel about yourself and your home is what truly matters.
If you’re ready to declutter with a purpose and add more ease to your life, you’ve found the right blog — and you’ve found the right company.
read more »Links
- Ravelry
- Getting to Good Enough podcast
- Organize Your Family History
- Institute for Challenging Disorganization
- Peace of Mind Spending
- National Association of Productivity and Organizing Professionals
- Shannon Wilkinson, life coach
- NAPO St. Louis
- Are you interested in becoming a professional organizer?