An extra hour on Sunday!

In the U.S., we gain an hour on Sunday as Daylight Savings Time (finally) ends. I always love this day because we’re given the gift of an extra hour. Back in the day, before clocks automatically set themselves, I made a point of turning the clock back after I woke on Sunday (rather than before bed), so I could actually experience gaining an hour. Nowadays, I settle for planning ahead about how I’ll use the hour.
For me, this year, my plan is to use the extra hour doing genealogy research. I will have just finished with a 30 × 30 challenge on my genealogy blog, Organize Your Family History, and mindfully using that extra hour for genealogy research will help keep the momentum I gained in October going.
How about you? Do you have plans for your extra hour? It might be fun to give it some thought. Whatever you decide to do, I encourage you to consider doing something for yourself, if possible. Maybe some sort of self care. Or a phone (or Zoom) conversation with a friend you haven’t seen in awhile. I hope you enjoy your extra hour!
Photo by Sonja Langford on Unsplash
The Power of Enough Zoom presentation
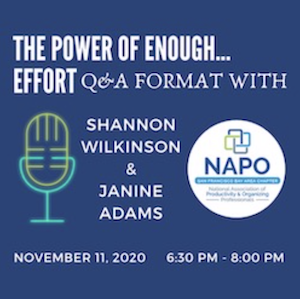
Since June 2018, life coach Shannon Wilkinson and I have hosted the weekly podcast, Getting to Good Enough, about letting go of perfectionism so you can do more of what you love. We just recorded Episode 128!
We were tickled to be invited by the San Francisco Bay Area chapter of the National Association of Productivity and Organizing Professionals (NAPO) to do a virtual presentation for their chapter (and anyone else who wants to buy a ticket) called the Power of Enough…Effort. Professional organizers are accustomed to talking with clients about identifying when they have enough physical stuff. In this presentation, Shannon and I will be talking about when to know you’ve put enough effort into something.
We embraced our motto “Let it be easy” when we set a couple of parameters before saying yes to the invitation. We requested a very informal presentation: No Powerpoint, no pre-set talking points. Instead, this will be an unrehearsed Zoom conversation where Shannon and I will discuss the power of enough effort and then answer questions from the audience.
The presentation will be on Wednesday, November 11, from 6:30 to 8:00 pm Pacific time. (This is the time frame for the chapter meeting; our presentation will take about 60 minutes of it, but I’m not sure which 60 minutes.) It occurs to me that some of you who read this blog (or listen to the podcast) might enjoy attending. The fee for those who aren’t NAPO-SFBA members is $30. For more information and to register, visit the event page on the NAPO-SFBA website.
We’re excited to model the power of enough in our presentation (as we do in our podcast)!
Good things can happen when you open your mail!
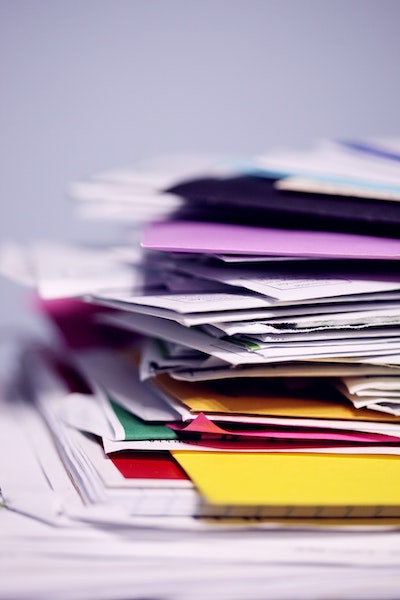
Keeping up with the snail mail is a challenge for a lot of my client. Sometimes it goes unopened for days or weeks. I had a couple of experiences this week that made me grateful that I make a habit of opening the mail every day. (For some reason, I’ve always loved opening mail, so it’s not a hardship.)
- We received a routine-looking piece of mail from our health insurance company that I expected to be an Explanation of Benefits. My husband had a health incident recently that necessitated an ambulance ride and a short hospital stay. (He’s fine now.) I opened the mail from the insurance company and inside was a $528 check! It was to reimburse us for the out-of-network ambulance. I don’t fully understand it. But I’m very glad I opened it!
- In the same mail delivery was an envelope from our auto insurance company, with the policy renewal. I took a look at the new rate and my eyes bugged out. The premium for my van had more than doubled. So I called the next day and got the wheels in motion to correct it. Our premium is paid automatically, so if I had not opened that mail we would have paid a much higher premium. Obviously, we would have noticed it, but it would have been a more stressful situation.
So the moral here is to take a moment and open your mail the day it arrives. You might find a check! Or a mistake that you can rectify. Bonus: If you open your mail daily and discard everything you can, your home will be tidier.
If this message resonates with you, you might be interested in purchasing my $9 Organizing Guide about handling the mail, called Love Is (Forever) Stamps—how to fall back in love with snail mail. Oh, and as an fyi, I’m having a half-off sale when you buy all eight of my organizing guides. Just scroll down to the bottom of the page linked above and click the Add to Cart button under “Want them all?”. Then enter the coupon code VOTE at checkout and you can get all eight guides for only $31.50. The coupon expires on November 3.
Photo by Sharon McCutcheon on Unsplash
Worth repeating: The importance of a place for everything

I wrote this post four years ago when we were in the midst of a kitchen renovation. The disorientation that losing access to your kitchen brings is real. But, of course, it’s worth it. We love our new kitchen. Re-reading this post today about the importance of having a place for everything made me want to share it again, because it’s such a universal truth.
My husband and I are in the midst of a kitchen renovation. If you’ve ever done that, you know how disruptive it can be. We’re lucky in that we actually have a spare kitchen to use. (We live in a two-family house, but no longer rent out the downstairs apartment.) Still, despite my best efforts to organize the downstairs kitchen for our temporary use, everything feels topsy turvy.
This has led to two realizations on my part:
- The kitchen really is the heart of the home. Take it away and you feel adrift.
- When you don’t have a place for everything, you really can’t maintain order.
I’m a naturally messy person, as I’ve written here many times. I don’t mind a little disorder around me. But I’ve come to learn that the critical component to maintaining my sanity amidst disorder is that I know where everything goes and know I can put it away swiftly.
Right now, we have items that usually belong in the upstairs kitchen (our main kitchen) and need to reside on the second floor that I just can’t find a home for. So the dining room table and a desk remain cluttered, despite my efforts. We’re slowly getting into a groove (we’ve been out of our kitchen a week). Just getting out the door has been challenging because we’re accustomed to exiting from the back staircase off the upstairs kitchen and that’s where items like our keys, my purse and dog-walking paraphernalia used to reside. For a little while, until we established a new place for them, we’d walk all over the house looking for those items.
The whole experience has given me new-found empathy for my clients who struggle because they don’t have a place for everything and therefore can’t find anything. And it’s made me understand the relief they feel when we help them establish a place for everything so they can put things away.
So far, the renovation is on schedule and (knock wood) we’ll be back in our kitchen by the end of the month. I cannot wait to unpack our kitchen stuff into the new space. (I created a spreadsheet detailing where everything’s going to go.) I’ll probably enlist the help of one or more professional organizers to help me organize my kitchen when that happy day comes.
Here’s the bottom line. The adage, “A place for everything and everything in its place” is truly the key to a peaceful life for me. If you’re not living it, I encourage you to do what you can to get there! (Here’s a hint: the first step is usually decluttering!)
Check your credit card benefits!

On my big driving trip to Walla Walla last month, a pebble hit the windshield of my rental car and cracked it. Fortunately, that happened on the second-to-the-last day of the trip and it didn’t impede my driving.
When I turned in the rental car, Enterprise charged my credit card for my car insurance’s $500 deductible. I contacted my insurance company to start the claim process and the claims agent advised me to check the benefits for the card I used to pay for the rental car because some credit cards will reimburse the deductible in situations like this.
I checked and sure enough my Chase Freedom card does have that benefit! (It’s called Auto Rental Collision Damage Waiver Benefit.) I had to upload some documents into an online portal, which required a little effort. But yesterday I received notification that the claim was accepted and today $483—the cost of the repair—landed in my bank account! (Enterprise refunded the remaining $17.)
Next time you have a few spare minutes, I encourage you to peruse your credit card’s benefits. You might be pleasantly surprised!
A great 90th birthday present
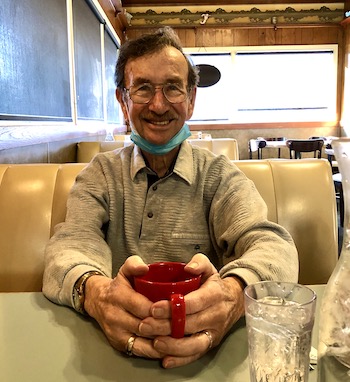
Gene at 90
My father, Gene Adams, turned 90 on September 11. He lives in Walla Walla, in remote southeastern Washington state. I usually visit about four times a year but because of COVID, I hadn’t seen him since early February. I couldn’t stand the idea of not being with him to celebrate such a big day, but I also wasn’t comfortable flying there and potentially picking up and transmitting the virus to him. So I drove. It was a 4,000-mile roundtrip journey and I had a great time despite the weirdness of COVID-era travel. (I promise a post on the trip and the precautions I took.)
Perhaps the greatest part of the whole birthday was the gift I gave him. I say this as someone who is not a gift person. I rarely think of giving them and when I do, I have a hard time coming up with good gifts. The fact that he doesn’t need anything ratchets up the degree of difficulty. I was telling my friend Geralin Thomas about my quandary and she came up with a great idea that was a giant success.
Because of COVID, we couldn’t have a birthday party, which is what I probably would have done in lieu of a gift. Instead, I reached out to dozens of people from various parts of his life, asking each of them to send me a 30- to 60-second video wishing him a happy birthday and marking the occasion any other way they wanted to.
I used Trello to track my invitations and responses, which made it really easy. It was such a joy to communicate with these folks and receive their wonderful videos. People jumped at the opportunity to participate and I ended up with forty videos. I purchased an older iPad for him so he can watch the videos when he wants. (He’s a Luddite with no computer and no internet access and no desire for either.)
I put the individual videos on the iPad and also used iMovie on my Mac to string them all together into one video, which I put on the iPad. That turned out to be the way he likes to watch it most. Finally, I bought a lightning-to-HDMI adapter so that he can watch the video on his TV. I did everything manually and found it quite easy. (Since then, I have found out about a service that will send out the invitations and the compile the videos for you for a small fee, VidHug.)
He was blown away. Because he’s a Luddite he thought it was a lot harder for me to do than it actually was, though I tried to set him straight. He really enjoyed hearing from so many loved ones. The video was just plain heartwarming.
If you have an elderly relative you need a gift for, I heartily recommend this. Honestly, it was quite easy—and very enjoyable—to organize. Feel free to reach out if you need advice or tips!
Make a plan to vote

Here in the U.S., the general election is less than 26 days away. From the top of the ballot to the bottom, it’s a very important election. Because of COVID-19, I urge you to make a plan to vote now. Don’t wait to think about it until November 3 when your options will be severely limited.
I outlined the Missouri voting options in my previous post, Ready, set, vote!. Missouri has a particularly complicated set of rules about voting before election day, so if you’re a Missouri and it’s not clear to you, please check out that post. And remember, if you’re in St. Louis I am happy to notarize your ballot for you. Just shoot me an email to make arrangements to come to my porch.
Less than four weeks to the election, I urge you to decide whether you’ll vote early, vote absentee, do a mail-in vote, vote at the polls on election day or whatever other option your state might offer. You can go to Vote.org to see your options and to Vote411 to see all the issues on your ballot.
Personally, I did a mail-in ballot, which required notarization and had to sent through the U.S. Mail. I sent it on October 2 and was thrilled today to see that it has arrived at the election commission. I’m in good company. My understanding is that more than 4.5 million people have already voted in this election. It feels great to have my voting completed!
If you’re planning to vote before the election, I urge you to do it as soon as you can. The earlier you do it, the less stress you’ll experience, I expect. If you plan to vote at the polls, be sure and schedule plenty of time because you might encounter lines.
Voting is always important. But this year it is vitally important. If you haven’t already, please make a plan today to vote!
About Janine

Hello! I’m Janine Adams — a certified professional organizer based in St. Louis, and the creator of Peace of Mind Organizing®.
I love order, harmony + beauty, but I believe that the way that you feel about yourself and your home is what truly matters.
If you’re ready to declutter with a purpose and add more ease to your life, you’ve found the right blog — and you’ve found the right company.
read more »Links
- Are you interested in becoming a professional organizer?
- Institute for Challenging Disorganization
- Peace of Mind Spending
- Organize Your Family History
- NAPO St. Louis
- Shannon Wilkinson, life coach
- Ravelry
- National Association of Productivity and Organizing Professionals
- Getting to Good Enough podcast