I still love my Loopy iPhone case!
Photo courtesy of Loopy Cases.
In May 2017, I blogged about my Loopy iPhone case, which I still adore. I’ve edited the post slightly and reprint it here. I’ve used the heck out of that loop for three years and it started to tear, so a month or two ago I ordered a replacement loop. I inquired about shipping and in the course of my conversation with customer service they offered to refund what I’d paid for the replacement loop, because Loopy has a lifetime warranty! I was very impressed. It makes me love them even more.
I attended the NAPO conference last month and roomed, as usual, with my pal, Geralin Thomas. Geralin is always turning me on to great things and I’ve learned over the years to take her recommendations very seriously.
This time, she showed me her phone case, which is called Loopy. This case has a collapsible silicon loop on the back, which threads through holes in the case to securely fasten the loop.
I dropped my phone in the garage last month and cracked the screen a tiny bit, so I’d been feeling a bit insecure. Who knew that a loop on the back of a phone case could give me such a sense of security?
Since I don’t have a landline, I have to keep my phone on my person, which can be a pain when I’m wearing something without a pocket. With Loopy, I can securely hang on to my phone with one finger while I’m carrying a bunch of other stuff. I can even hold my phone when I walk my dog, if I want, without worrying about dropping it.
Sometimes, though, I want my hands completely free when walking Bix. I have a dog-walking belt with a carabiner that I wear when I walk Bix in weather that’s too warm for a coat with pockets. I just attach my phone to the carabiner by the loop so that it’s handy.
An added Loopy bonus is that when I set my phone face up on my desk, it sits at an angle that makes it easy to read. If I want to put my phone in my pocket, the loop collapses.
I’m (still) tickled pink by this purchase, so I just had to share the Loopy love!
A fun pandemic-era celebration
My birthday was last week. I’m a birthday person. I’ll tell anybody and everybody when it’s my birthday (it’s September 22) and I love a fuss being made. That doesn’t mean I want lots of gifts or even a party. But I do love having a special day.
So far in this pandemic, we’ve celebrated our 30th wedding anniversary in April and my husband’s birthday in May and both celebrations were fairly subdued because of COVID. After six months of the pandemic, I knew I wanted more for my birthday.
Luckily for me, I’d heard about DFW Scavenger Hunt (DFWSH), a company that before the pandemic (if I understand correctly) ran in-person scavenger hunts, for team-building and private events, in the Dallas area. Obviously, the stay-at-home order made that impossible and they did a marvelous pivot. They started offering a stay-home scavenger hunt. When I heard about it back in July, I made a mental note and in August, I reached out to them.
September 22 was available and we easily set it up. On the big day, all the guests had to do was log in to the Zoom link Brandon from DFWSH had provided and he took it from there. There were several kinds of games, including finding items in our homes (we all were on one team) and solving word games and some trivia games. The whole thing lasted just over an hour.
We had so much fun! A couple of dozen people participated from around the country (and the world!) with friends and family from all parts of my life. Brandon had me fill out a survey about my interests and he created a custom experience with lots of references to my favorite things (like Hamilton, The Office, and American Ninja Warrior). There was much laughter. And that’s really what I was looking for. Brandon did a great job of emceeing.
I heartily recommend the experience. You can check out the Stay Home Scavenger Hunts. I just noticed they also have kids’ virtual hunts, as well as a Halloween virtual hunt and a Holiday virtual hunt! The price is very reasonable—for events like this they charge $12 per webcam. (My party was under $200.)
Did you pay your quarterly taxes on September 15?
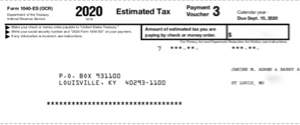
I’ve been paying estimated taxes every quarter for 25 years, since I left my full-time to become a freelance writer in 1995. After ten years writing, I started Peace of Mind Organizing in 2005. That’s 25 years of self-employment and 100 estimated tax payments. I know that they’re due January 15, April 15, June 15, and September 15. That’s been engraved in my memory for years.
Then along came 2020. As you might recall, in response to the COVID-19 crisis, the IRS extended the deadline for tax returns, as well as estimated tax payments, to July 15, 2020. So that day I paid the first two estimated tax payments for the year. (Amazingly enough, I’d filed my 2019 taxes before the tax deadline was extended.)
This morning, I realized I’d completely forgotten the September 15 estimated tax payment. It may because I was in Walla Walla and my computer was in the shop (a one-two punch), so I was less connected to my day-to-day life. It may be because only two months, instead of the customary three, had elapsed since the last time I paid. (Although two months in 2020 feels like a lifetime.) Whatever the reason, I was a little shocked to realize that I’d let the deadline slip. And I’m making the payment today.
It occurred to me that maybe I’m not alone in this and that you could use a reminder that the estimated taxes for June, July and August 2020 were due on September 15. If you pay estimated taxes and didn’t make a payment on the 15th, feel free to join me in doing it today!
Ready, set, vote!
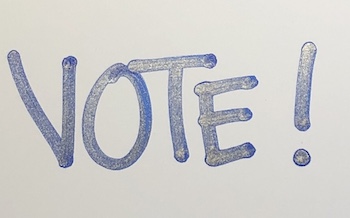
It’s less than six weeks to the November 3 election here in the United States. This has long felt like a very important election, and it’s been made even more important by the passing of Supreme Court Justice Ruth Bader Ginsburg on September 18. Between now and November 3, I’m committed to devoting a whole lot of time, energy and resources to helping people make sure they’re able to vote.
This is something that Shannon and I discussed on Episode 122 of our podcast, Getting to Good Enough, entitled Get Out the Vote, which dropped today. In this episode, we talk about making sure you’re able to vote, and how you can help get out the vote. There are loads of resources in the show notes so I encourage you to read them and/or listen to the episode.
Voting in Missouri, where I live, is confusing. And the inherent risks of voting in person on November 3 because of the pandemic have made it even more confusing. Since I’m assuming a lot of my readers are in Missouri, I want to help you understand the options. Here’s an easy-to-understand flyer on the Secretary of State’s website that spells it out well.
There are three ways to vote in Missouri. This chart on the Secretary of State website indicates the deadlines for each. Here’s my explanation of the three options.
Please note that in Missouri, absentee and mail-in voting are two different things, with different requirements.
Missouri Option 1: Absentee voting. To vote absentee, you must have an excuse. This year, because of COVID-19, anyone age 65 or older or at risk of contracting COVID, such as those with diabetes or heart problems, may vote absentee. Other excuses include being incapacitated or caring for an incapacitated person, being out of town on election day or religious beliefs. (The complete list of excuses is on the ballot request form.) Absentee ballots can be requested by mail (deadline is October 21 at 5 pm) or in person (deadline is November 2). An absentee ballot request form can be found here. Most absentee ballots must be notarized. The exceptions are for those who indicated a health reason (including all voters age 65 or older) or those caring for an incapacitated person. Absentee ballots can be returned by mail or dropped off. You can also vote absentee in person at your local election authority in advance of the election and you do not have to apply in advance to do so. In St. Louis city and county (and probably elsewhere in Missouri) satellite absentee voting sites will open next month.
Missouri Option 2: Mail-in voting. This year, because of COVID-19, Missouri is offering no-excuse mail-in voting for the first time. You do not need an excuse to vote by mail; however, all mail-in ballots must be notarized and you MUST return your ballot through the U.S. Postal Service. You can request a mail-in ballot by mail or in person at your local election authority. Here’s a link to a mail-in-ballot application. The deadline to request a mail-in ballot is October 21 at 5 pm.
IMPORTANT NOTE: If you live in St. Louis and need a ballot notarized, contact me at janine@peaceofmindorganizing.com. I became a notary public in August specifically to help make it easier for people to vote by mail or absentee and I want to help you. I do not charge for notarizing a ballot.
Missouri Option 3: Go to the polls on election day. Voting in person is certainly an option. Be sure you know where your polling place is since the number of polling places in your area may have been reduced. Be sure to wear a mask and follow social distancing practices. And prepare to be there awhile. Because of the potential for a reduced number of polling places, and the importance of the election, long lines are likely. Go to this page on the Secretary of State’s website to find your polling place and to see what issues are on the ballot in your jurisdiction.
If you’re planning to mail your ballot, give it plenty of time to get there. I suggest considering October 20 your deadline.
This year it’s really important to make a plan to vote. You don’t want to wait until the last minute and find out that your options are more limited than you thought. You also want to make sure you understand the different options, choose the appropriate one and execute it properly. If you make a mistake—and unfortunately, it’s easy to make a mistake—your vote may be disqualified. If you have any questions about Missouri voting, feel free to reach out to me. I’m happy to help make it more clear.
If you live in a state other than Missouri, you can go to Vote.org to find out the voting rules in your state. I’m happy to help you navigate your options as well, if you’d like.
Edited to add: I’m planning to do a separate post about this, but it bears mentioning now that you should educate yourself about what’s on your ballot before going to the polls or filling out your absentee/mail-in ballot. The League of Women Voters has a website, Vote411.org, that provides information on your election based on your address. Right now, it lists only the presidential race when I enter my address. But Missouri’s Voter Outreach page had a more comprehensive listing of what’s on the ballot when I entered my address.
Worth repeating: Organizing your car
I wrote this post a few years ago and when I stumbled across it today, I decided to share it again. I have a different car now and can no longer use my knitted trash can, alas. But I got another hand-made trash receptacle for my car, which I love. If you, like me, are spending less time in your car these days, now might be a good time to organize it. You’ll have a fighting chance of keeping it organized!
Last week, a client asked me to help him organize the console and glove compartment of his car. I think that’s the first time I’ve been asked to organize a car and it was fun! In no time at all, we had his car organized so that he can find what he needs easily.
Perhaps because I had so much fun with my client, I decided to organize my own car today. In my case, the console is pretty much empty and the glove compartment under control, but the cargo area and back seat (full of organizing supplies) needed some love and attention.
Organizing a car is like organizing any space, just on a smaller scale. Here are the basic steps:
- Empty the area in question (glove box, console, cargo area)
- Sort the items into categories, putting like things together
- Toss the inevitable trash
- Take inside the stuff that belongs inside (I can guarantee there will be some)
- Donate the car gadgets that seemed like a great idea but you never use
- Start putting away the stuff you know you want to keep in the car. Start with the items you use most often and put them in the areas easiest to reach from the driver’s seat.
- Put the “just in case” stuff in the farthest away storage spaces—you really want to keep close at hands the items that are used regularly.
Here are some storage ideas we used for my client:
- Ziploc® bag to corral his food items in the glove compartment
- Stacked accessory boxes in his center console (which is square-ish), with the most used stuff in the top box, without a lid. Tucked underneath in an accessory box with a lid were items he wanted in the car but didn’t need super-easy access to.
- The pocket in the passenger side door for the owner’s manual, so it didn’t take up valuable space in the glove compartment.
Don’t forget about your wastebasket! Putting wrappers and other trash items in a receptacle is probably the single best thing you can do to keep, your car looking clean. I absolutely love the hand-knit basket I put in my car (I knitted it before I bought the car and it fits perfectly into the spot in front of the console! Here’s a picture:

If you like the idea of a decorative, hand-made wastebasket, there are no shortage of options for car trash cans on Etsy.
Now that my car is clean and organized, I’m off to get it washed and detailed! When I think about how much time I spend in my car, I realize I should do that more often!
Five months of daily yoga
Today is special for me because it marks five months of doing at-home yoga every day with Yoga with Adriene. That’s 153 days in a row of yoga. It’s gone from something I felt like I should do (even when I didn’t really feel like it) to something I want to do. There’s no longer a question of whether I’ll do it. The question is just which yoga video I’ll do. I almost always do it in the morning, before walking Bix. It’s a lovely way to start the day.
In June, after two months of daily yoga, I wrote a post about why I love Yoga with Adriene. I just re-read it and I don’t think I can improve upon the reasons I enumerated, so here they are again:
Nine things I love about Yoga with Adriene
- I’m getting stronger and more flexible. I’m 57 years old. I am absolutely thrilled to be getting stronger and more flexible, not the other way around.
- It’s good for my body and my mind. Stilling my mind, breathing deeply and moving my body are absolutely what I need right now.
- It’s gentle. Adriene is such a kind and gentle communicator. Her workouts are full of love and body acceptance. She suggests modifications for every pose and normalizes the idea that you might be not able to do all the stretchy bendy things she can do.
- Adriene is funny. She’s a yoga goddess with a beautiful body but Adriene is self-deprecating and makes funny comments all the time. (Today she bowed her head, then commented, “I see toothpaste on my shirt. Class act.”)
- There are many options, but I don’t have to make a choice. I’m easily overwhelmed by options. Adriene offers 30-day yoga journeys every January where you just do the workout designated for that day. (You can start any time.) No choice necessary. She also offers a themed calendar every month, so you can do the workout for that day. (This month the theme is, appropriately enough, Courage.) So far, I’ve done three different 30-day journeys, two of them twice. I’ve done 2020’s Home twice, 2015’s 30 Days of Yoga twice and 2019’s Dedicate once. I love that I don’t necessarily have to choose which of her many videos to do!
- The workouts are varied but there’s continuity. Each workout has some sort of theme—it might be for a certain part of the body (today I did neck and shoulder relief) or it might be to create a certain feeling, like “Soften”. After doing it this long, the yoga poses are familiar but there endless ways to put them together and each workout feels fresh to me.
- It’s free! Adriene does have a paid community, but all the workouts on her YouTube channel are free. And they’re not interrupted by ads.
- I get to do yoga in my pajamas. I know if would be very hard for me to leave the house to do yoga. Now, I just have to take a few steps from my office to my guest room to do yoga in the morning. And most mornings I do it in my pajamas. Talk about letting it be easy!
- Benji. Adriene’s Australian Cattle Dog, Benji, is present in almost all the videos. He’s calm and zen and adorable. Usually he’s extremely well behaved but occasionally he does something funny (like the time he sat on Adriene’s head when she was in child’s pose.) Adriene always acknowledges him and treats him with love.
I had been thinking about doing yoga for literally years. And now it’s part of my life. I think the reason I could get started and stick with it was that I got rid all the barriers—it literally couldn’t be easier for me to do from my home, often in my pjs. (Plus, I was inspired by my awesome niece, Miranda, who won’t start her day without it.)
I’m going to be taking a two-week driving trip soon and I intend to keep up the daily practice. I won’t be doing it out of a sense of obligation to break the chain. I’ll do it because I want to do it to help my body (and my mind) after long days of driving. I am so grateful to have been able to make this part of my life.
Is there something you’ve been wanting to incorporate in your life that you’ve had trouble starting? Maybe take a look at the barriers and see if you can set them aside. I’m really glad I did.
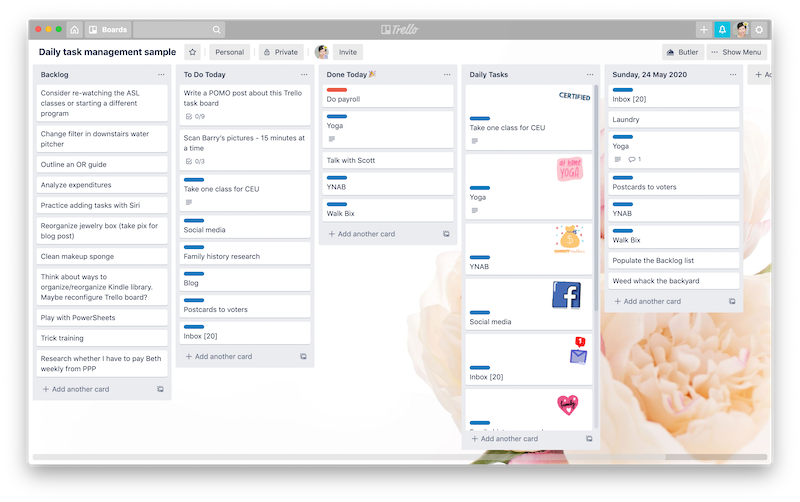
The nitty gritty of my Trello daily task management board
Back in May, I wrote a blog post, called Trello + automation = productive bliss, about the daily task management Trello board I’d been using for a couple of weeks. As you can tell by the title of that post, I was really excited about this task-management system. Now, three months later, I’m even more excited about it. I’ve used it every day (many times a day) for about four months now and it is helping me be more productive and, even more importantly, it’s keeping relatively stress-free. I’m holding less in my head, which gives me a clearer brain.
On Episode 118 of our podcast Getting to Good Enough, published today, my co-host Shannon and I discussed this task management system—which I’ve roped her into trying—and I promised listeners a granular blog post about how I use it. If you’re a podcast listener, I’m glad you clicked over to this post and I hope you find it helpful. (If you haven’t listened to Episode 118, and this topic interests you, I encourage you to listen to it.)
As I wrote in my original post, my board is based on a template created by Mitchell Fry that is a free download from Trello. The template includes a link to his blog post with two tutorials about setting up the Butler automations for this board. I encourage you to check it out. Please understand that give full credit to James for this brilliant board.
I’ve modified the daily task management (DTM) board a a bit for my needs and I’m so happy about it I want to share it in detail in hopes it will help you too.
Just to give you a point of reference, here’s a picture of a sample board I created. It looks like my regular board, with some of the more personal tasks removed. (It’s the same photo I used in the previous post.)
I’m going to break this post down into a few sections:
- The basics
- The automations
- How I use it every day
- The extra goodness (confetti, stickers, cover art, divider cards)
- Entering new tasks
The basics:
My DTM board is broken down into lists. The key lists with which I interact every day are (in left-to-right order):
- Backlog
- To Do Today
- Done Today
- Daily Tasks
- The past week’s Done Today lists (I keep seven days’ worth before they’re archived)
The Backlog list contains my master task list. Each is written on a card, which are like electronic sticky notes. For the most part I have one task per card.
The Daily Tasks list contains, as you would expect, the tasks I like to do every day, usually seven days a week. There are 13 cards in there, including things like yoga, blog, walk Bix, and write in my gratitude journal.
The To Do Today list is populated by my daily tasks (which are automatically moved to the To Do Today list while I sleep—more on that in a minute) and the tasks I select each morning from the Backlog list.
The Done Today list contains cards that I drag manually after accomplishing a task. When I drag something into Done Today using the Trello app on my computer, it explodes with confetti. You read that right. It’s as awesome as it sounds. To get the confetti, all you have to is copy a little icon into the title of the list. You can find the icons on this blog post from Trello. (Scroll down to “Party Your Pants Off.”)
Here’s the video of the confetti I created for the last post, so you can see what I mean:
The automations
I want to interject right here that automations are not available in the free version of Trello. Trello Gold, which costs $5 a month (or $45 when paid annually), provides a limited number of command runs every month. I found out within two weeks that in order to have all the automations I use, with the frequency I use them, I have to pay for Trello Business Class. (I pay $120 a year for that.) It’s absolutely worth it to me, obviously. But I wanted to make that clear before you read further.
I’ll be the first to admit that setting up Butler automations isn’t intuitive for a non-coder like me. But Mitchell Fry’s blog post Using Butler Automation with your Trello Boards recreates, step by step, how to do them in its two tutorials. So you can just replicate what he teaches. And once you understand it a bit, it becomes easier to branch out and create additional automations of your own invention.
These are the automations that I’ve employed. They are the secret sauce of the system and they are the reason it’s been so sustainable for me.
While I’m asleep, these things happen:
- Everything left in my To Do Today list is moved to my Backlog list.
- A new list is created with the previous day’s date and the cards in my Done Today list are moved to it.
- The cards from the Daily Tasks list are copied to the To Do Today list.
- Any Done Today list dated more than a week ago is archived.
Those are my daily automations. I also have weekly and monthly automations as well. For example, on Saturdays, two cards appear in my Backlog list: weed rain garden and laundry. Every other Wednesday a card appears in my To Do Today list that says “get ready for housekeepers.” And on the last day of the month, a card appears in my To Do Today list, reminding me to gather social media analytics, something that I do every day on the last month.
The types of automations described above are in the Calendar section of the Butler automation. I also use Board Buttons. The one I use most often shuffles the Backlog list so I don’t get in a rut of looking at the only ones on the bottom or the top. I also have a board button that selects a random task from the Backlog and puts it in my To Do List. I love that.
How I use it every day
When I wake up in the morning, my DTM board is ready for me to finish setting up for the day. My To Do Today list is populated with my daily tasks and nothing else. I look at my Backlog list and archive any daily tasks that I didn’t accomplish the previous day. (They’re easy to spot because they have stickers. More on that in the Extra Goodness section below.) If there are tasks I actually did but didn’t manage to drag to Done Today, I move them to the previous day’s Done Today list (which is also equipped with confetti). Then comes the important part: I drag those things I want to get done today into the To Do Today list. As I look that list over, I usually put the cards in the order I think I’ll do them.
If I have appointments or other key events in the day, I’ll separate them out with dividers. I make a divider card by typing three dashes in a blank card. That creates a card with nothing but a line in it and I use the divider card to separate chunks of the day. So, for example, if I have a phone appointment at 11, I’ll add the appointment as a task and put a divider card before it, which indicates to me that I hope to get everything above the divider line done before that appointment. That’s a level of detail that’s certainly not necessary, but it works for me.
Here’s what that looks like. I took this photo of my actual board today.
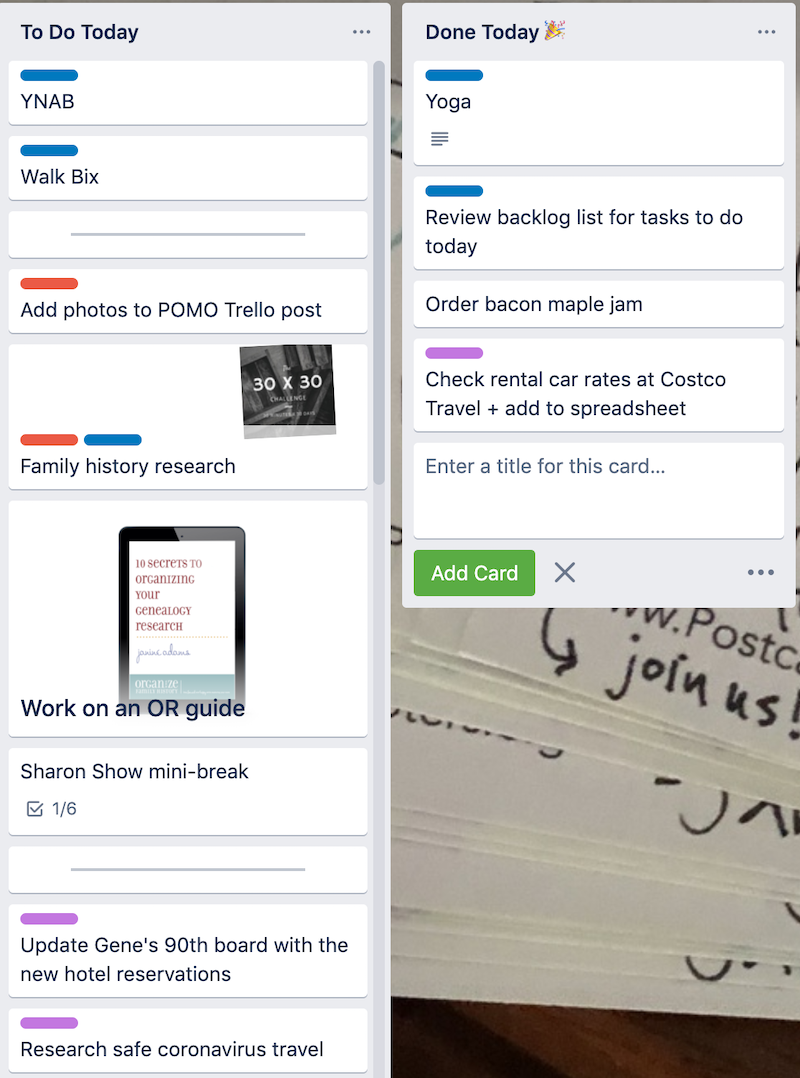
Throughout the day I’m scanning my To Do Today list and moving items I’ve accomplished into the Done Today list while I bask in my confetti explosion. Also throughout the day I’m adding tasks. Usually I add them to the Backlog list, but sometimes I add them to the To Do Today list, depending on their urgency. And, yes, I’ve been known to create a card after I’ve done something that wasn’t on the list, just so I could drag it to Done Today and get confetti.
Extra goodness
Everything I’ve described is great, in my opinion. But there are some little extras that are cherry on the sundae. They include:
- Stickers. I add a sticker to my daily tasks, which helps them stand out and are cute and fun (and who doesn’t need a little cuteness and fun in their task-management system?). The stickers do take up extra space, though, so I have an automation that removes the sticker once I move it to the Done Today list. (I used to remove them from the tasks in the To Do Today list, which is why they’re not in the top photo, but now I keep them until the task is done.) Stickers are accessed by clicking on the Show Menu button at the top the board then Stickers in the Menu panel. The stickers are actually gifs, but I don’t have mine move. That would be overstimulating for me. Sometimes I upload my own photos to use as stickers (like the 30 × 30 challenge sticker in the Family History Research card shown above). You can see some of the Trello-supplied stickers I use for daily tasks in the sample board at the top of the post.
- Labels. You can label cards with a little bar of color to color-code tasks. So, for example, I have a blue Daily bar on my daily tasks so that once the sticker is removed, I still recognize it as a daily. The other two labels I use most on this board are Top Priority (red); Financial (green, of course). Right now I’m planning a trip, so I have tasks related to the trip labeled in purple.
- Covers. You can also use photos as cover art on the card, which makes them fun and easily spotted. I do this sparingly, but I do have one for the daily card for working on my next Orderly Roots guide. I uploaded a picture of an existing Orderly Roots guide to use as the cover art. (You can see it in the photo in the “How I use it every day” section above.) You don’t have to upload photos for covers; Trello provides photos from Unsplash that you can use as card covers (as well as board backgrounds). You can also use a color as a cover, either making the entire card that color or putting a big bar of color across the top of the card (much bigger than a label).
- Keyboard shortcuts. My life got better when I discovered the keyboard shortcut for archiving a card. If I hover over a card so it turns grey and press the “c” key on my keyboard, that task is automatically archived and out of my sight. I also use the “l” shortcut for quickly adding labels to a card. You can see a complete list of keyboard shortcuts by pressing the shift key and the ? at the same time.
Entering new tasks
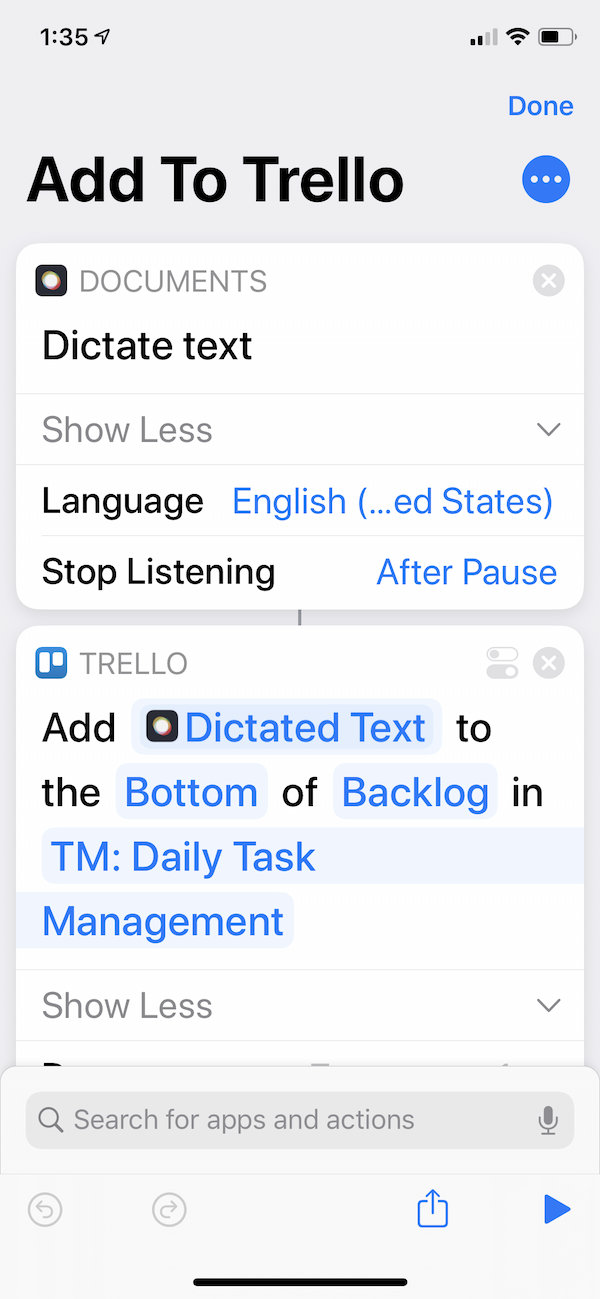
It’s easy to add a new card to a list by clicking on “Add another card” at the bottom of a list. I do it all the time. You can also insert a new card under an existing card by hovering over that card and pressing N. But my favorite way to add a task to my Backlog list is to dictate the task on my iPhone using a Shortcut. This was a game changer for me. It’s the easiest method I’ve ever used for adding a task to any kind of task list (digital or analog).
I find iOS shortcuts a little hard to put together, so here’s a picture of my shortcut recipe for adding a task to my backlog list:
And here’s how it looks on my phone.
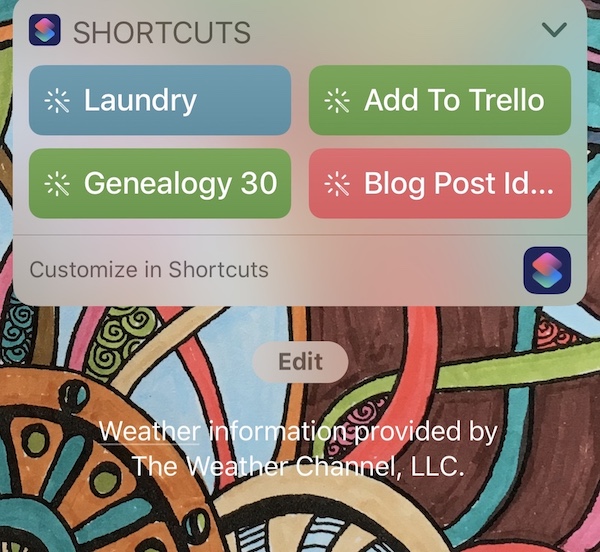
I get to it from the Control Center on my phone (swiping right as far as I can, and then scrolling to the bottom of my screen, where my Shortcuts widget is.) I simply press Add to Trello and start talking. The task is automatically added to the bottom of my Backlog list. It’s like a miracle. (As you can see in the photo, I also have a shortcut that allows me to dictate a blog post idea and it’s automatically added to my Blog Post Ideas Trello board.)
Shannon uses Siri on her Apple Watch to dictate tasks that are added to the bottom of her Trello task-management list. She never even has to touch her phone. That feels miraculous too.
Implementing this new system has revolutionized my desk time. Because of the pandemic, I’m spending a lot of time at my desk and I don’t want to look back at all this available time and feel I squandered it. My DTM board keeps me focused and on task. It’s the touchpoint for my day. Whenever my focus shift away from what I’m doing, I go to the list and I’m reminded of what to do next. I no longer have days where I can’t figure out how the day passed without my getting anything done. I do a lot and what I do is all captured on my board.
One important note: the success of this system (like any task-management system) depends on daily interaction with it. If you were to implement the same automations I have and then ignored your board for a week, your undone daily tasks would pile up in the Backlog list and become overwhelming. If you try it, I encourage you to commit to daily interaction with it until you can reap the benefits that will keep you going.
I hope this post answers questions you have if you’re interested in giving it a try. Feel free to reach out in the comments below through the Contact form if you have further questions you think I can answer.
About Janine

Hello! I’m Janine Adams — a certified professional organizer based in St. Louis, and the creator of Peace of Mind Organizing®.
I love order, harmony + beauty, but I believe that the way that you feel about yourself and your home is what truly matters.
If you’re ready to declutter with a purpose and add more ease to your life, you’ve found the right blog — and you’ve found the right company.
read more »Links
- Institute for Challenging Disorganization
- Ravelry
- Are you interested in becoming a professional organizer?
- Organize Your Family History
- National Association of Productivity and Organizing Professionals
- Getting to Good Enough podcast
- Shannon Wilkinson, life coach
- NAPO St. Louis
- Peace of Mind Spending