No Excuses series (part 2): "I paid a lot for it"
This is the second in a three-part series of posts debunking the three excuses I hear most frequently from clients for wanting to keep items they no longer use or love. Click here to see the other articles in the series.
The second most common excuse I hear from clients who want to keep something they don’t use of love is that they paid a lot for that item. I get it. It feels terrible to let go of an expensive item that turned out to be a foolhardy purchase. But you know what? Keeping it doesn’t make you feel any better. In fact, when you see the item, it just makes you feel worse.
There are two important things to remember when you’re tempted to keep an item you don’t use or love just because you paid a lot for it:
- The money is spent. Keeping it won’t bring it back. Selling it will get you some of the money. And donating will get you a tax deduction. Keeping it doesn’t help.
- There’s a cost associated with keeping items that you don’t use or love, especially if clutter is an issue in your life. There’s an emotional cost (that reminder of your bad purchasing decision); there can be a physical cost if the item contributes to clutter that poses a tripping hazard or you’re unable to clean because there’s so much clutter; and there can be a financial cost if there’s so much clutter that you have to rent a storage unit.
For those expensive items you don’t use or love, I suggest pulling off the Band-aid. Take a deep breath and decide to let it go. If it’s easy to sell it, do so. Otherwise, donate it and take a tax deduction. Or make yourself feel better by giving it to someone you love. I’m pretty sure it will be a relief to get that thing out of your home!
No Excuses series (part 1): "I might need it some day"
This is the first in a three-part series of posts debunking the three excuses I hear most frequently from clients for wanting to keep items they no longer use or love.
When I work with clients on decluttering, we discuss their goals and motivations for letting go of excess. They understand that it makes most sense to hang on to meaningful items, not those that are sitting idle. Yet it’s not unusual for a client to want to keep an unused item that’s perfectly good because “I might need it some day.”
I usually push back, particularly if we’re dealing with severe space constraints and the need to let go of a lot of stuff.
Here’s what I say to those clients when I hear, “I might need it some day.”:
- How likely is it that you’ll need it?
- If you decide to let it go and you do find you need it, are you able to get another one?
- If you keep it, will you be able to find it when you need it?
That last question is important, because if a client is keeping a lot of those “some day” items it may be difficult to organize the stuff they keep in a way that will allow them to find everything.
Here’s the thing about perfectly good items that aren’t being used. If they’re perfectly good, somebody else can use them. Rather than having them sit idle, taking up space, it’s better to contribute to the greater good by donating them and letting them be used. If you hang on to them until a future decluttering session and then decide to let them go, they may be less valuable or useful to others.
Basically it comes down to a couple of things:
- Your goals for decluttering and getting organized. If you’re trying to create space in your home and life so that you can find what you want when you want it and live with ease (my definition of organized), then storing a lot of unused stuff might well get in the way of that.
- A fear of regret. I think a lot of us live in fear of regretting our decisions. If you do find that you let go of an item that at a future date you could have used, you may feel a twinge of regret. But you’ll get past it. Hanging on to unneeded items is a pretty high price to pay to ward off future regret, in my opinion.
I have seen over and over how living with less makes one’s life easier. A great first step toward living with less is letting go of the perfectly good stuff you don’t use.
Stay tuned for parts 2 and 3 of the No Excuses series: “I paid a lot for it” and “It was a gift.”
Find a spot for your tax-related papers
This is the time of the year in the U.S. where the mail carrier starts bringing in tax-related documents, like W-2 and 1099 forms. To avoid that frantic feeling at tax time when you can’t easily put your hands on these important documents, I encourage you to do yourself a favor today.
Establish a spot in a safe place (like a desk) for your 2016 tax documents. It can be an envelope, a letter tray, or a file. Whatever works for you. As soon as it arrives, immediately put that tax document in your designated spot and don’t put any non-tax-related mail there.
When it comes time to figure out your taxes a potential barrier will be gone. Talk about a small action that makes your life easier!
The phrases that make me cringe and smile
When I’m working with a client, a few phrases make me cringe when I hear them come out of the client’s mouth. And a few make my heart sing.
I think my least favorite phrase is:
“For now.”
As in, “I’ll keep that for now.” To me, saying “for now” indicates that the client isn’t committed to keeping something. And if we’re dealing with a lot of clutter, hanging on to items that don’t deserve a commitment is counterproductive (to say the least).
Whenever I hear “for now,” I push back. I ask the client when s/he will know it’s time to let the item go. Or I ask, “What would it feel like to let that go now?” Or I just pause and look at them calmly, hoping they’ll realize that keeping something for now might not be in their best interest.
I also dislike hearing a client give these three (very common) reasons for keeping an item:
- I paid a lot for it
- It was a gift
- I might need it some day
(Keep an eye out for a series I’ll write soon countering each of those reasons.)
There are a couple of phrases I hear that make me smile. Topping that list is:
“I’ve been looking for that!”
I probably hear that at least once a session and it always feels so great. I know how thrilled I am when I find something I’ve been looking for in my home and I think clients have usually been looking longer and feeling less hopeful they’ll ever find it.
I also love hearing the ubiquitous, “This feels so great!” And “I feel lighter!”
Helping someone lighten their load by decluttering is such a rewarding way to make a living. If I never heard a client utter “for now” again, I’d be thrilled. That’s not going to happen, of course. But once we get past the “for now” part of the session to the “this feels great!” part, I know we’re on the road to making a huge difference in the client’s life.
Worth repeating: Baby Ella sings along to Elvis
I stumbled on this August 2013 post in my blog archives and watched it again. I think today is a good day to watch something that makes us smile, so I thought I’d rerun it.
I originally saw this video on Facebook and have watched all five minutes and forty seconds of the video at least a half dozen times. It makes me smile and laugh each time. In case you have seen it, I thought I’d share it here so you can smile and laugh with Ella Mae too.
Little Ella, who according to ABC News is 21 months old, clearly loves her Elvis and her daddy. Be sure and watch it through to the soulful finale!
Support for your New Year's resolutions
Where are you on the New Year’s Resolution Continuum?
(statistics from 2008 survey by Opinion Corporation of Princeton, NJ)

If you fall in that big middle group (or have drifted into the no resolutions group due to disappointment) this could be the year for something different.
A few years ago, Shannon Wilkinson and I teamed up to teach a teleclass on how to actually do the stuff you set out to do every year. We shared the reasons resolutions don’t work, and more importantly, we talked about how to change that. We gave tips and strategies and guided participants through helpful exercises so they experienced a new way of approaching their resolutions and goals.
It was pretty darn awesome. And it’s still available.
The audio of the class and a companion 24-page workbook are available for download right now. The workbook will take you through the process outlined in the teleclass and includes worksheets so you can keep track of your goals and resolutions and how you’ll go about achieving them.
Maybe your resolution (once again) is to declutter and get organized this year. Or maybe you want to make changes for your health, creativity or finances. Our approach is terrific for whatever set your sights on.
Why Resolutions Don’t Work (and How to Get What You Want Anyway)
The recording is great to listen to any time you want to re-vamp a resolution that isn’t working, create a new habit or establish a goal that really works for you. The workbook can stand alone (if you’d rather read than listen) or can help you get more out of the audio.
Details:
- In the audio, we talk for about an hour and then open it up for questions.
- The course covers the common reasons that setting resolutions doesn’t work, and takes you through exercises that help you get what you want.
- The 24-page workbook is based on the content of the audio, but isn’t a mere transcript. (The Q&A is transcribed, however.) It includes worksheets to make the most of Shannon’s meditations.
- This is for anyone who has been frustrated by resolutions or goals, and wants to learn a new way to approach it.
- The cost? Just 19 bucks.
Are you in? Yes? Just click the “Add to Cart” button:

Here’s to getting what you really want in 2017!
Hunkered in? Do some filing!
Much of the U.S. is dealing with some lousy winter weather today. Here in St. Louis, a two-day ice storm is forecast and both the national weather service and the state transportation division have instructed people to stay off the roads. I’m not going anywhere. Seems like a perfect weekend to catch up on a few things.
Are you one of the millions staying in this weekend? And is there a pile of papers in your house somewhere waiting to be filed? Here’s my challenge to you: Set a timer for 10 minutes and start filing! If that pile’s been there awhile, I bet a lot of the paper will have aged out. Throw away as much of it as you can. I’d be willing to bet that in ten minutes you’ll make a nice dent.
And you’ll never know what you might find in the pile. In 2015 I finally tackled a pile that I’d put on top of a filing cabinet because I needed to make files for them. (Bad organizer!) In that pile I found my grandfather’s birth certificate. That may not sound like such a big deal, but I’m a genealogy researcher and for a number of years I’d been trying to solve the mystery of where my grandfather was born in 1904. The answer was sitting my house the whole time.
Between this past Christmas and New Year’s, I tackled a really old pile of papers that had been mocking me in my office for literally years. There were no treasures there, beyond some nice handwritten notes from people. (I filed them in my Kudos file.) I think it took less than a half hour to process all that paper because I was able to throw so much of it away.
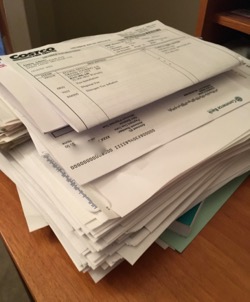
I have a pile of household papers needing attention in a different office in our house. I’m going to see how much progress I can make on it ten minutes at a time and I’ll post here how long it took. That’s a picture of the pile at the top of the blog post.
There’s no better time than now to eliminate or reduce that pile!
ETA: I did address the pile pictured above, and after three 30-minute spurts, it’s gone!
About Janine

Hello! I’m Janine Adams — a certified professional organizer based in St. Louis, and the creator of Peace of Mind Organizing®.
I love order, harmony + beauty, but I believe that the way that you feel about yourself and your home is what truly matters.
If you’re ready to declutter with a purpose and add more ease to your life, you’ve found the right blog — and you’ve found the right company.
read more »Links
- Institute for Challenging Disorganization
- Are you interested in becoming a professional organizer?
- Shannon Wilkinson, life coach
- Ravelry
- Getting to Good Enough podcast
- Organize Your Family History
- National Association of Productivity and Organizing Professionals
- NAPO St. Louis
- Peace of Mind Spending